Use bulk enrollment based on PPKG in Windows 10 and Windows 11
Last updated July 26th, 2023
Introduction
The Windows bulk device enrollment process — also known as Windows provisioning — allows IT admins to configure target devices without imaging each device separately. Using Windows provisioning, IT admins can quickly and seamlessly set up the device configuration and settings for the entire enrollment process and deploy these configurations to devices in bulk. For this purpose, we use a provisioning package file — a PPKG file — that is a container for a collection of configuration settings. You can create this file using a Windows device and later use it to configure and set up Windows devices without any user interaction. For more information about Windows provisioning packages, see Provisioning packages for Windows.
Before using bulk enrollment for Windows devices
To use a PPKG file to bulk enroll Windows devices, you must meet the following prerequisites:
-
Knox Manage console:
- Administrator access rights and privileges for your account on the Knox Manage console.
- Configured the enrollment settings under Device Enrollment > Windows > Enrollment Settings on the Knox Manage console.
-
Device to create the PPKG file:
- Windows 10 or Windows 11 with the Windows Configuration Designer software installed.
- Administrator privileges to create the provisioning package.
-
Target devices:
- Running Windows 10 or Windows 11.
- Administrator privileges to run the provisioning package.
Benefits of using a provisioning package
There are a few major benefits of using a Windows provisioning package to enroll and configure devices:
-
One-time setup — The entire provisioning process is a one-time setup process where the device users just need to power-on the device, connect to the network, and install the PPKG file to enroll with Knox Manage.
-
Bulk enrollment — This process allows a large scale rollout of corporate-owned devices. IT admins just need to create the PPKG file and share it with all the corporate users who need to set up their devices. IT admins can then manage the devices enrolled in bulk using the MDM of their choice.
-
Set up kiosks or special use devices — IT admins can also customize the PPKG to configure and enroll special use devices such as:
- Kiosks like ATMs or point-of-sale (POS) terminals
- School devices used by students in an educational organization
- Industrial machinery
- Handheld devices used on the sales floor
Stages of the provisioning process
The provisioning process includes the following stages:
- Assign use
- Create PPKG
- Deliver PPKG
- Install PPKG
- Install and Enroll Knox Manage Client
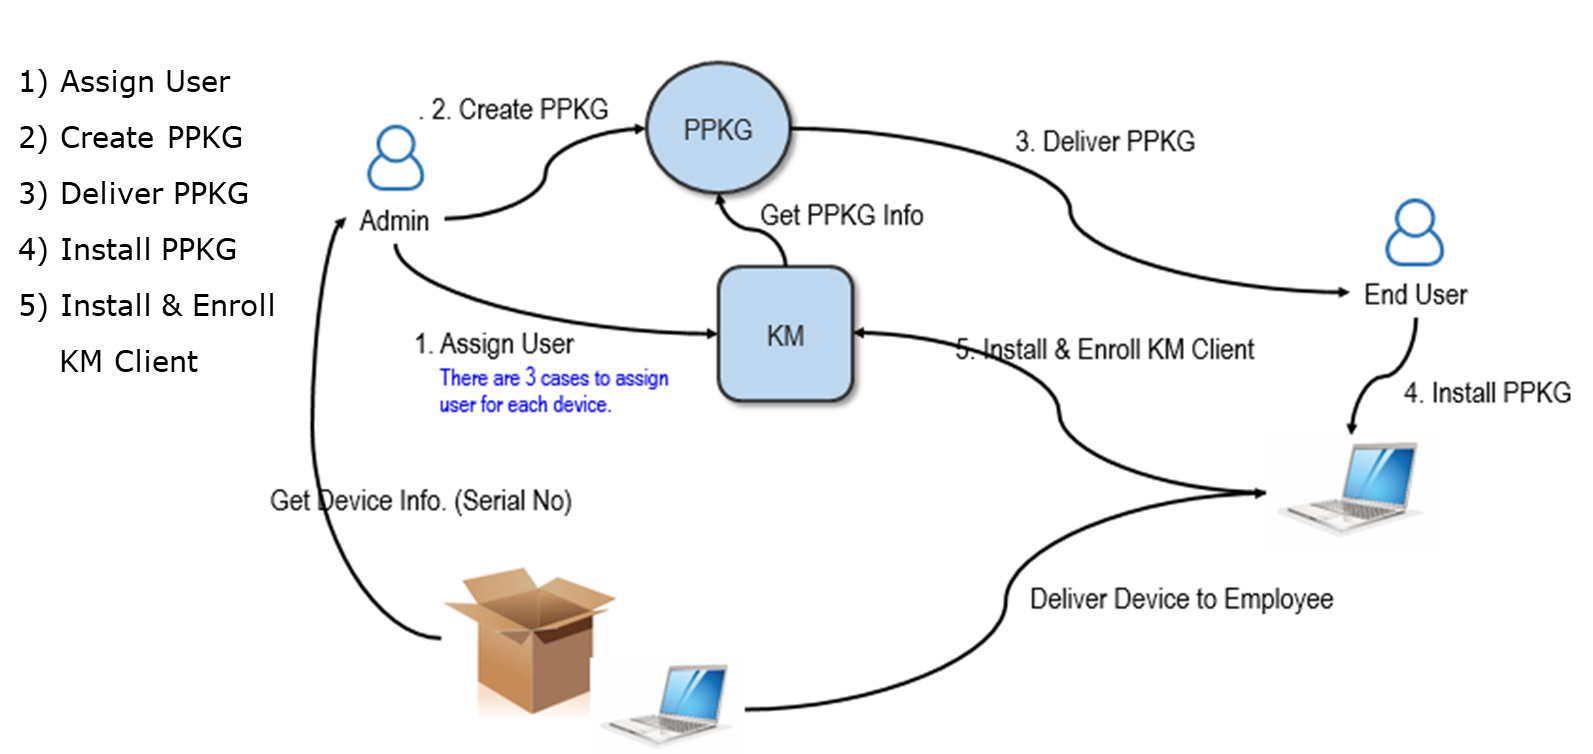
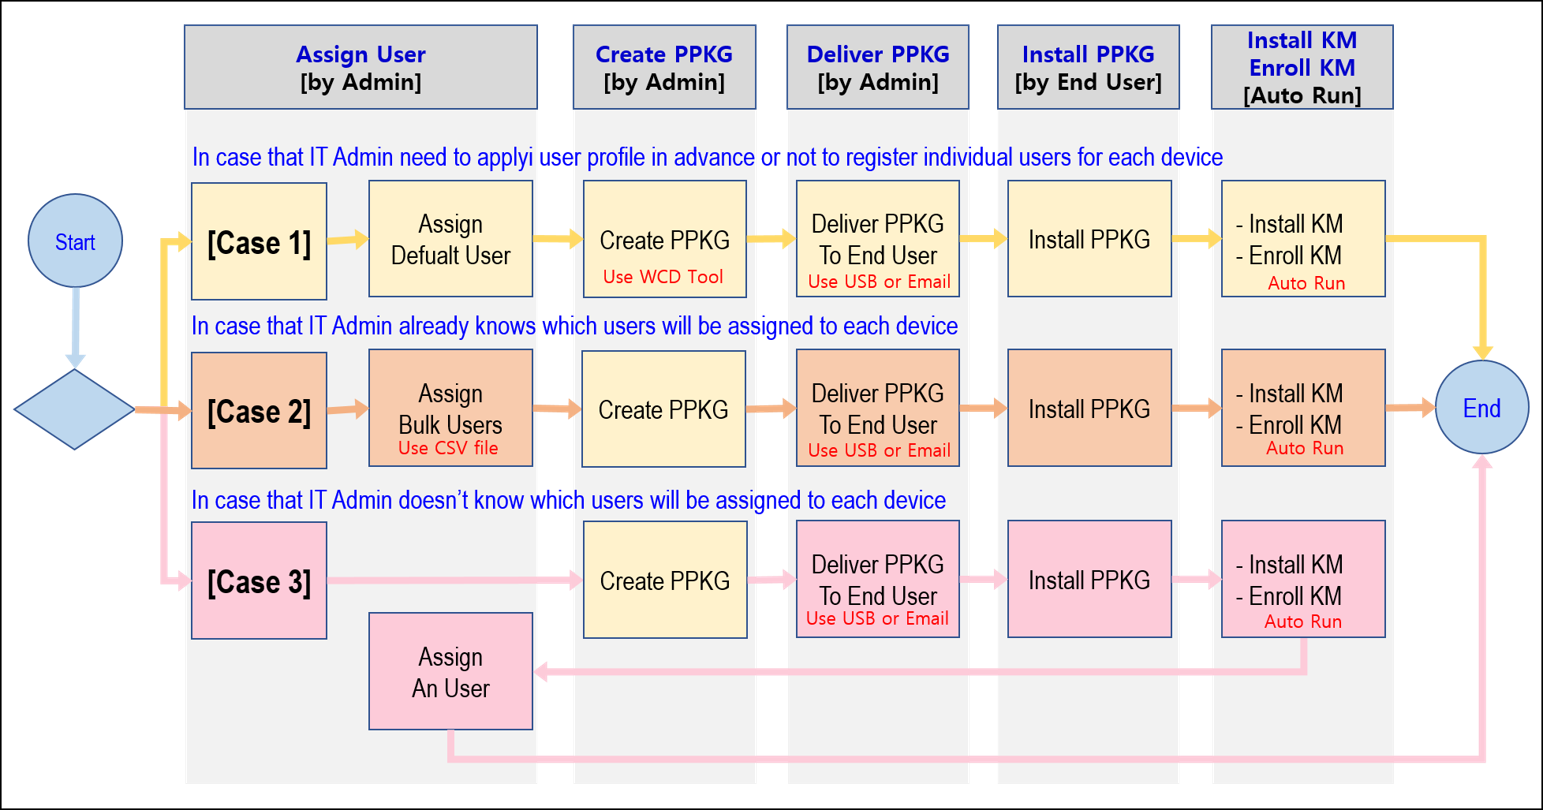
Depending upon the purpose of configuring the device and specific customer needs, the IT admin can choose to assign one of three user types to the device user. The following image describes these three types:
Bulk enroll devices
Assign users
During the bulk enrollment process, Knox Manage first adds the MDM Work account to the device, and after that, the Knox Manage Client app gets installed to the device automatically. By default, Knox Manage does not assign devices to any user during the bulk enrollment process. IT admins have to manually or automatically assign users using the Assign User settings using one of the following three use cases:
- Assign a default user for all devices
- Assign bulk users for each device using a CSV file
- Assign a single user for each device
Assign a default user
This use case is available to devices before the PPKG file is installed and the device is enrolled in Knox Manage.
- Once a device is enrolled using this default user, you cannot change the user’s information later.
- If you want to enroll devices using a default user, the device’s information must not already exist in the Knox Manage console > Device Management menu.
To assign a user:
-
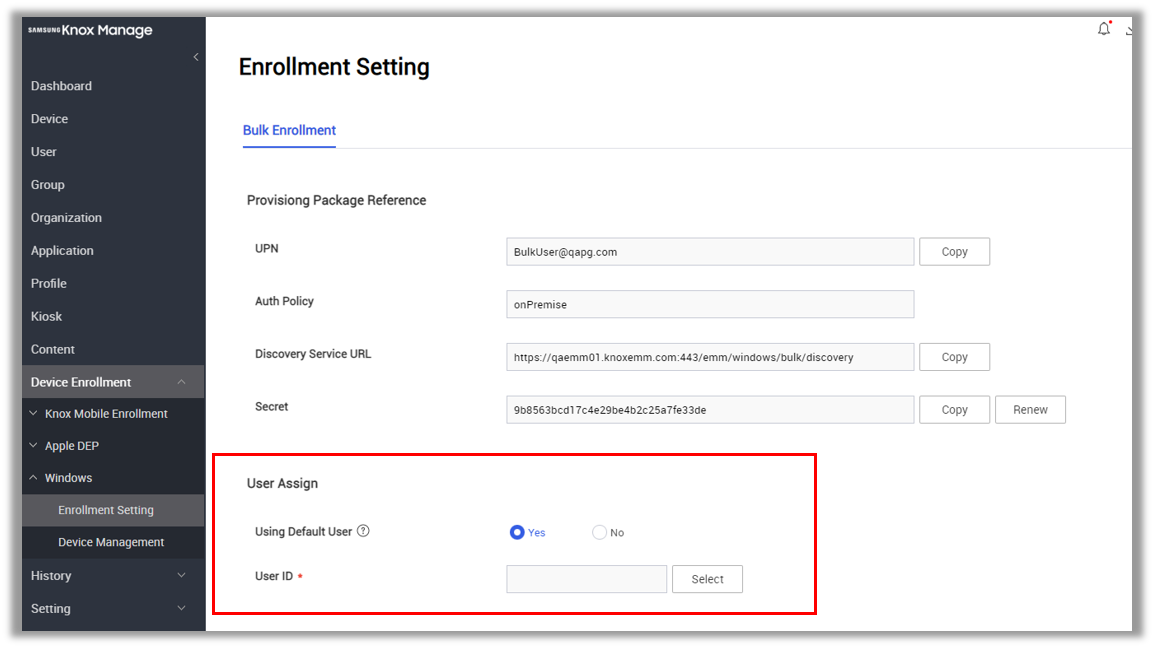
In the Knox Manage console, go to Device Enrollment > Windows > Enrollment Setting > scroll to the User Assign section.
-
Specify whether the user is a default user or not by selecting a value for the Using Default User field:
- Yes — Choose this option if you want to assign this user as a default user for all appropriate devices.
- No — Choose this option if you do not want to assign this user as a default user.
-
Specify a value for the User ID field by clicking Select. On the dialog that opens, scroll to select the appropriate user ID.
-
Click Save to save your changes.
Assign bulk users
Bulk assignment of users is available as an option before you can assign a default user.
- The value of the Computer Name field must be set to Serial Number of the device.
- Even if you set up the device to use the Default User from the Enrollment Setting menu, the Bulk Assign Users setting takes priority over the default user setting.
To assign users in bulk:
Before you can use automatic assignment on devices, you must set the device name to the serial number.
-
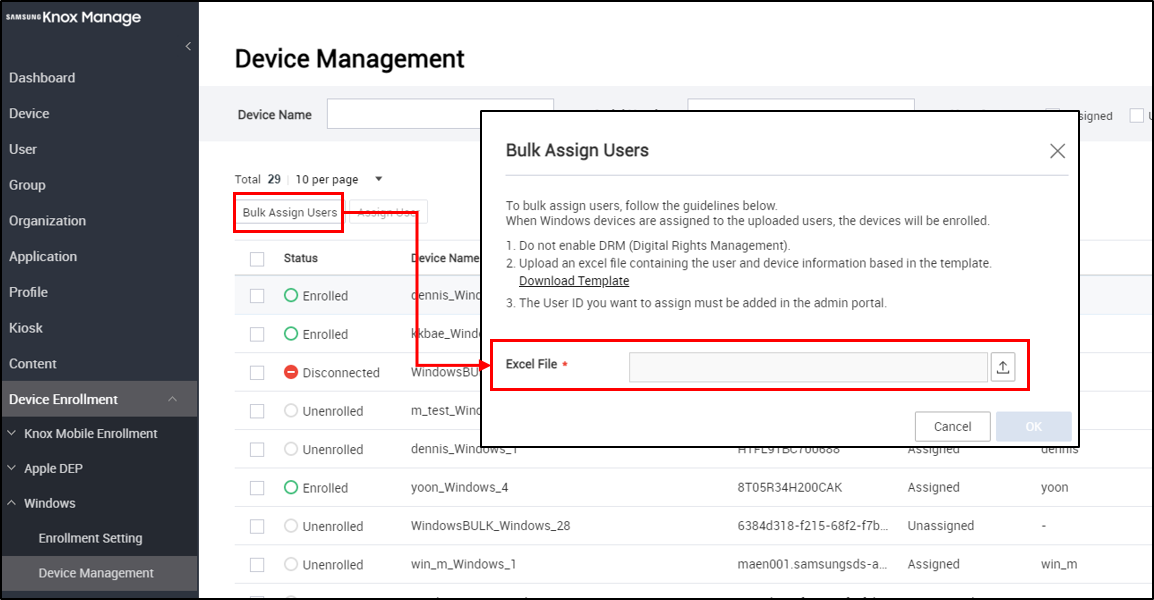
In the Knox Manage console, go to Device Enrollment > Windows > Device Management > click Bulk Assign User.
-
In the Bulk Assign Users dialog that opens, click Download Template to download an Excel file that you can customize to include the appropriate user and device information. Ensure that the file you create has Digital Rights Management (DRM) disabled.
Before you upload this Excel file, add the User ID you want to assign to the Knox Manage console.
-
Click
 to select the appropriate file.
 -
Click OK to upload the file to the Knox Manage console.
Assign a single user
You can assign a single user to each device only after you’ve installed PPKG and enrolled the device in Knox Manage.
To use this setting you must set the Using Default User setting in the Enrollment Setting menu to No.
To assign a single user to a device:
You can only assign a user to a device that is active and does not currently have a user assigned.
-
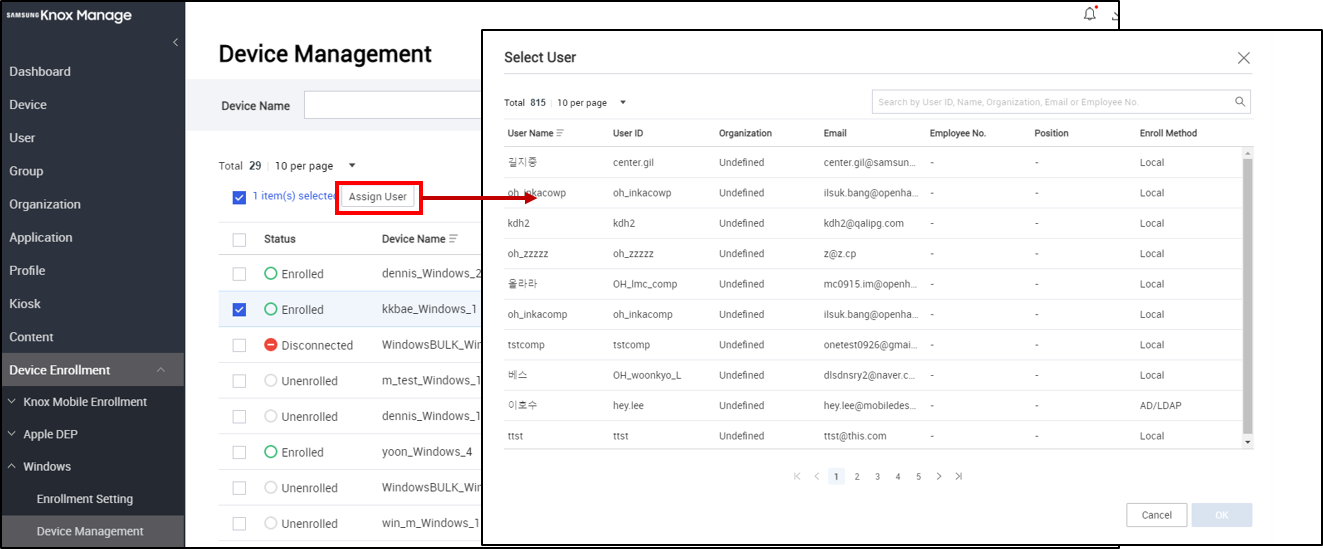
In the Knox Manage console, go to Device Enrollment > Windows > Device Management > scroll to the device to which you want to assign a user, and click the checkbox to select the device and then click Assign User.
-
In the Select User dialog that opens, click the User Name for the user you want to assign to the device.
-
Click OK to assign the user to the selected device.
Create and customize the PPKG
You can create the PPKG using the Windows Configuration Designer (WCD) tool.
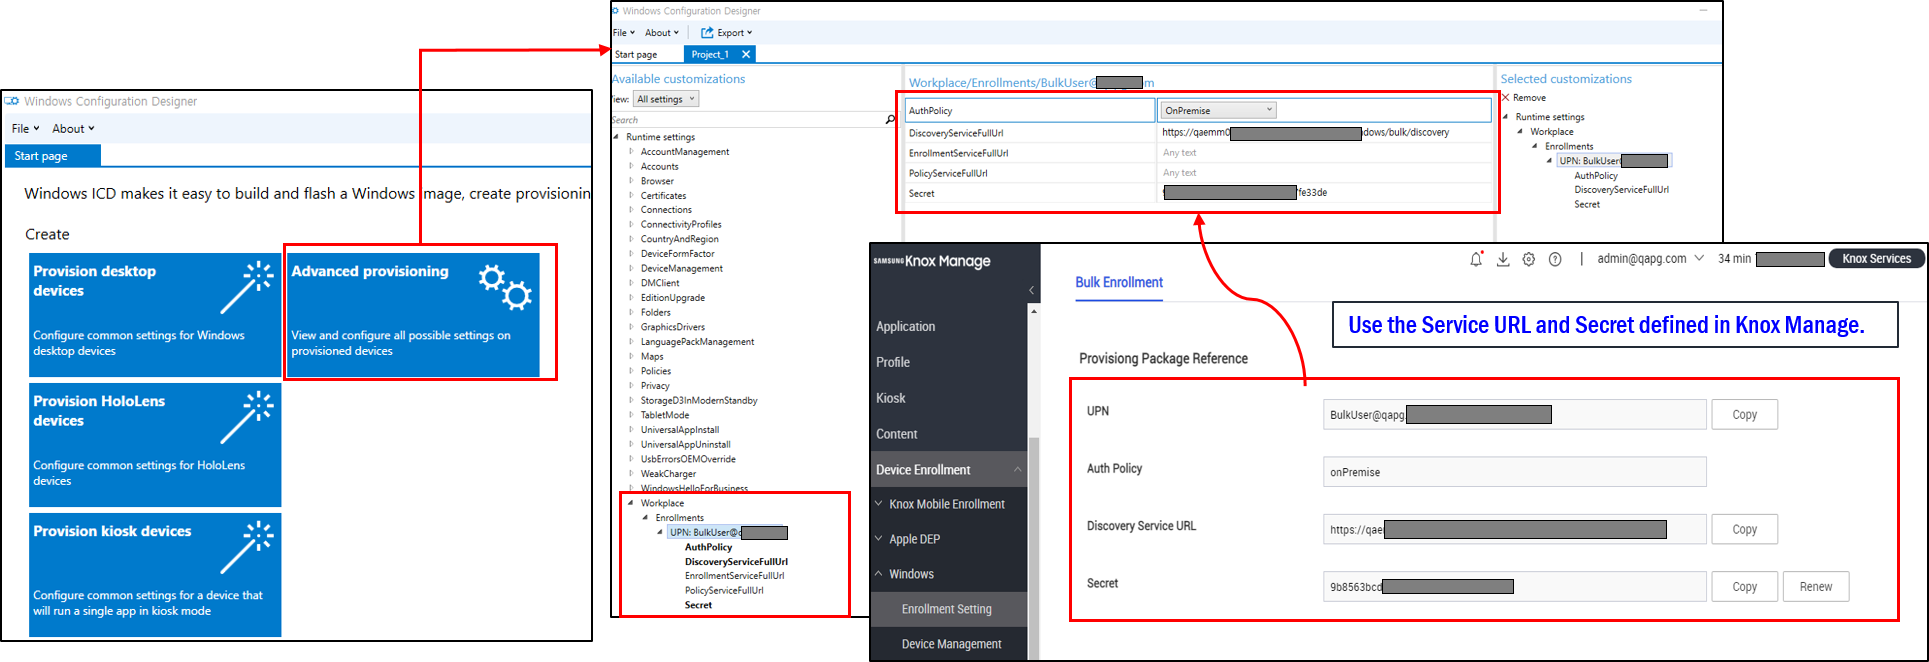
To create and customize the PPKG file:
-
Download and install the Windows Configuration Designer tool from the Microsoft Store. For information on how to install the WCD tool, see Microsoft documentation > Install the Windows Configuration Designer.
-
Use the WCD tool to create a project:
-
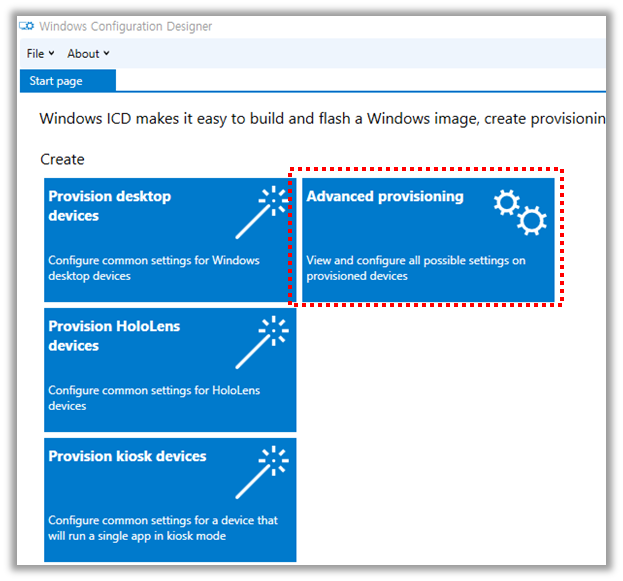
Open the Windows Configuration Designer, and click Advanced Provisioning.
-
Enter a project name and click Next.
-
When prompted, select All Windows editions, since Enrollment Setting is common to all Windows 10 and Windows 11 editions, then click Next.
-
Optionally, you can skip importing a provisioning package, and finally click Finish.
-
-
In the WCD tool, customize the PPKG settings:
-
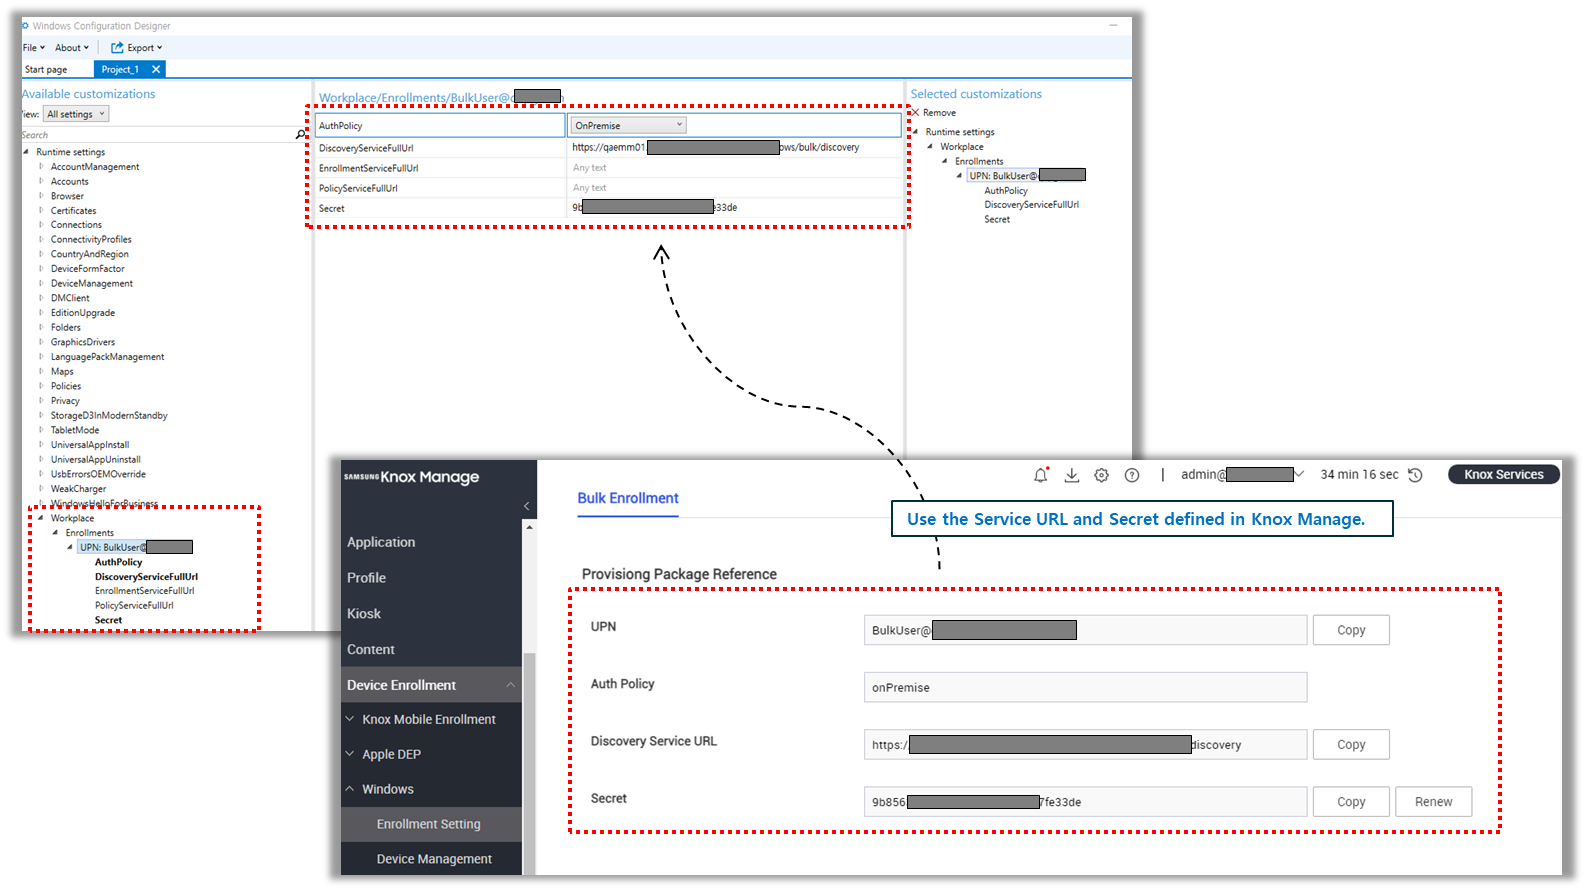
Expand Runtime settings and choose Workplace > Enrollments.
-
Provide the User Principal Name (UPN) for the Windows enrollment here.
For Bulk Enrollment, you can get the UPN from the Knox Manage console by going to Device Enrollment > Windows > Enrollment Setting > Bulk Enrollment > copy the provided UPN.
-
Enter the copied UPN and click Add.
-
On the left navigation menu, expand the UPN and then enter the information for the rest of the settings for enrollment process:
- AuthPolicy > Select OnPremise.
- DiscoveryServiceFullUrl > Same as UPN, use the Discovery Service URL provided by Knox Manage.
- EnrollmentServiceFullUrl > Optional and in most cases, it should be left blank.
- PolicyServiceFullUrl > Optional and in most cases, it should be left blank.
- Secret > Same as UPN, use the Secret provided by Knox Manage.
-
-
Use the WCD tool to build the provisioning package:
-
Click Export and select Provisioning package.
-
Provide the following details, and click Next.
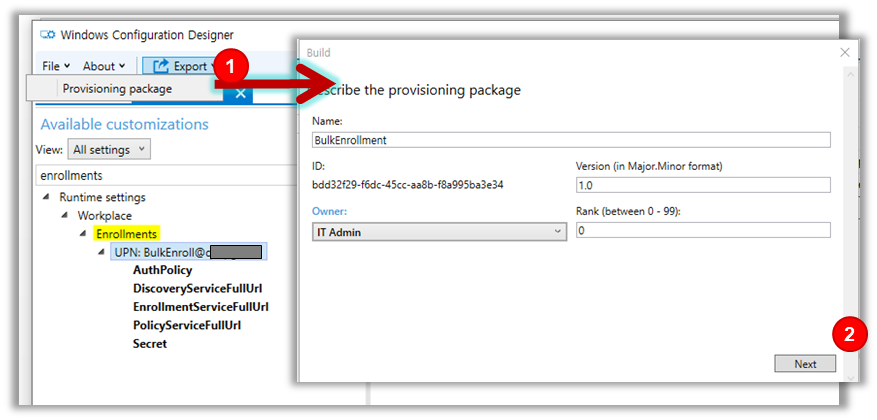
- Name — This field is pre-populated with the Project Name, and you can customize it as necessary.
- Version (in Major.Minor format) — This field is optional, and represents the default package version. You can change the current version by specifying a new value.
- Owner — Select the appropriate ownership type here.
- Rank — Choose a package rank between 0-99. The default rank is 0.
-
Enter the following values for your package file. If the package contains sensitive data that must not be compromised, you can select the required security type.
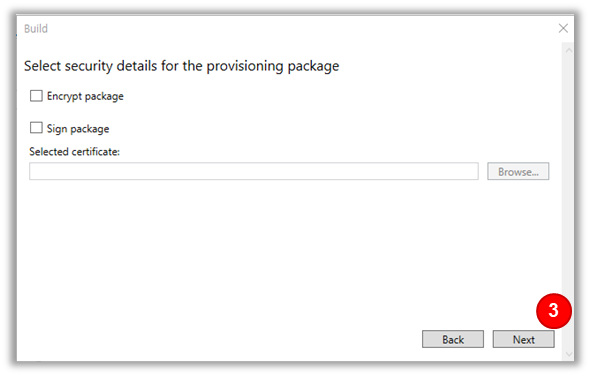
- Encrypt package — Select this option to enrypt the package file. You must also provice an encrption password.
- Sign package — If you sign the package file, you must provide a valid certificate. Click Browse to open a file browse dialog and attach your certificate file.
-
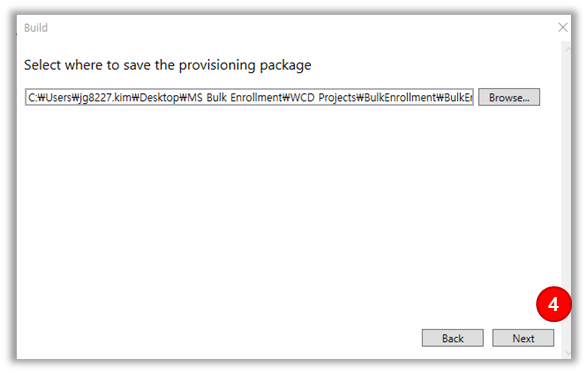
Provide the destination path where you want to save the package file, and then click Next.
-
Click Build.

-
You can find this information about the PPKG file on the Knox Manage console on the Device Enrollment > Windows > Enrollment Setting > on the Bulk Enrollment page go to the Provisioning Package Reference section.
Deliver, install, and enroll with the PPKG
Once you create the PPKG, you can deliver it to your users either using a USB flash or another external drive, network drive, or as an email attachment. Firstly the device users can install the PPKG file by double-clicking the PPKG file after saving it on the local storage. Or they can install the PPKG file via Windows setting only if they have saved it in USB or SD card: Windows Settings > Access work or school > Add or Remove a provisioning package > Add a package.
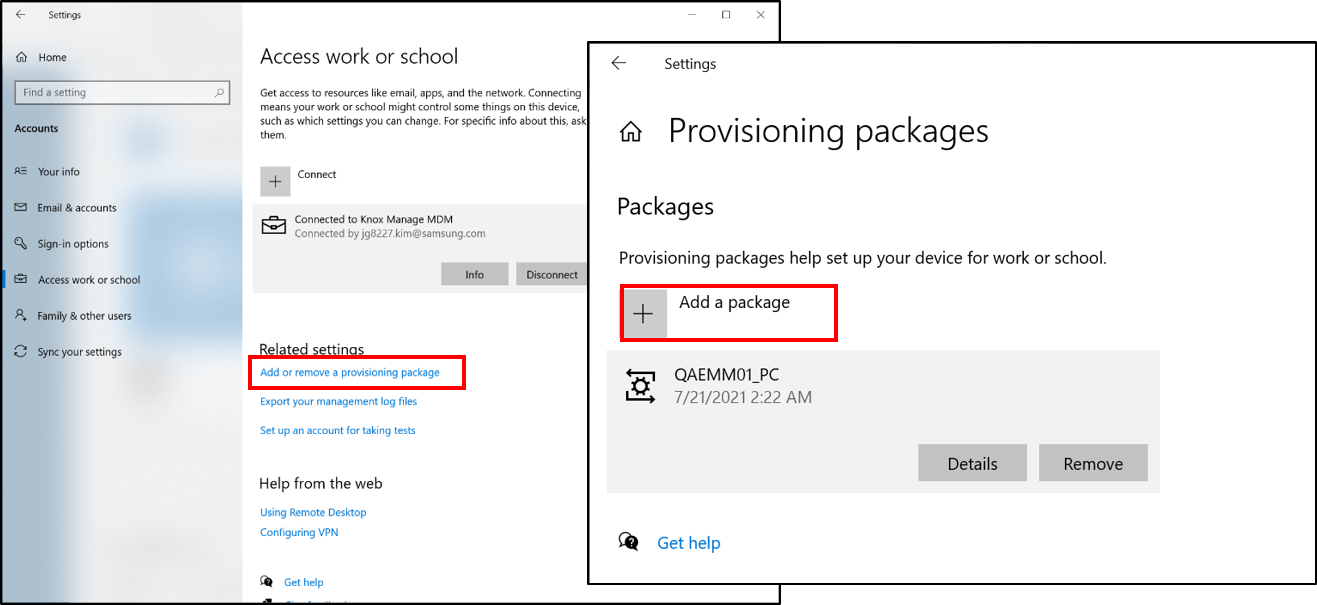
On the target device, administrator-level device users have to double-click the PPKG file to run it. Alternatively, they can run the file in administrator PowerShell with the following command, replacing name with the name of your PPKG file:
Install-ProvisioningPackage -PackagePath name.ppkg -QuietInstall
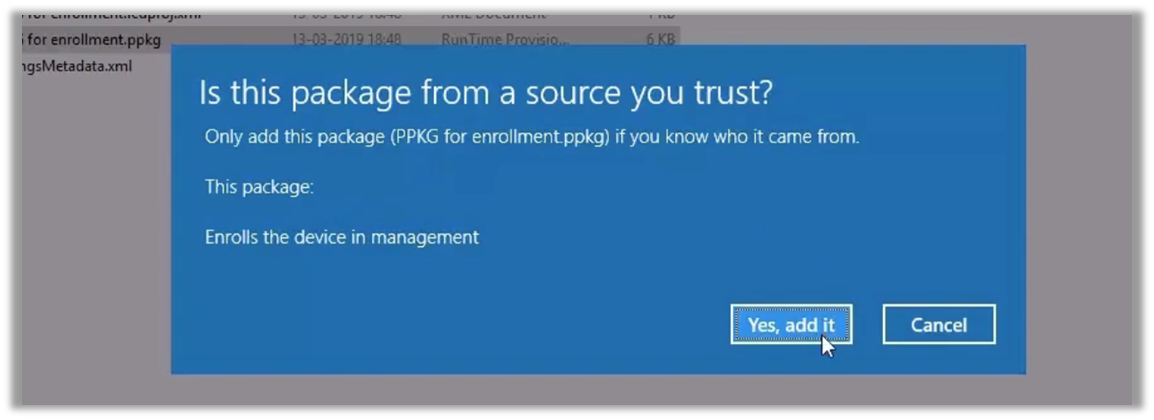
After the device users install the PPKG files on their devices, the Knox Manage client is automatically installed on the device and the device is enrolled to the Knox Manage console.
Device users can verify that the enrollment process was successful on their device, by navigating to Settings > Accounts > Access work or school. They can check the installed PPKG file using the Add or Remove a provisioning package setting.
Unenroll devices and delete the PPKG file from devices
If you want to retry bulk enrollment using a PPKG file:
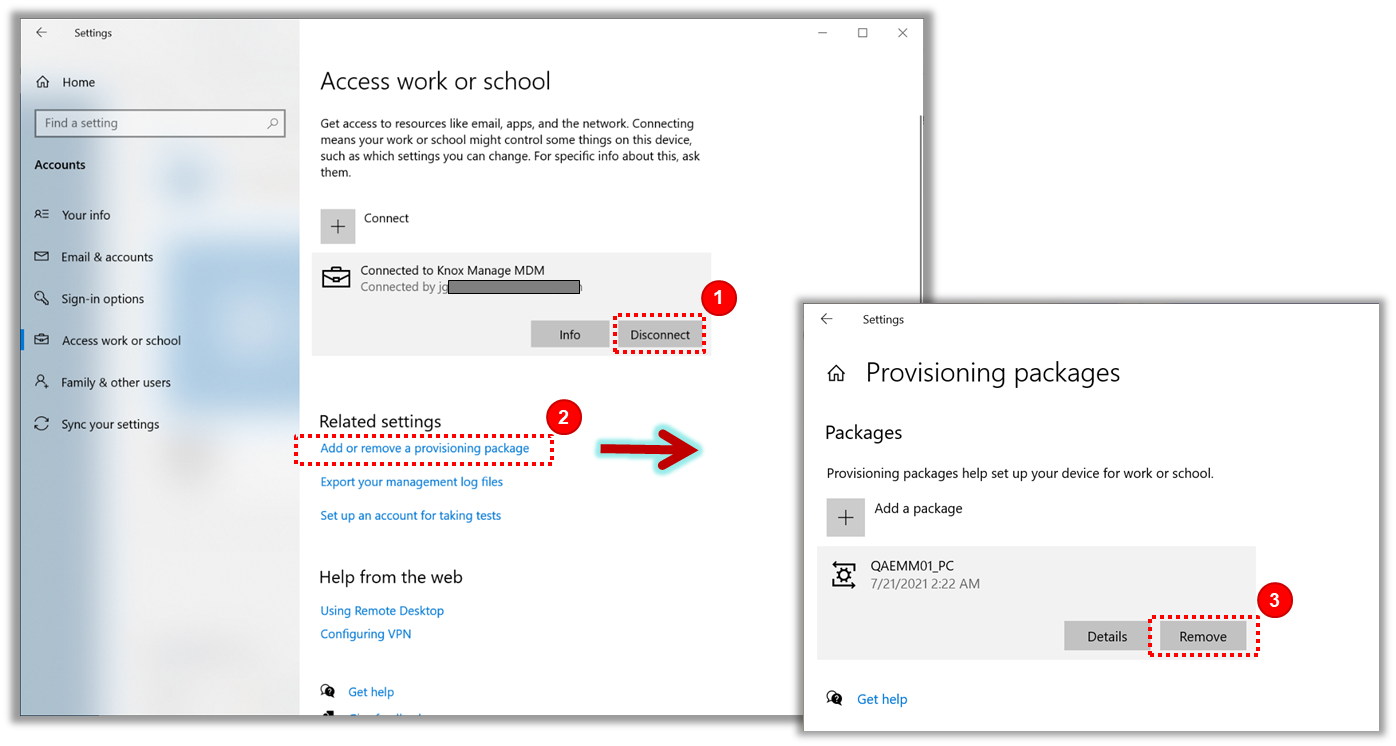
- First, unenroll the device using the Knox Manage console or using the Disconnect button in Settings > Accounts > Access work or school.
- Next, click Add or remove a provisioning package and follow on-screen instructions to remove the previously installed PPKG file.
See also
On this page
Is this page helpful?