Run and manage the Samsung Cloud Connector client
Last updated June 17th, 2026
You can run the Samsung Cloud Connector (SCC) client either by executing the batch file manually, or by allowing the Windows background service to run it automatically. If needed, configure the SCC client. When a new version is available, you can update the SCC client.
Run the SCC client manually
To run the SCC client manually, execute the batch file from the path below:
{SCC installation folder}\scc-client\bin\sccClientStart.bat
When you close the command window, the SCC client service is terminated.
Run the SCC client automatically
To run the SCC client automatically, complete the following steps:
-
Execute the batch file from the path below to register the SCC client to Windows background services:
{SCC installation folder}\scc-client\bin\scc_service_install.bat -
Check the service name below in Start > Administrative Tools > Services:
Samsung SDS Cloud Connector Client(1) Background Service -
Right-click on the service name and click Start to run the service.
-
To stop the service, right-click on the service name and click Stop.
-
To disable the SCC client background service, execute the batch file from the path below:
{SCC installation folder}\scc-client\bin\scc_service_uninstall.bat
-
Manage the SCC client
Configure the SCC client
Layer 4 (L4) switch domains contain the IP address and port configurations needed for your SCC client to connect to the appropriate SCC server in your service region. If the L4 domains in the service region are changed after installing the SCC client, modify SERVER_IP and SERVER_PORT in the following batch file and restart the SCC client:
{SCC installation folder}\sccclient\bin\sccClientStart.bat
Update the SCC client
You can update the SCC when a new version is available.
To update to SCC client 26.06, JDK 21 (64-bit) must be installed. To use any SCC clients before 26.06, JDK 1.8.0 must be installed.
To do so, complete the following steps:
-
Create a backup of the existing version of the SCC client.
- We recommend compressing the existing installation folder and moving the compressed file to a backup folder.
-
Stop the currently-running SCC client.
- If the SCC client is running as a batch file, close the SCC Client Services window.
- If the SCC client is launched as a Windows background service, it automatically terminates and reruns at the time of the update.
-
Extract the new version of the contents from the ZIP file. The filename format resembles SCC_Region.zip. For example: SCC_US02.zip.
-
Execute the .exe file. The filename format will resemble SCC_Setup_{new version}_{build date}. For example: SCC_Setup_26.06_20260130.exe.
-
When the upgrade confirmation pop-up appears, click Yes.
-
Click Next after the InstallShield Wizard starts.
-
Select an installation directory for the Destination Folder, then click Next. The default path is
C:\SamsungSDS\.The SCC client Installer only supports x86-based 32-bit systems. Do not change the installation path to
C:\Program Files. -
Enter your tenant ID and secret token, then click Install.
-
You can find your Knox Manage tenant ID by clicking your profile icon in the upper right corner.
-
See Copy the secret token for steps to copy your secret token. You can also revoke the current token and generate a new one if needed.
-
-
Click Update.
- The SCC client and Java Development Kit (JDK) are installed in the same path as the previous version.
-
Click Finish.
Following the update, you can execute the original .exe file again to uninstall the original SCC client. The filename format will resemble SCC_Setup_{original version}_{build date}. For example, SCC_Setup_25.11(2.8.1)_20250805.exe.
Integrate services in Knox Manage
Admins can access the Knox Manage console and configure the settings for Lightweight Directory Access Protocol (LDAP) and certificate authority (CA) service integration.
Integrating LDAP in Knox Manage
To integrate LDAP with SCC:
- The admin must enter the LDAP server information in the Knox Manage console.
- That information sends to the SCC client-side server with the tenant’s information.
- The SCC client-side server assigns an IP and Port for the LDAP service to the SCC server-side server.
Knox Manage connects with the LDAP server only using the IP and Port assigned by the SCC server-side server. For more information about LDAP integration, see Configure third party providers.
Integrating CA in Knox Manage
The administrator must register the CA server in the Knox Manage console to integrate the Knox Manage server with the client’s CA server using SCC. For more information about the CA settings, see Manage certificate authorities.
Fix background service errors
If the SCC background service suddenly stops because of an error, the error message below appears or an error log is created in the Windows Event Viewer.
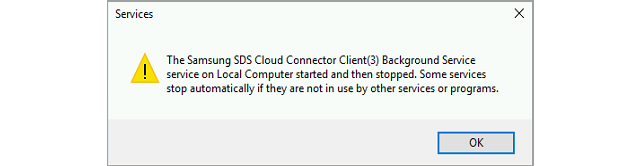
This error occurs when the msvcr*.dll library cannot be loaded with Java. To fix the error, perform one of the following two solutions:
Setting PATH from JAVA_HOME.
To set the PATH variable using the JAVA_HOME environment, complete the following steps:
- In the Control Panel of your computer, select System and Security > System > Advanced system settings > Environment Variables.
- Select Path under System variables, and then click Edit.
- Click New.
- Enter
{JAVA_HOME}\binin the text input filed, and then click OK. For example, if JAVA is installed underC:\Program Files\JAVA, you can enter that path in the text input field.
Copying msvcr*.dll
Copy the msvcr*.dll file from the path {JAVA_HOME}\bin to the {SCC installation folder}\bin path, and restart SCC. The file name differs depending on the JAVA version. For example, the file name for JAVA version 1.8 is msvcr100.dll.
On this page
Is this page helpful?