Create rules
Last updated October 21st, 2026
Rules trigger specific actions on a device once predefined conditions are met. There are two kinds of rules: General and Compliance.
General rules reduce the need to continuously apply actions or policy settings. For example, you can set a condition to lock devices once they leave a specific geographical radius or apply a profile to them on certain days of the week. This makes general rules ideal for scenarios where you need different device behaviors in specific situations.
Compliance rules define the security conditions a device must meet to be considered non-compliant. If devices meet the security conditions assigned to them, then preset actions are triggered — such as a notification to IT admins. Compliance is re-evaluated automatically as device properties change or rules are updated. When Knox Manage is integrated with Microsoft Intune as a Compliance Partner, access to protected resources, such as Microsoft 365 apps, is also granted or blocked. See Configure Knox Manage as a compliance partner for Microsoft Intune to learn more.
Create a general rule
General rules operate similarly to event profiles in the original console, but offer more actions. While event profiles only push profiles to devices once they meet the predefined conditions, rules also let you perform the following actions on devices: Remove all managed apps, Lock devices, Reboot devices, and Send push notification to devices.
If you have assigned an event profile to a group in the original console, you must unassign it before you can assign a rule in the new console.
If you want to create a profile to push to devices when a specific condition is met, it’s recommended that you create the profile before you begin configuring the rule. Otherwise, you must leave the Create rule page and your progress is lost.
To create a general rule:
-
Go to the Rules page and click CREATE RULE.
-
Select General rule as the Rule type. Enter a Rule name and an optional Description. Then click NEXT: CONDITIONS. Enter a Rule name and an optional Description. Then click NEXT: CONDITIONS.
-
On the Choose condition category screen, select and configure one of the below categories:
Schedule
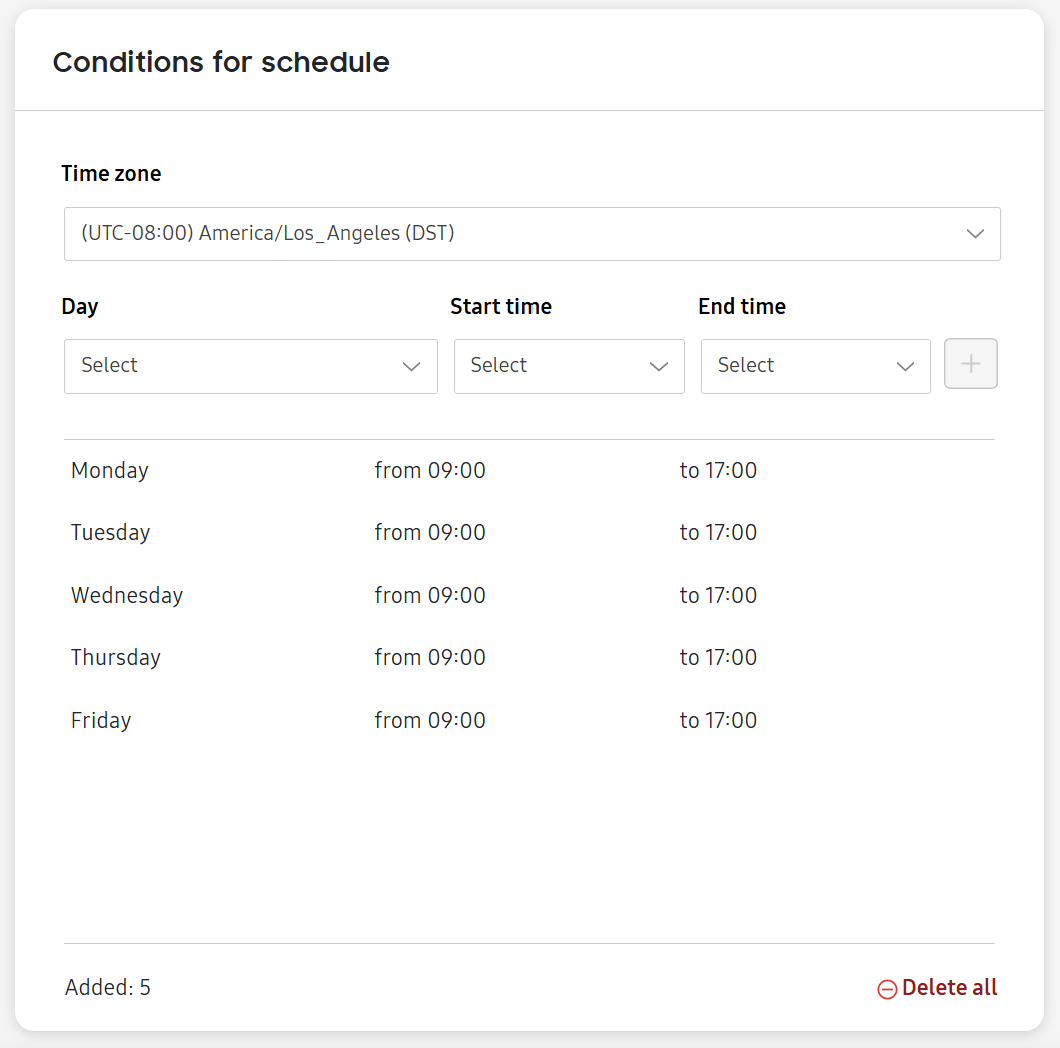
The schedule condition applies rules at specific times and days of the week. For instance, you could configure a profile of security settings to deploy to a device during a device user’s work hours.
- When the rule triggers, it might take ten minutes or more to apply settings to the device. If you have time-sensitive settings, consider scheduling the rule ten minutes early.
- For non-Samsung devices or Samsung devices with a work profile, device users are prompted to accept or deny the change and permit the Knox Manage agent to run in the device’s background.
- Fully managed devices do not require user permission to run the event.
Configure the following fields:
- Time zone — Select a time zone. You can only set conditions for a single time zone per rule.
- Day — Select a day or days of the week. You can’t set more than one schedule for each individual day.
- Start time — Select a start time.
- End time — Select an end time.
Click (Add icon) to add your configuration.
Geofence
The geofence condition applies rules when devices are inside or outside of a specific geographical radius. For example, you could configure a profile of security settings to deploy to a device when the device user arrives at a jobsite.
- The GPS must be enabled on devices for the geofence condition to work.
- For non-Samsung devices running Android 9 or later, you need to enable the Google Location Accuracy setting if your device supports geofencing. To enable this setting, see Turn your device’s location accuracy on or off.
This condition is not available in South America.
Configure the following fields:
- Trigger actions if — Select one of the below options:
- Device is within the geofenced location
- Device is outside the geofenced location
The Add geofence dialog opens. Search for an address, then set a radius in meters. The location and radius display on the map. Click CONFIRM.
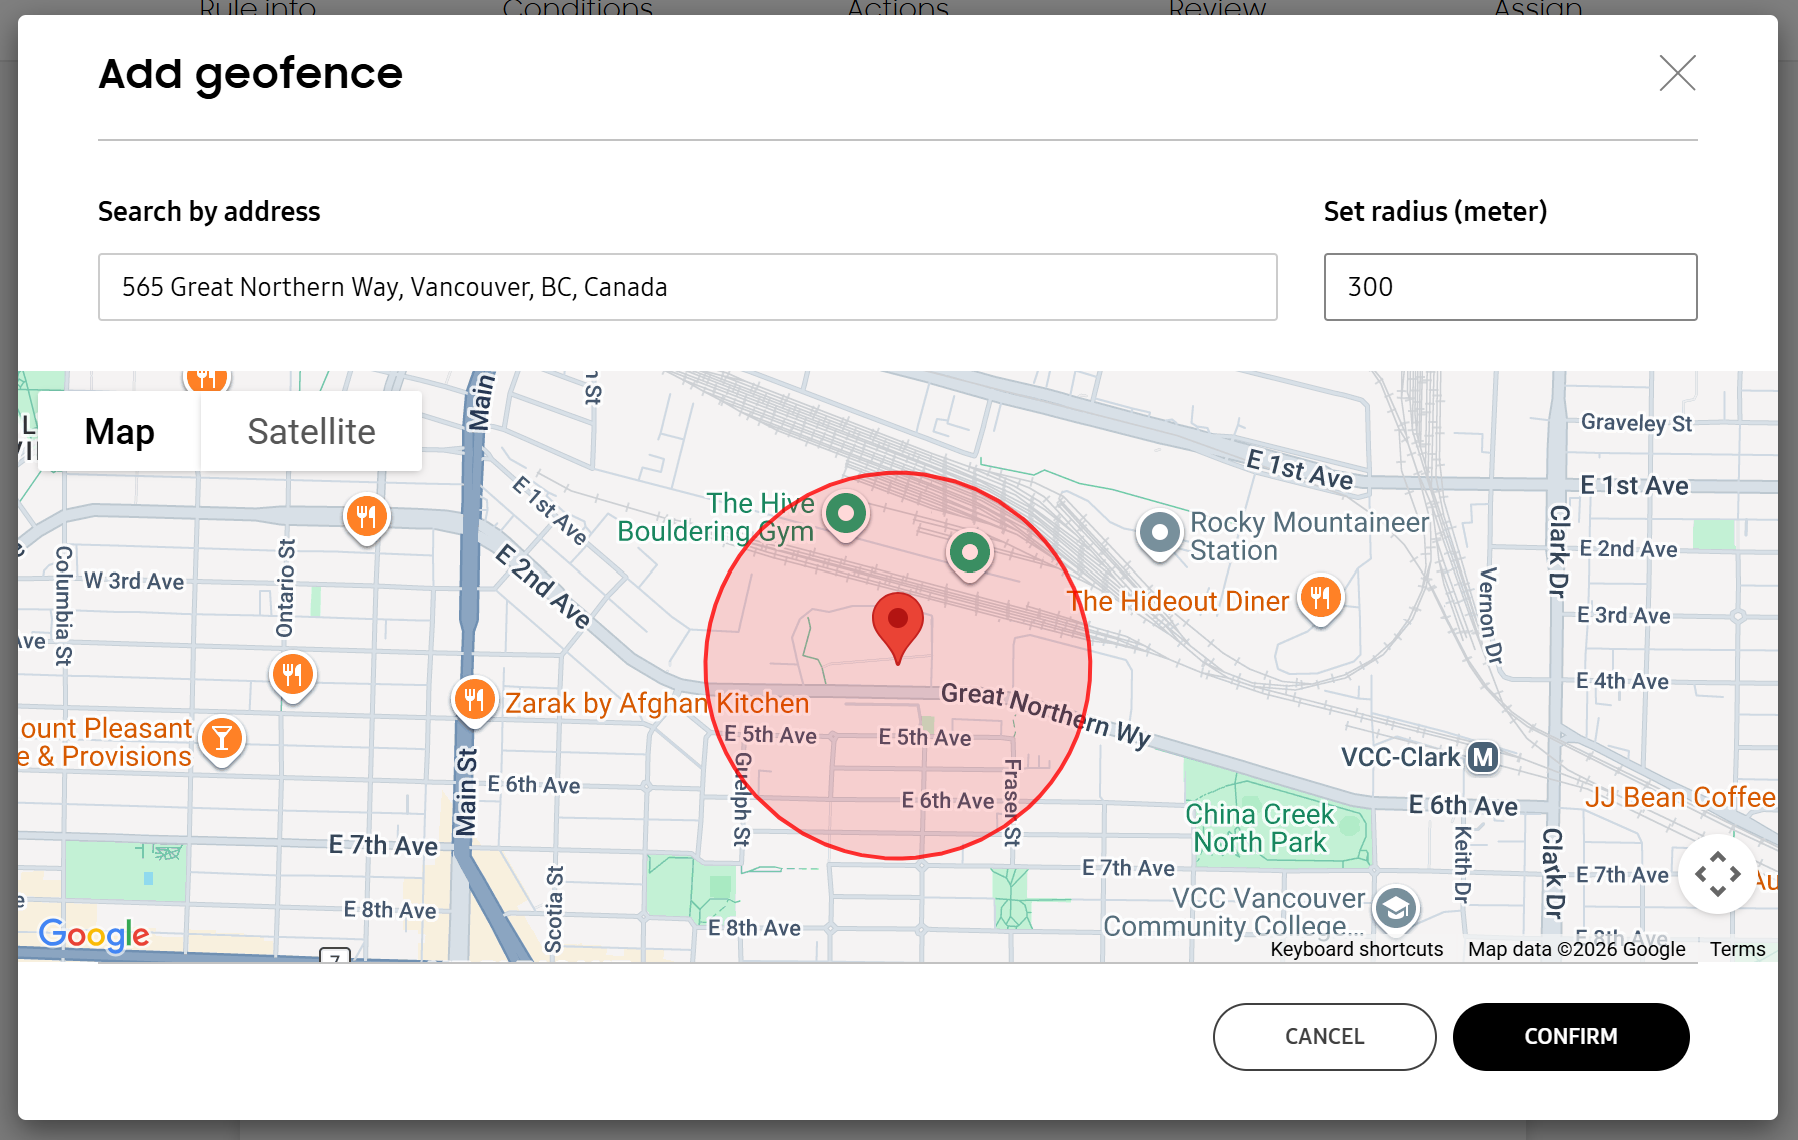
Once you add a configuration, you can hover over it with your cursor to edit it or delete it. You can add up to 20 configurations.
Network
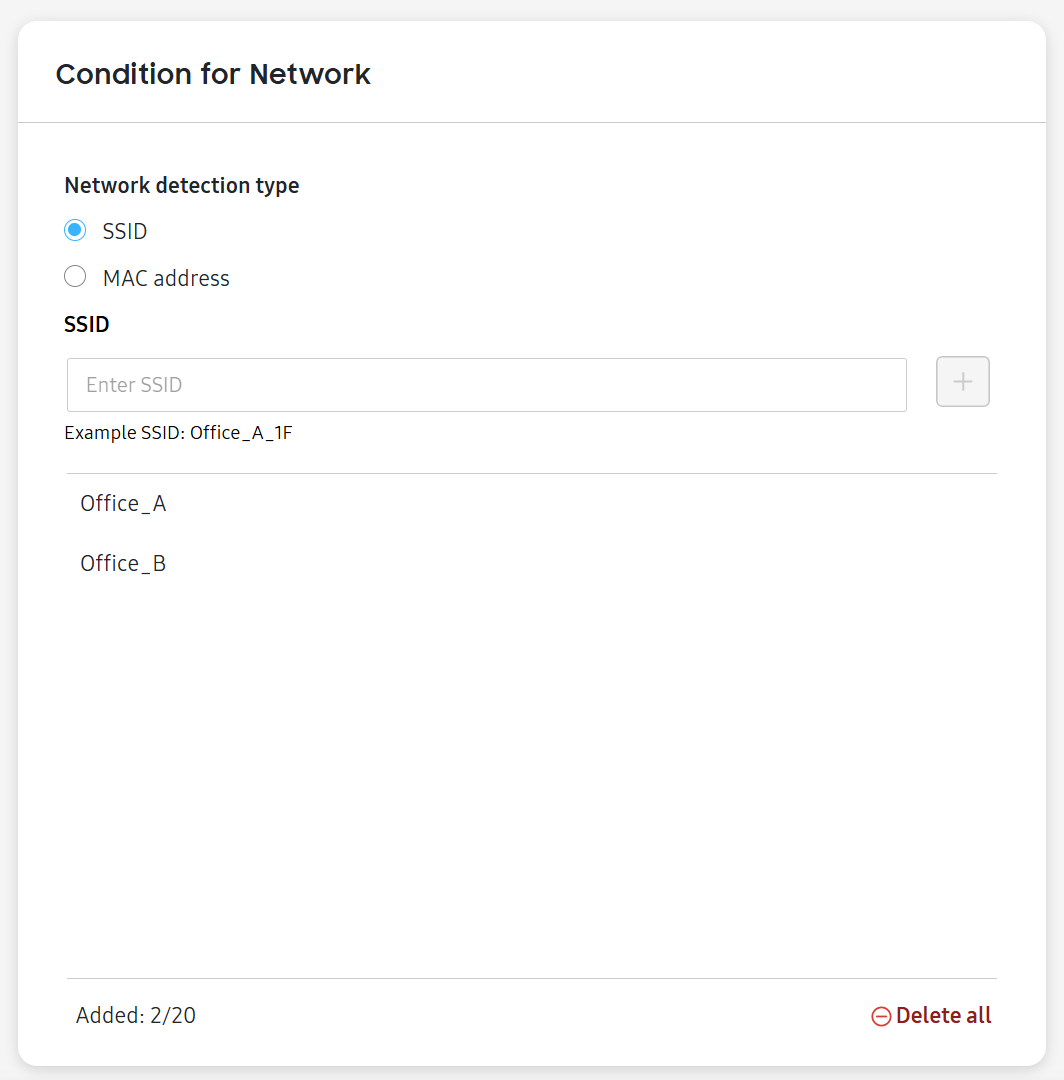
The network condition applies rules when devices connect to a Wi-Fi network with a specific SSID or MAC address.
For devices running Android 9 or later, the Location settings policy must be enabled to allow searching Wi-Fi SSIDs and MAC addresses.
Configure the following fields:
- Network detection type — Select one of the options below:
- SSID — Enter an SSID. Only alphanumeric characters and the following special ones are permitted: . (period), : (colon), and - (hyphen).
- MAC address — Enter a MAC address.
Click (Add icon) to add your configuration. You can add up to 20 configurations.
SIM
The SIM condition applies rules when a physical SIM card is inserted or removed. No additional configurations are needed to set this condition. On devices where a device has more than one SIM, this condition is dependent on the device’s Authenticated SIM only. You can learn the Authenticated SIM for a device by navigating to its details panel.
No additional configurations are needed to set this condition.
Device Connection (Keepalive)
The device connection condition applies rules based on the device’s connection status to the Knox Manage server, similar to the keepalive feature in the original console.
To prevent duplicate configurations, if you set up keepalive in the original console , you can’t configure this rule unless you delete the configuration . The opposite also applies.
Under Check for device communication, set the number of days a device needs to communicate to the Knox Manage server within. If the device doesn’t communicate for longer than this period, than the rule triggers.
-
After you’ve configured a condition, click NEXT: ACTIONS.
-
On the Actions screen, you can enable the following actions, as well as a push notification, to send to devices when they meet the conditions.
- Push profile — Select a profile to push to devices. You can click VIEW PROFILE DETAIL to see its configured policy settings. The profile is removed when the devices no longer meet the conditions.
If a profile is already assigned to devices, it’s not unassigned when this profile is pushed. Instead, both profiles apply to the devices at the same time. If the policy settings conflict between profiles, then the profile with the higher priority is applied. See View profiles to learn more.
- Remove all managed apps — Removes all managed apps from devices. The apps aren’t restored when the devices no longer meet conditions.
- Lock devices — Locks devices. The devices are unlocked when they no longer meet conditions.
- Reboot devices — The devices are rebooted once.
- Send email to admin — Sends an email notification to select IT admins when the rule triggers. You can use the system-specified default email template, or write a custom email with a custom title and body.
- Send push notification to devices — Sends a custom message to device users. Enter a Notification title and Notification body.
- Click NEXT: REVIEW. On the Review screen that opens, review the rule you set. Edit any sections if needed, or click NEXT: ASSIGN.
- On the Assign screen, select a group or groups to assign the rule to, then click ASSIGN.
The rule is created.
Create a compliance rule
Each compliance rule consists of one or more conditions. Assigned conditions determine a device’s compliance status:
- Compliant — The device doesn’t violate any of the compliance conditions assigned to it.
- Non-compliant — The device violates at least one of the compliance conditions assigned to it.
- Not assigned — No compliance rules are assigned to the device. The compliance status of these devices isn’t reported to Microsoft Entra ID.
Rules are re-evaluated whenever a device property changes, not on a fixed schedule. Since enrolled devices update attributes like the Last seen property approximately every four hours, all devices are re-evaluated at least that often, even without other property changes.
To create a compliance rule:
- Go to the Rules page and click CREATE RULE.
- Select Compliance rule as the Rule type. Enter a Rule name and an optional Description. Then click NEXT: CONDITIONS.
- Define the conditions that mark the device as non-compliant. Conditions are combined using either the AND or OR logic operators. You can’t mix AND and OR within the same rule.
- If you use AND, all conditions must be met for the device to be marked as non-compliant.
- If you use OR, at least one condition must be met.
Click ADD CONDITION to add another condition, or click the (Delete icon) to remove one. You can add up to ten conditions per rule.
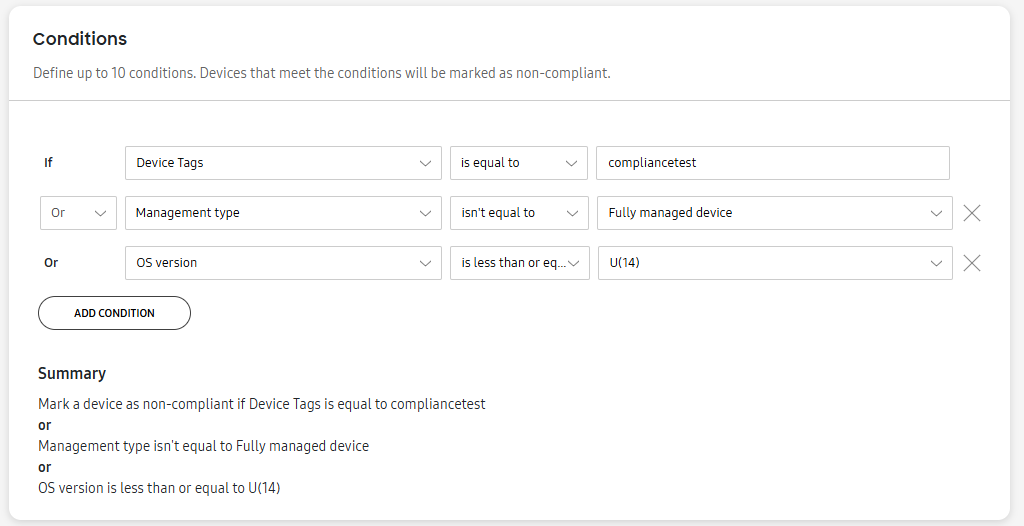
For each entry, select a logical operator, a condition, an operator (such as is equal to or isn’t equal to), and a value. The following conditions are available:
| Condition | Description |
|---|---|
| Device Tags | Marks devices as non-compliant based on their device tag and the selected operator. Enter a device tag. |
| Device nickname | Marks devices as non-compliant based on their nickname and the selected operator. Enter a device nickname or value to match against, if required by the operator. |
| Enrollment type | Marks devices that are or aren't enrolled using the specified enrollment method as non-compliant. Select either Knox Mobile Enrollment or Zero-touch enrollment. |
| Firmware version | Marks devices as non-compliant based on their firmware version and the selected operator. Enter the version number of the firmware. |
| ICCID information | Marks devices as non-compliant based on the selected operator and their Integrated Circuit Card Identification (ICCID) on their SIMs, a unique identifier which helps device identify themselves when connecting to networks. |
| IMSI | Marks devices as non-compliant based on the selected operator and their International Mobile Subscriber Identity (IMSI), the unique code to identify the device users on a cellular network. Enter a value. |
| Lock status | Marks devices as non-compliant based on their lock status and the selected operator. Select either Locked or Unlocked. |
| MAC address | Marks devices as non-compliant based on the selected operator and their MAC address, the unique alphanumeric sequence connected to the hardware component, which identifies the device when it connects to a network. Enter a value. |
| Management type | Marks devices as non-compliant based on their management type and the selected operator. Select either Fully managed device, Work profile only, or Work profile on company-owned device. |
| Device model | Marks devices as non-compliant based on their device model and the selected operator. Enter a device model name or model code. |
| OS version |
Marks devices as non-compliant based on their Android version and the selected operator. Select one of the following OS versions:
|
| Platform | Marks devices as non-compliant based on their device platform and the selected operator. Select Android. |
| Status |
Marks devices with or without the specified status, or its connection to the Knox Manage server. Select one of the following values:
|
| User ID | Marks devices as non-compliant based on the device user's ID and the selected operator. Enter a user ID. |
| KM Agent version | Marks devices as non-compliant based on which version of the Knox Manage agent they're running and the selected operator. Select 26.10(06.A). |
| OS rooted | Marks devices as non-compliant depending on if they're rooted, which could mean they're compromised and running unauthorized software, and the selected operator. Select either Yes or No. |
| Play integrity | Marks devices as non-compliant based on the selected operator and Play Integrity violations. Select be violated. |
Once you add your conditions, click NEXT: ACTIONS.
-
Specify which actions to trigger if devices become non-compliant.
- Send email to admin — Sends an email notification to specified recipients when the devices become non-compliant.
- Under Email content, select the method to create the email:
- Default email template — Uses a pre-defined template. A preview of the template appears, showing the subject and body of the email, including dynamic variables such as the compliance condition details and tenant ID.
- Custom email — Lets you write your own subject and body. Enter an Email subject and Email body.
- Under Recipients, click SELECT RECIPIENT to choose one or more recipients from your list of admins, or enter an admin’s email on the Add recipient by email field.
- Set the Frequency of emails: Hourly, Daily, Weekly, or Monthly.
- Set the Start date, and optionally, the End date for when emails begin to send.
- Under Email content, select the method to create the email:
- Send push notification to devices — Sends a custom message to device users. Enter a Notification title and Notification body.
- Send email to admin — Sends an email notification to specified recipients when the devices become non-compliant.
-
Click NEXT: REVIEW. On the Review screen that opens, review the rule you set. Edit any sections if needed, or click NEXT: ASSIGN.
-
On the Assign screen, select a group or groups to assign the rule to, then click ASSIGN.
The rule is created.
On this page
Is this page helpful?