Get started tutorial
Last updated April 29th, 2026
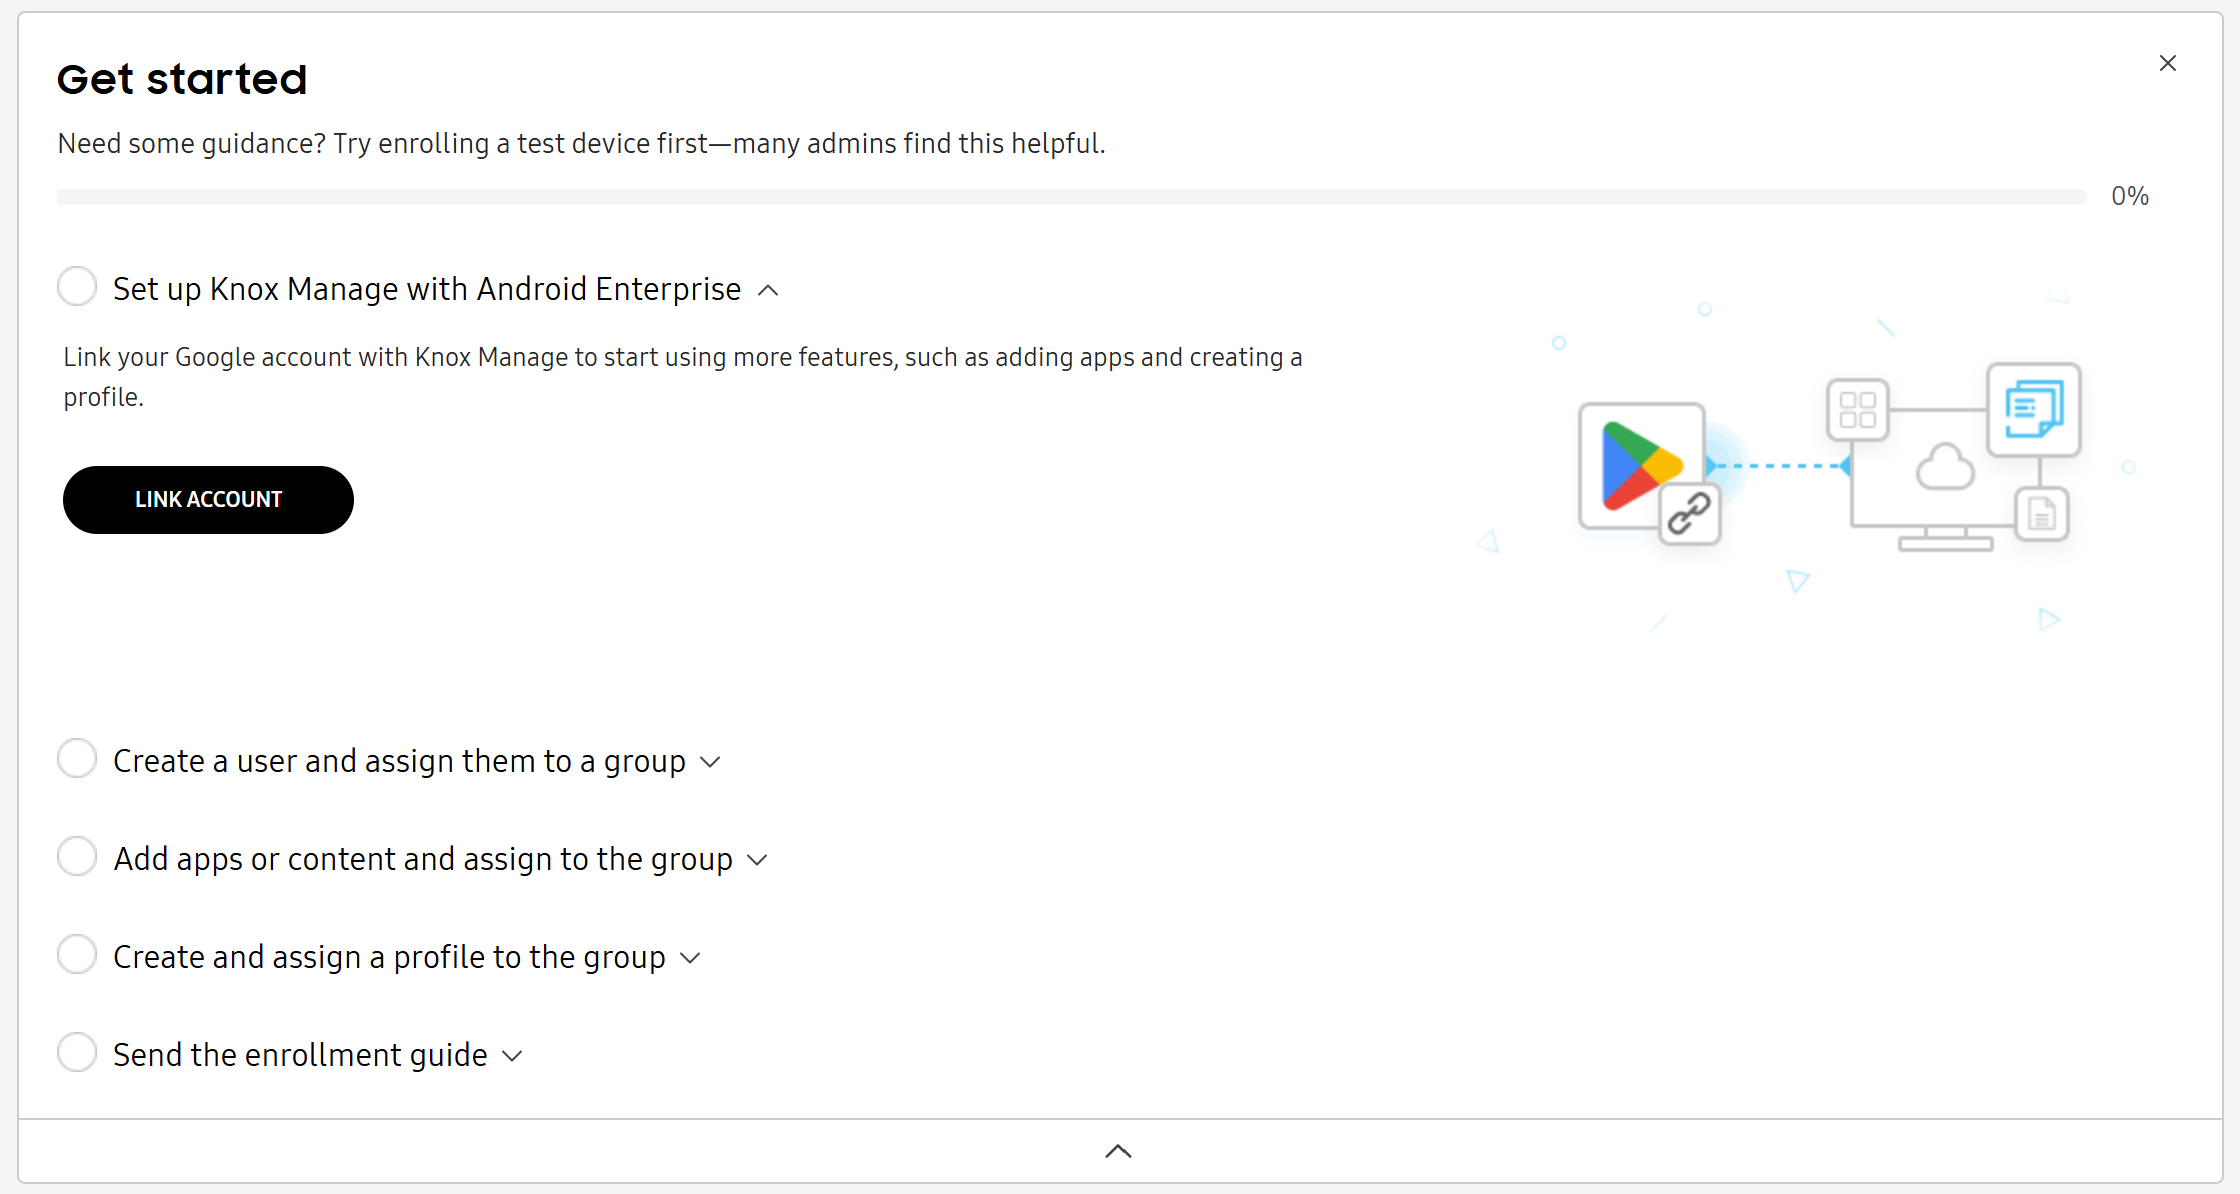
This tutorial is designed to guide new users through the basic setup required to start using the Knox Manage new console. It’s intended to supplement the Get started checklist on the dashboard, which follows and tracks your progress as you complete the steps below.
Step 1: Register Knox Manage as your EMM
Before you can manage Android devices, you must register Knox Manage as an EMM provider on the Managed Google Admin Console and link your Android Enterprise account to your Knox Manage tenant.
You can use the following account types when registering Knox Manage as an EMM provider:
- A personal Google account allows you to manage Android devices.
- A Google account from an enterprise domain allows you to manage Android and ChromeOS devices.
To link your Android Enterprise account to your Knox Manage tenant:
-
On the Knox Admin Portal, click your account icon in the upper-right corner, then Settings. Under KNOX MANAGE, click ANDROID ENTERPRISE. Knox Manage redirects you to Google’s Create account page.
Alternatively, from the Knox Manage dashboard, you can also click LINK ACCOUNT in the first step of the Get started tutorial.
-
Enter your email address. If your Google account’s domain is managed by Google, click Allow to bind your Knox Manage tenant to the account.
If your Google account’s domain isn’t managed by Google:
- You are asked to verify your email and a verification message is sent to your email address. Sign in to your email account and verify your email address.
- Google’s Welcome to Android Enterprise page displays. Click Continue.
- Provide the required registration details, select Android Enterprise as your subscription, create a password, and click Agree and continue.
Click Allow and create account to register Samsung Knox Manage as your EMM provider and create an account on the Google Admin console.
If there is an existing admin account, your email address is pre-populated.
-
The Bring Android to Work screen opens. Click Get started.
-
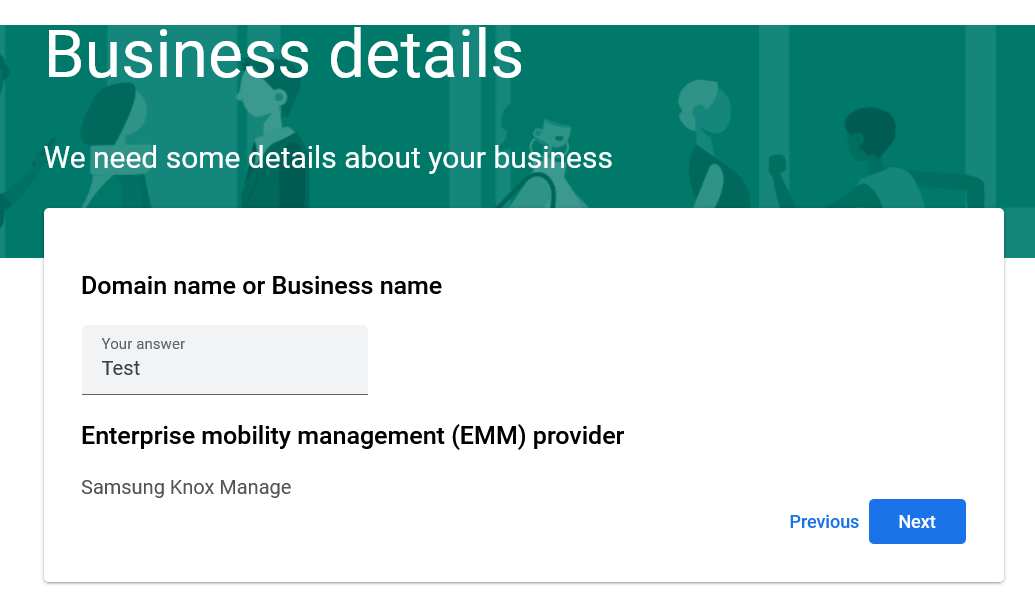
On the Business details screen, enter your domain or business name, then click Next.
-
Fill out the Contact details page:
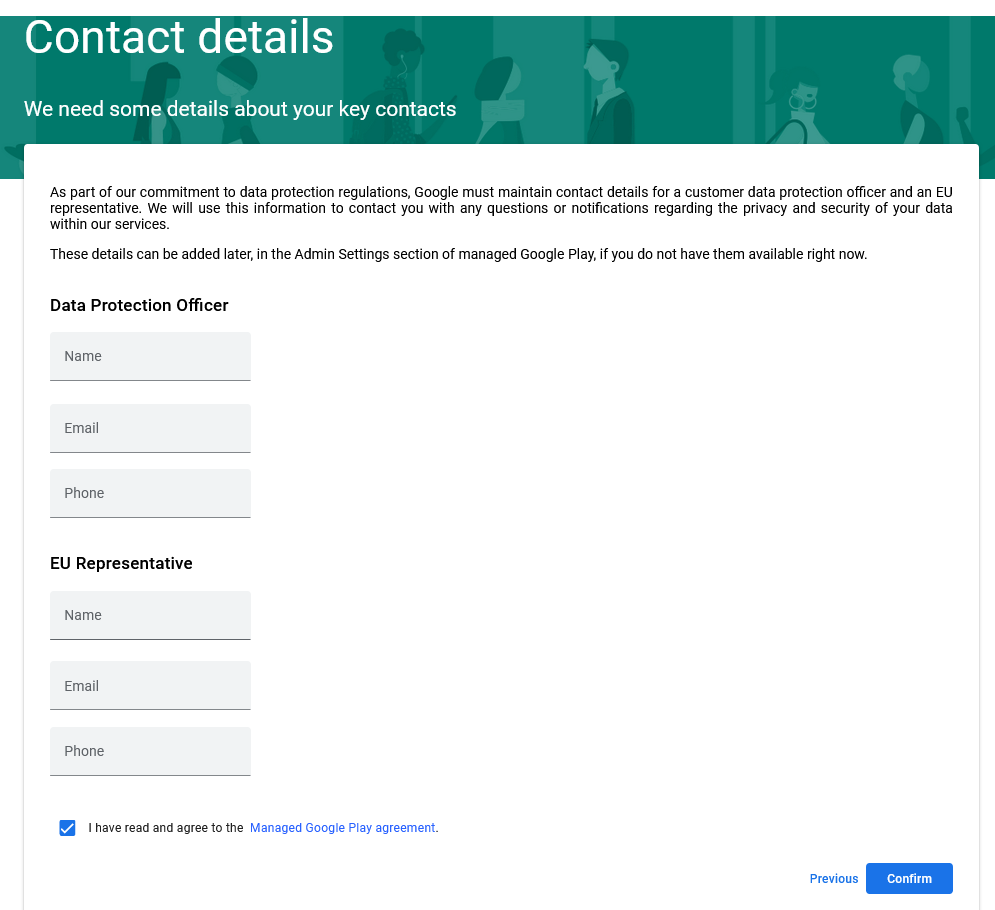
-
Under the European Union’s General Data Protection Regulation (GDPR), your organization may be required to designate a data protection officer (DPO) and EU representative. If you don’t have this contact information on hand, you can add it later. For more information, see the Google Play docs.
-
Select I have read and agree to the Managed Google Play agreement.
-
-
Click Confirm.
-
On the Set up complete page, click Complete Registration to finish linking your Android Enterprise account to Knox Manage.
After a few minutes, the connection between your Knox Manage tenant and your Managed Google Play Admin console is established.
There are additional settings you can configure for your Android Enterprise environment. See Configure Android Enterprise settings to learn more.
Step 2: Add a user and a group
Users are required to enroll devices in your Knox Manage tenant. Groups are then required to categorize and manage users.
To create a user:
- Go to Users and click CREATE USER.
- Enter the following details:
- Under ENROLLMENT INFORMATION, set the User ID and Password that the user will enter to sign-into Knox Manage on their device.
- Under USER INFORMATION, set the user’s Name and Email.
- Select CREATE GROUP. Enter a Group name, then click CREATE. Now select that group to add the user to it.
You can also create a group separately, but you must have users or devices configured:
- Go to Groups and click CREATE GROUP.
- Enter a name and choose if your group contains users or devices.
- Select either Manual or Dynamic for Membership type. For manual groups, you can add members manually, whereas members are automatically added to dynamic groups based on pre-set conditions. Click Next.
- If your group is manual, select users to add to your group. If your group is dynamic, set the membership conditions.
- Click CREATE.
For more information, see Create groups.
Step 3: Add and assign an app
Add apps from Managed Google Play that you want to push to user’s devices, then assign it to their groups.
To add an app:
- Go to Apps and click ADD APP.
- Choose an app from Managed Google Play. On the page that opens, click Select, then click ADD. You are returned to the Apps page.
In addition to managed apps, you can manage in-house apps and system apps in Knox Manage too. See Add apps to learn more.
- You can now assign an app to groups. Select the app you just added, then click ACTIONS > Assign app(s).
- Set the managed configuration for the app. Click NEXT: SELECT to open the Select screen.
- Assign the app to a group and click NEXT: REVIEW to open the Review screen.
- Click ASSIGN.
For more information about apps, see Add an app.
Step 4: Create and assign a profile
Profiles help you set rules to control various aspects of a device. Policies, the settings that make up a profile, specify configurations for a device, such as camera access. To control functions and permissions on a device, just assign and push profiles to the group it belongs to.
To create a profile:
- Go to Profiles and policies and click CREATE PROFILE.
- Enter a Profile name, then click NEXT: CONFIGURE. The Configure screen opens.
- Set policy settings for the profile, then click CREATE AND ASSIGN. The Assign screen opens.
- Select a group to assign the profile to. You can then select ASSIGN ONLY or ASSIGN AND PUSH PROFILE. Click ASSIGN ONLY if you only want to assign the profile now, then push it to devices later. Click ASSIGN AND PUSH PROFILE to assign the profile now and sync it with the selected devices and groups.
For more information, see Create a profile and policies.
Step 5: Enroll devices
Once a device is enrolled, the configurations you just set up for it are pushed and you can manage it from the console.
There are multiple ways to enroll a device, but this tutorial will teach you how to send the enrollment guide to the device user. The enrollment guide includes a QR code which the device user scans with their device.
To send the enrollment guide:
- Go to Users and select a user or users. Click ACTIONS > Send enrollment guide.
- On the Send enrollment guide dialog, select CONFIRM to email the guide.
Once the user receives the enrollment guide, they must enroll the device. To enroll a device, the user must:
- Turn on the factory-reset device and tap the Welcome screen six times
- Scan the QR code from the enrollment email. The enrollment email also contains their user ID, which they need to sign into the Knox Manage agent.
- Follow the prompts to sign into the agent and finish setting up the device.
The device is now enrolled in Knox Manage. For more information about device enrollment, see Enroll a device.
You’ve reached the end of the Get started tutorial!
On this page
Is this page helpful?