Configure general settings
Last updated June 17th, 2026
Configure the general settings in Knox Manage to set preferences for everything from email notifications to device configurations.
To configure the general settings, click your profile icon, then click Settings. Navigate to the KNOX MANAGE section and click GENERAL SETTINGS.
There are four tabs you can configure: Preferences, Device configuration, Cloud connector, and Email notification.
Preferences
Configure general preferences for Knox Manage.
Only the super admin who created the tenant can view this page.
-
Preferred console — Choose which Knox Manage console to use:
-
New console – The easy-to-use view of Knox Manage with features for Android device management. The new console is the default console for new users. Click What’s the new console? to learn more.
-
Original console – The traditional view of Knox Manage with advanced features and granular control beyond Android device management.
Some settings, such as profiles, cannot be managed in both consoles and must be configured separately in each. To learn what settings must be configured differently in the new console, see Transition to the new console.
-
-
Country/Time — Set your country code and time zone for Knox Manage.
-
Technical support access — Select the checkbox to allow the Samsung Knox technical support team temporary access to your Knox Manage console for support and troubleshooting. Note that the Samsung Knox technical support team can only access the console your tenant is currently set to.
- Set period to allow access — Set the time period during which the Samsung Knox technical support team can access your Knox Manage console.
Device configurations
Set your general preferences for device configurations in Knox Manage.
- Maximum number of active devices per user — Limit the number of devices each Knox Manage user can have active at a given time.
- Android inventory collection frequency — The frequency that inventory information is collected for Android devices. 0 means device inventory is not collected.
- Delete content from device when unassigned — Automatically delete content from devices when they’re unassigned. This feature is useful when your devices contain sensitive content that should be deleted when the device is unassigned from a user or group.
- Knox Manage agent — General settings for the Knox Manage agent.
- Allow users to unenroll their device from Knox Manage — Let users unenroll their devices from Knox Manage.
- Allow users to see all policy settings applied to their device — Let users see all policies applied to their device in the Knox Manage policy list.
Cloud connector
Download the Samsung Cloud Connector client, and generate the token needed to connect the client to your identity provider. Learn more about Samsung Cloud Connector.
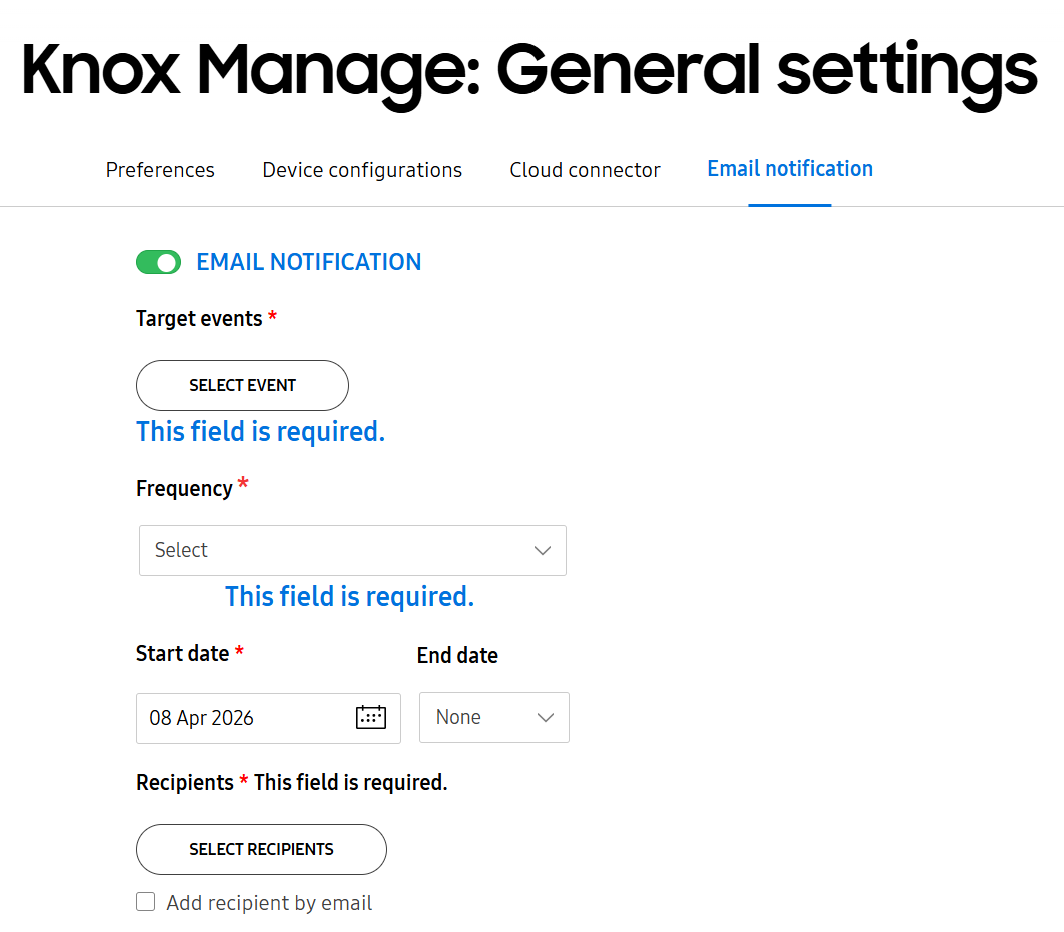
Email notification
Configure email notifications to be sent to your admins whenever a target event occurs. This feature gives your admins the capability to monitor the activities and statuses of your managed devices, helping you respond more effectively to events in your enterprise activities.
- EMAIL NOTIFICATION — Toggle this on to enable email notifications.
- Target events — Select the event or events you want to trigger email notifications. You can choose from pre-defined events or log events.
- PRE-DEFINED EVENTS — Triggered when a device’s status changes or admins perform actions on a device.
- LOG EVENTS — Triggered when a log event occurs.
- Frequency — Decide how frequently you want to send emails, including the time they’re sent.
- Hourly — Send emails on an hourly basis ranging from every hour to every 12 hours.
- Daily — Send emails daily at a specific time.
- Weekly — Send emails on a certain weekday or weekdays at a specific time.
- Monthly — Send emails on a certain day or days of the month at a specific time.
- Start date — Set a date for the emails to start.
- End date — Select None for emails to continue indefinitely, or select By and set a date for the emails to end.
- Recipients — Click SELECT RECIPIENTS to open a list of your admins, or add admins by their email.
Set a support contact
In addition to the above tabs, you can also add the contact information for a person in your company who device users can contact if they need help. This information displays on the Knox Manage agent. To add the contact information:
- Click your profile icon, then click Settings.
- Navigate to the KNOX MANAGE section and click DEFAULT SUPPORT INFORMATION.
- Enter a Phone number and Email address, then click SAVE.
On this page
Is this page helpful?