Configure third-party providers
Last updated June 17th, 2026
Knox Manage can connect to third-party identity providers (IdPs) and directory services that manage and verify authentication information, such as user IDs. This allows identification and authentication information to sync between Knox Manage and enterprise directories, enabling users to enroll and sign into devices with their enterprise credentials.
Supported third-party identity providers
The new console currently supports the following IdPs:
If you connected to a identity server directory in the original console that isn’t supported in the new console, such as Okta, then switching to the new console doesn’t disrupt this connection. However, to manage identity server directories not supported in the new console, you must use the original console.
Add a connection
Connect to On-premises AD
To sync Knox Manage data with the enterprise and cloud servers, Samsung provides a secure Cloud Connector data transfer channel. You must install Samsung Cloud Connector on the Lightweight Directory Access Protocol (LDAP) server before you can connect Knox Manage to On-premises AD.
To connect to an On-premises AD server:
-
Navigate to Connection and security > Identity provider, then click ADD CONNECTION.
-
Set the Connection type to On-premise AD.
-
Add a Connection name.
-
Enter the IP or host address, and the port number of your server under IP/Host.
-
Select the Encryption Type used when communicating with the AD server. Available options are None (default) and TLS for Transport Layer Security.
-
Select an authentication method to use when establishing a connection with the AD server. The options are:
- None — There are no fields to fill out.
- Simple — Enter the user ID and password.
- DIGEST-MD5(SASL) — Fill out the fields with the information below.
- CRAM-MD5(SASL) — Fill out the fields with the information below.
- SASL realm — Enter the realm of the SASL server as a domain. This field is only available if you select DIGEST-MD5(SASL).
- Quality of Protection — Select the extent of data protection.
- Authentication Only — Protect data only upon authentication.
- Authentication with integrity — Ensure integrity of all the data exchanged, as well as authentication.
- Authentication with integrity and privacy — Ensure integrity of all data exchanges, as well as authentication through data encryption.
- Protection Strength — Select a data protection level.
- High — Use 128-bit encryption.
- Medium — Use 56-bit encryption.
- Low — Use 40-bit encryption.
- Use mutual authentication — Select to enable validation for data exchanged between the client and the server.
-
Under User ID, enter the administrator information for accessing the directory server in any of the following formats:
- domain/administrator ID
- administrator_ID@domain
- CN = administrator ID, CN = Users, C = domain, DC = com
-
Enter the Password associated with the User ID.
-
Under Connect to directory, select what you want to sync:
- Users only
- Users and groups
- Organizations only
- Users and organizations
- Users, groups, and organizations
-
Check Schedule automatic syncs to directory to schedule automatic syncs.
-
Time zone — Set the time zone for the schedule.
-
Start date and time — Set the start date and time to sync with the directory.
-
Sync frequency — Sync Only once, or configure Hourly, Daily, or Weekly syncs.
To configure monthly sync frequency and other advanced settings, use the original console.
-
-
Click NEXT to configure the user connection.
Connect to Microsoft Entra ID
To connect to your Microsoft Entra tenant, Knox Manage integrates with the Microsoft Graph API. When configured, this connection makes directory data available to Knox Manage, similar to LDAP connections.
Only one Microsoft Entra ID connection can be used by a Knox Manage tenant. If you need to change your Directory ID, please delete the old Microsoft Entra ID connection and create a new one.
To connect to a Microsoft Entra ID server:
-
On the Microsoft Entra ID portal, navigate to the Mobility (MDM and WIP) page and add Samsung Knox Manage as an application. Then copy your Tenant ID from the Overview page.
-
Sign into Knox Admin Portal. Navigate to Connection and security > Identity provider, then click ADD CONNECTION.
-
While adding a connection, set Connection type to MS Entra ID.
-
Add a Connection name.
-
Under Directory ID, enter the Tenant ID from your Microsoft Entra ID portal.
-
Under Connect to directory, select if you want to sync Users only, or if you want to sync Users and groups.
-
Check Schedule automatic syncs to directory to schedule automatic syncs.
-
Time zone — Set the time zone for the schedule.
-
Start date and time — Set the start date and time to sync with the directory.
-
Sync frequency — Sync Only once, or configure Hourly, Daily, or Weekly syncs.
To configure monthly sync frequency and other advanced settings, use the original console.
-
-
Click NEXT to configure the user connection.
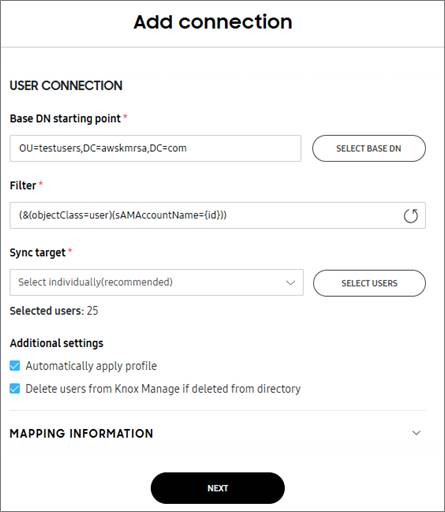
Add a user connection
Configure how Knox Manage syncs users from your identity server as follows:
-
(Only for On-premise AD connections) Enter the Base DN starting point. This is where your AD server searches for users. For optimal performance, click SELECT BASE DN and select the closest base DN to your target users.
-
(Only for On-premise AD connections) Configure a filter string to specify LDAP data items.
-
Under Sync target, sync specific users or all users.
- To sync specific users, choose Select individually (recommended) from the dropdown, click SELECT USERS, then select the users you want to sync.
You can set between 10,000 and 70,000 sync targets. The default remains at 40,000, but you can submit a ticket to change it. To submit a ticket, see Submit a support ticket.
-
(Optional) Configure Additional settings:
- Automatically apply profile — A profile is automatically applied to a user’s device when their organization details change.
- Delete users from Knox Manage if deleted from directory — Delete users from Knox Manage if they are deleted from the identity server directory.
-
Expand the MAPPING INFORMATION dropdown to configure user information synced from the didentity server directory to Knox Manage. Click ADD MORE to see additional fields that you can fill.
- User ID — Enter a user ID.
- User name — Enter the user’s user name.
- Email — Enter the user’s email address.
- Mobile number — Enter the user’s mobile number.
- DN — Enter the unique name of the LDAP object.
- Status — Enter the status of the user account.
- UPN — Enter the User Principal Name (UPN).
- Object Identifier — Enter the ID used to distinguish the synced user.
- Microsoft User Security Identifier — Enter the Microsoft User Security Identifier.
- Organization — Enter the organization name.
- Organization code — Enter the organization code.
- Employee number — Enter the employee’s number.
- First name — Enter the user’s first name.
- Middle name — Enter the user’s middle name.
- Last name — Enter the user’s last name.
- Display name — Enter the user’s display name.
- Department — Enter the user’s department.
- Administrator DN — Enter the unique name of the administrator.
- Email user name — Enter the user’s email address that is linked to their username.
- Contact — Enter the user’s phone number.
- User identifier — Enter the name used to distinguish the synced user.
- Default country code — Enter the default country code.
-
If you chose to sync both Users and groups earlier, click NEXT to configure the group connection. Otherwise, click ADD CONNECTION.
Add a group connection
Configure how Knox Manage syncs groups from your identity server directory:
- (Only for On-premise AD connections) Enter the Base DN starting point. This is where your AD server searches for groups. For optimal performance, click SELECT BASE DN and select the closest base DN to your target groups.
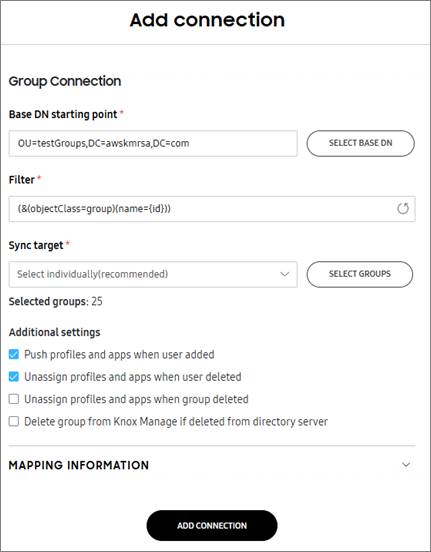
- (Only for On-premise AD connections) Configure a filter string to specify LDAP data items.
- Under Sync target, sync specific groups or all groups.
- To sync specific groups, choose Select individually (recommended) from the dropdown, click SELECT GROUPS, then select the groups you want to sync.
You can set between 10,000 and 70,000 sync targets. The default remains at 40,000, but you can submit a ticket to change it. You can set between 10,000 and 70,000 sync targets. The default remains at 40,000, but you can submit a ticket to change it. To submit a ticket, see Submit a support ticket.
- To sync specific groups, choose Select individually (recommended) from the dropdown, click SELECT GROUPS, then select the groups you want to sync.
- (Optional) Configure Additional settings:
- Push profiles and apps when user added — Automatically push profile and app assignments to new group members.
- Unassign profiles and apps when user deleted — Unassign profiles and apps from deleted group members.
- Unassign profiles and apps when group deleted — Unassign profiles and apps from deleted groups.
- Delete groups from Knox Manage if deleted from directory — Delete groups from Knox Manage if they are deleted on the identity server.
- Expand MAPPING INFORMATION to configure the group information that’s synced from AD to Knox Manage.
- Group Name — Enter a name for the group.
- Member — Select a member for the group.
- DN — Enter the unique name of the LDAP object.
- Object Identifier — Enter the ID used to distinguish the synced group.
- Group Identifier — Enter the name used to distinguish the synced group.
- Click ADD CONNECTION.
Add an organization connection
Configure how Knox Manage syncs organizations from your directory service:
-
Enter the Base DN starting point. This is where your AD server searches for organizations. For optimal performance, click SELECT BASE DN and select the closest base DN to your target groups. This field is only available for on-premises AD connections.
-
Configure a filter string to specify LDAP data items. This field is only available for On-premises AD connections.
-
Under Sync target, sync specific organizations or all organizations.
- To sync specific organizations, choose Select individually (recommended) from the dropdown, click SELECT ORGANIZATIONS, then select the organizations you want to sync from your AD server.
You can set between 10,000 and 70,000 sync targets. The default remains at 40,000, but you can submit a ticket to change it. To submit a ticket, see Submit a support ticket.
-
Expand MAPPING INFORMATION to configure the organization information that’s synced from AD to Knox Manage.
- Organization code — Enter a unique string value for the customer tenant ID.
- Organization name — Enter a name for the organization.
- Member — Select a member for the organization.
- Organization DN — Enter the unique name of the LDAP object.
- Object Identifier — Enter the ID used to distinguish the synced organization.
- Organization Identifier — Enter the name used to distinguish the synced organization.
- Company number — Enter the company number.
- Upper Organization Code — Enter the code for an organization in a higher tier than the organization to which the user belongs. It allows synchronizing the organization by maintaining the hierarchical relationships in the organization chart.
- Department Head ID — Enter the ID of the department head.
- Department Head Name — Enter the name of the department head.
- Department Head Position — Enter the position of the department head.
- Display Order — Enter the display order.
-
Click ADD CONNECTION.
On this page
Is this page helpful?