Manage API clients
Last updated June 4th, 2026
On this tab
The API Integration page lets you manage API clients. You must create an API client to authenticate any API calls you or developers make.
To learn more, see the Knox Manage API reference.
Add an API client
To add an API client:
-
Navigate to the API Integration page.
-
Click ADD API CLIENT.
-
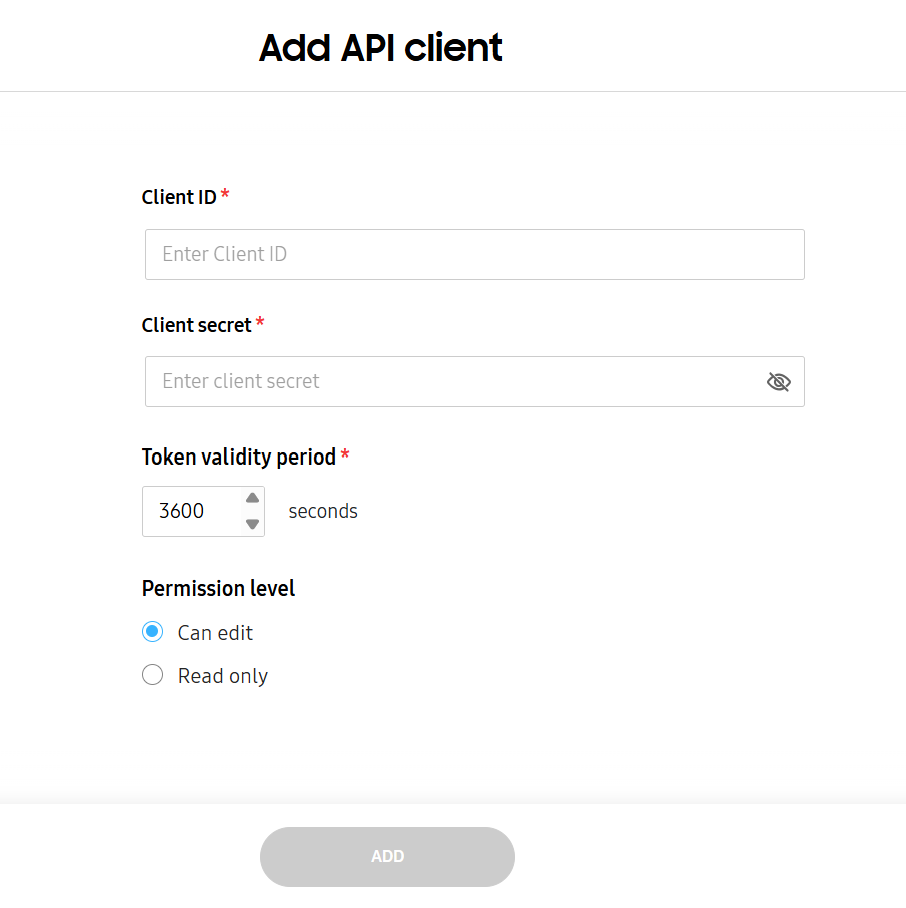
On the Add API client page that opens, enter the following:
- Client ID — Assign a unique client ID. This must be under 50 characters.
- Client secret — Enter a password between 8 and 30 characters. The password must be a combination of letters, numbers, and at least one special character.
- Token validity period — Set the access time in seconds for how long the authentication token is valid for. The default is 3600 seconds.
- Permission Level — Set the client’s permission levels. You can grant Can edit or Read only access. Read only clients can only make GET calls.
-
Click ADD.
You can generate as many clients as needed, but only five can have an active status at the same time. If you already have five active clients, any new clients you add will automatically be set to Inactive. Clients with the Inactive status can’t be used for authentication.
To free up spots for new clients, deactivate existing clients. To activate or deactivate a client, select it and click ACTIONS > Change status. The status of the API client changes to Active or Inactive depending on its previous status.
Any API clients you generate in the new console can be managed in the original console. Similarly, any clients you generate in the original console can be managed in the new console.
View and manage API clients
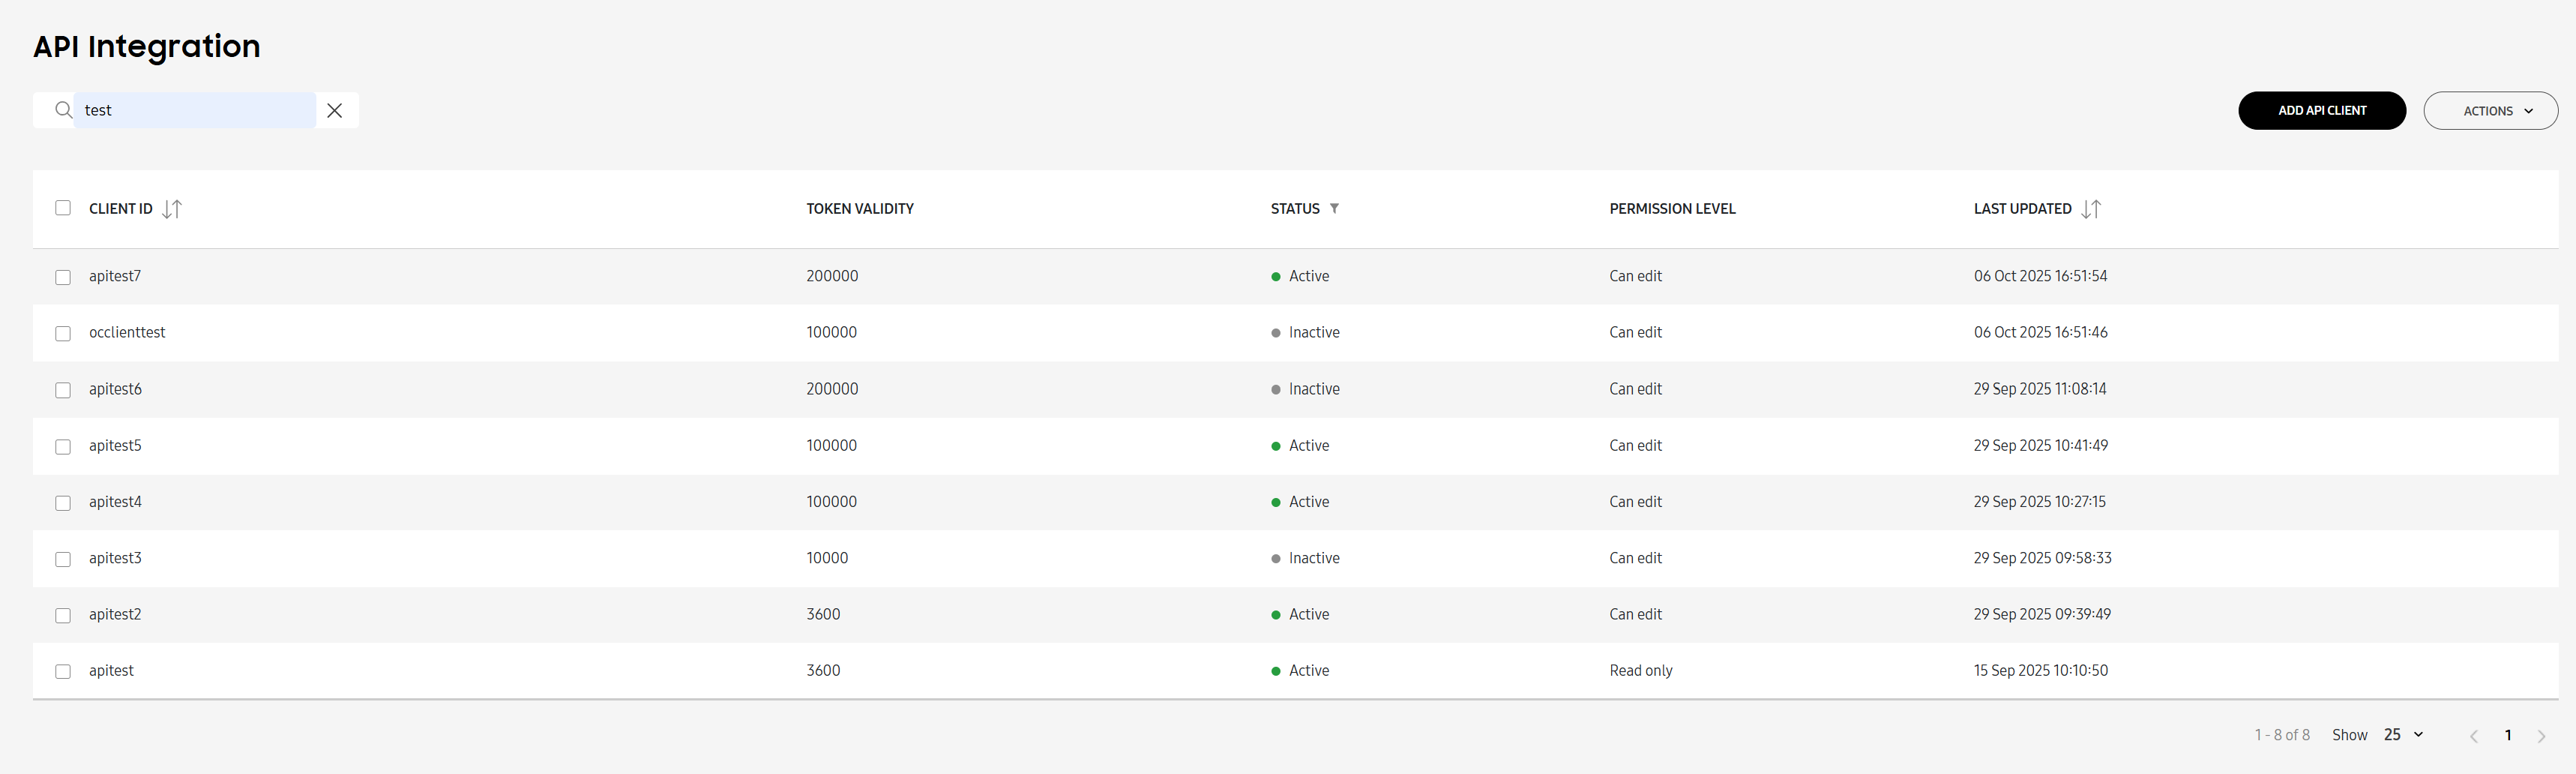
To view your API clients, go to the API Integration page. In the search bar, search for specific clients by their client ID.
The table of clients is organized into the following columns:
| Column | Description |
|---|---|
| CLIENT ID | The unique ID assigned to the client. |
| TOKEN VALIDITY | The length of time, in seconds, that the authentication token is valid for. |
| STATUS | The status of the client. Sort by Active or Inactive. |
| PEMISSION LEVEL | The permission level of the client. |
| LAST UPDATED | The date and time when the client was last updated. |
You can also view the activity logs to learn more about the authentication and generation history of your API clients. See Review the activity logs for more information.
You can further edit and manage clients from the ACTIONS drop-down. Select a client, then click ACTIONS and choose one of the following options:
- Invalidate a token — Invalidates the authentication token. Once a token is invalidated, it can’t be used again — you must request a new one.
- Change status — Changes the status of the client to Active or Inactive depending on its current status.
- Duplicate API client — Duplicates the selected API client to create a new client with the same token validity period and access permission. You must create a new client ID and client secret for the duplicated client.
- Edit API client — Allows you to modify the API client’s client ID, token validity period, and permission level.
- Delete API client(s) — Deletes the API client.
This document was updated for the Knox cloud services 26.06 UAT.
On this tab
The API Integration page lets you manage API clients. You must create an API client to authenticate any API calls you or developers make.
To learn more, see the Knox Manage API reference.
Add an API client
To add an API client:
-
Navigate to the API Integration page.
-
Click ADD API CLIENT.
-
On the Add API client page that opens, enter the following:
- Client ID — Assign a unique client ID. This must be under 50 characters.
- Client secret — Enter a password between 8 and 30 characters. The password must be a combination of letters, numbers, and at least one special character.
- Token validity period — Set the access time in seconds for how long the authentication token is valid for. The maximum is 3600 seconds.
- Permission Level — Set the client’s permission levels. You can grant Can edit or Read only access. Read only clients can only make GET calls.
-
Click ADD.
You can generate as many clients as needed, but only five can have an active status at the same time. If you already have five active clients, any new clients you add will automatically be set to Inactive. Clients with the Inactive status can’t be used for authentication.
To free up spots for new clients, deactivate existing clients. To activate or deactivate a client, select it and click ACTIONS > Change status. The status of the API client changes to Active or Inactive depending on its previous status.
Any API clients you generate in the new console can be managed in the original console. Similarly, any clients you generate in the original console can be managed in the new console.
View and manage API clients
To view your API clients, go to the API Integration page. In the search bar, search for specific clients by their client ID.
The table of clients is organized into the following columns:
| Column | Description |
|---|---|
| CLIENT ID | The unique ID assigned to the client. |
| TOKEN VALIDITY | The length of time, in seconds, that the authentication token is valid for. |
| STATUS | The status of the client. Sort by Active or Inactive. |
| PEMISSION LEVEL | The permission level of the client. |
| LAST UPDATED | The date and time when the client was last updated. |
You can also view the activity logs to learn more about the authentication and generation history of your API clients. See Review the activity logs for more information.
You can further edit and manage clients from the ACTIONS drop-down. Select a client, then click ACTIONS and choose one of the following options:
- Invalidate a token — Invalidates the authentication token. Once a token is invalidated, it can’t be used again — you must request a new one.
- Change status — Changes the status of the client to Active or Inactive depending on its current status.
- Duplicate API client — Duplicates the selected API client to create a new client with the same token validity period and access permission. You must create a new client ID and client secret for the duplicated client.
- Edit API client — Allows you to modify the API client’s client ID, token validity period, and permission level.
- Delete API client(s) — Deletes the API client.
Is this page helpful?