Install and launch the Knox E-FOTA client
Last updated December 2nd, 2025
To successfully enroll devices in Knox E-FOTA, you must first install and launch the Knox E-FOTA client app on your devices. The client allows Knox E-FOTA to manage the device. It functions as an agent that connects the device to the Knox E-FOTA server.
For legacy OneUI Core devices, install the Knox E-FOTA: Legacy OneUI Core app instead. For more information, see Install the Knox Knox E-FOTA: Legacy OneUI Core app.
This section describes several ways to install the Knox E-FOTA client on devices:
-
Manually install and launch the client
-
Install the client through your EMM
-
Install the client through Knox Configure
-
Notify device users to install the client
When the client app is installed, it proceeds to provision the device. The app typically prompts the user to read and accept the privacy policy. If you want the client app to skip this step during device provisioning, you can update the privacy policy setting in the Knox E-FOTA admin portal. Click your account icon and select Privacy policy setting. Only a user with a super admin role can perform this action.
If your device is managed by an EMM, you can install the Knox E-FOTA app through managed Google Play or Knox Service Plugin. To prevent the Knox E-FOTA app from being uninstalled by an EMM policy, approve the Knox E-FOTA app through managed Google Play.
If you use an app allowlist policy in Knox Configure or your EMM, you must add the following Knox E-FOTA client packages to the allowlist.
com.samsung.android.knox.efota— For both OneUI and the latest OneUI Core devicescom.samsung.android.knox.core.efota— For legacy OneUI Core devicescom.samsung.android.knox.efota.plugin— For all devices
Manually install and launch the client app
These procedures are useful if you’re testing how Knox E-FOTA works and you want to install the client on just a few devices.
Install the client through Play Store
- On the device, launch Play Store.
- Search for the Knox E-FOTA client app.
- Follow the prompts to install the app.
- Launch the app.
Install the client through a download link
-
Sign in to the Knox Admin Portal. In the left sidebar, click Knox E-FOTA.
-
Go to Devices.
-
Click Direct Download.
-
In the Direct Download popup, copy the download link for the APK file.
You can also copy the sample message and send it through email or SMS to your devices.
-
On each device, download, install, and launch the app:
-
Tap Download > Open File > Install. The client app installs.
-
Tap Open to launch the app.
-
Automatically install and launch the client after unboxing
After unboxing or a factory reset of a device, out-of-box experience (OOBE) automatically installs and launches the Knox E-FOTA agent after its initial setup is complete. This enrolls your device to Knox E-FOTA right out of the box without the need for manual interaction. OOBE is only supported on devices running Android 9 or higher.
You can configure OOBE with enrollment profiles. To learn more, see Manage enrollment profiles.
Install the client through your EMM
The following procedures describe how you can push the Knox E-FOTA app to devices through your (EMM).
- Install and launch the client through the Knox Service Plugin
- Install the client through managed Google Play
- Install the client through the EMM as an internal app
Install and launch the client through Knox Service Plugin
You can use Knox Service Plugin (KSP) to install the Knox E-FOTA client app.
-
Set up KSP on your EMM console. See the Knox Service Plugin admin guide for information on how you can do this on the most common EMMs.
-
On your EMM’s console, go to the Knox Service Plugin settings.
-
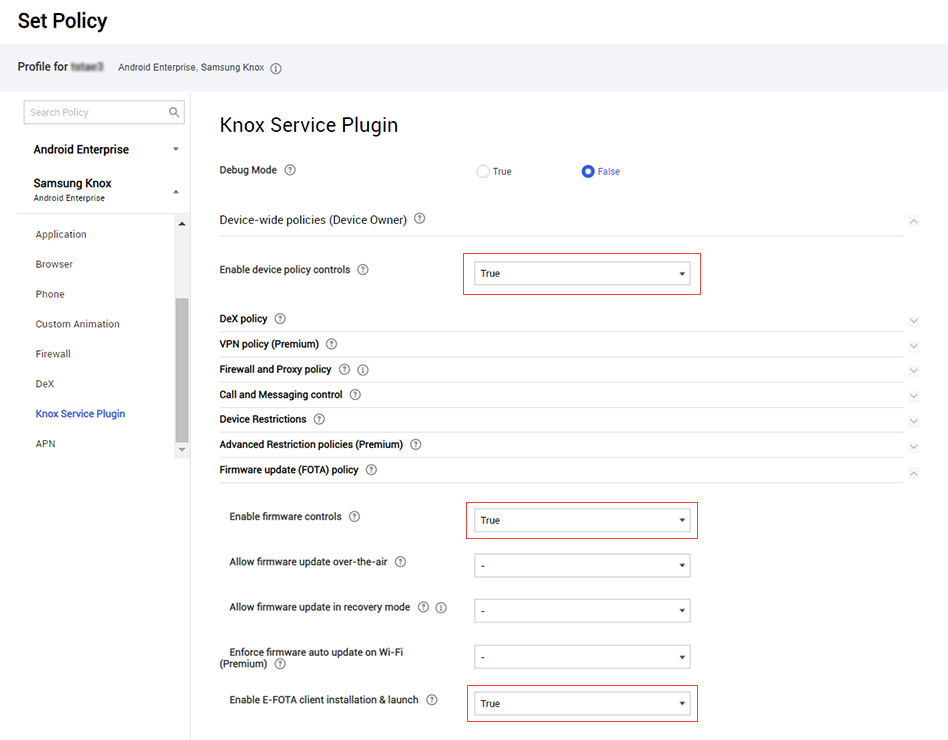
Under Device-wide policies (Device Owner), enable Enable device policy controls.
-
Under Device-wide policies (Device Owner) > Firmware update (FOTA) policy enable the following KSP policies:
-
Enable firmware controls
-
Enable E-FOTA client installation & launch
In the following example, the Knox Manage console is configured to enable these settings.
-
-
Enroll your devices as fully managed devices to your EMM:
-
Unbox the device if it is brand new. If it is not brand new, perform a factory reset. You are prompted to run the setup wizard.
-
Follow the device setup wizard. When you’re prompted to enter a Google email or phone number, enter the DPC identifier. The DPC identifier differs depending on the EMM you’re using, but it typically starts with afw#.
There are several other ways to enroll fully managed devices. For example, you can use Knox Mobile Enrollment or Zero-touch enrollment.
The EMM app is installed. The user is prompted to sign in to complete enrollment. The EMM app automatically installs the KSP client app. In turn, the KSP app installs and launches the Knox E-FOTA client app.
-
Install the client through managed Google Play
If your EMM supports the following functionality through managed Google play, you can approve the Knox E-FOTA app, push the app to your devices, and launch the app on those devices.
- App installation (DO)
- Remote app launch
The general workflow is as follows:
-
Sign in to your EMM.
-
Use your EMM’s search functionality to search for the Knox E-FOTA app in managed Google Play.
-
From the search results, select the Knox E-FOTA app and approve it.
-
Configure the EMM such that:
-
It automatically installs the app on devices.
-
It automatically launches the app after installation.
-
-
Assign the app to the devices that you plan to enroll in Knox E-FOTA.
If your EMM has the capability to automatically launch the client, we strongly recommend you enable it. Enrollment can’t complete until the client launches on the device.
For detailed information, refer to your EMM’s documentation.
Install the client through your EMM as an internal app
If you use an EMM that has an app installation functionality, you may be able to use your EMM’s console to push the client app to your devices. For general information on how to push an app to devices through various EMMs, see Install an app to devices through an EMM.
If your EMM has the capability to automatically launch the client, we strongly recommend you enable it. Enrollment can’t complete until the client launches on the device.
If you want to block the firmware update before the Knox E-FOTA client installation, you should disable the firmware update policy of the device on your EMM portal. See Block non-mainline firmware updates for more information.
Install and launch the client through Knox Configure
With Knox Configure, you can create a profile, upload the client app, add the client app to the profile, and assign the profile to your devices. For more information, see the Knox Configure documentation.
Notify users to install and launch the client
This section describes how to copy a sample message to notify device users to install the client app APK on their devices.
- Sign in to the Knox Admin Portal. In the left sidebar, click Knox E-FOTA.
- Go to Devices.
- Click Direct Download.
- In the Direct Download popup, click Copy Message to copy the sample email to your clipboard.
- Modify the message if needed and send it to the device users through email or SMS.
Install the Knox E-FOTA: Legacy OneUI Core app
For legacy OneUI Core devices, you must install the Knox E-FOTA: Legacy OneUI Core app instead of the standard Knox E-FOTA app.
For a list of all devices running the Legacy OneUI Core, see Samsung devices with legacy OneUI Core UI Platform.
You can install the Knox E-FOTA: Legacy OneUI Core app by doing any of the following:
-
Manual download — Download the Knox E-FOTA: Legacy OneUI Core APK from https://umc-cdn.secb2b.com/kfm/KnoxEfota_Core.apk.
-
Managed Google Play — Search for the Knox E-FOTA: Legacy OneUI Core app on managed Google Play and approve and assign it to legacy OneUI Core devices. Configure the EMM to automatically install and launch the app.
If you don’t know whether your devices run Legacy OneUI Core, you can approve and assign both of the client apps on your EMM console. The proper app is automatically installed on each device depending on its type. That is:
- The Knox E-FOTA app will be installed on both OneUI and the latest OneUI Core devices.
- The Knox E-FOTA: Legacy OneUI Core app will be installed on legacy OneUI Core devices.
-
OOBE or KSP — The proper app Knox E-FOTA or Knox E-FOTA: Legacy OneUI Core is automatically installed on your device depending on its type.
Tutorial Progress
You’ve completed 4/5 steps! Go to the next step.
On this page
Is this page helpful?