Add, edit, and delete users
Last updated December 14th, 2023
With Knox E-FOTA On-Premises, super admin can manage users and their roles directly from the admin portal.
To access the users list:
- Sign in to the Knox E-FOTA On-Premises console.
- Click your account icon.
- In the menu that’s shown, click Settings.
- The navigation sidebar pane refreshes with a new set of tabs. Click Users.
The users list is then displayed, which includes the name, ID, role, status, and join date of each user.
Add a user
-
On the Users screen, click ACTIONS > Add User.
-
A popup is shown, prompting you to enter the user’s details. Fill in the required fields as shown, then click SAVE.
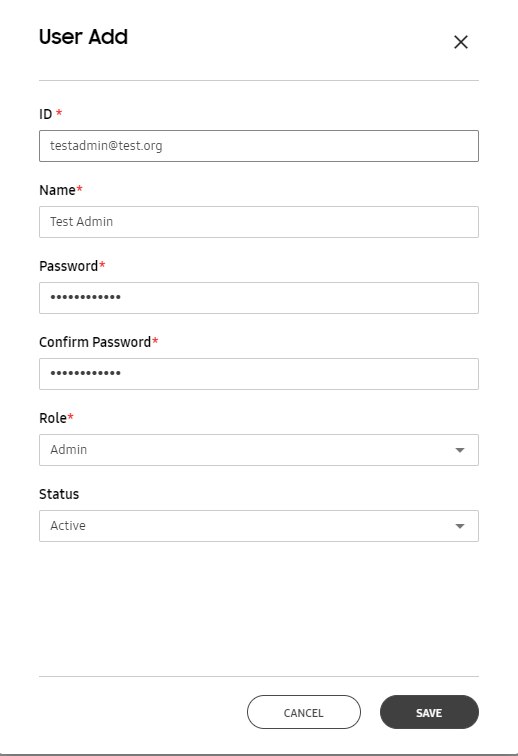
After saving, the new user is added to the list. The user’s role, assigned password and status can be changed at a later date.
Edit a user
-
On the Users screen, select the checkbox next to the user you want to modify.
-
Click ACTIONS > Edit User.
-
Select one of the available options:
Action Description APPROVE If the user’s status is Pending, click APPROVE to change their status to Active and grant them console access. PASSWORD MODIFY Set a new password for the user. Depending on how your Knox E-FOTA On-Premises instance is configured, a password length policy may apply. By default, the minimum length for a password is 8 characters, and the maximum length is 12. EDIT Change the user’s name, role, status, or time zone.
Delete a user
- On the Users screen, select the user you want to delete.
- Click ACTIONS > Delete User.
- In the confirmation popup that appears, click PROCEED.
The user is then removed from the list and can no longer access the Knox E-FOTA On-Premises instance.
On this page
Is this page helpful?