Step 7 — Create and assign a campaign
Last updated July 19th, 2024
Now you can create and assign a campaign to target devices.
-
Go to Campaigns and then click Create Campaign.

-
Fill in your Basic info:
-
Enter a unique name for the campaign and a description of what the campaign is for.

-
Click NEXT.
-
-
Fill in your Target firmware:
-
Select the model and sales code corresponding to the target devices. Under FIRMWARE VERSION, select one of the following options:
Firmware version Description Latest firmware Automatically push the latest firmware version to the corresponding devices. Lock current firmware Keep the current firmware version. Select from firmware list Select a firmware version to push to the corresponding devices. -
Select the target firmware on the next page and click SELECT. The campaign page opens.
-
Click ADD ANOTHER ROW and repeat this step to assign as many firmware versions to the campaign as needed.

-
Click NEXT.
-
-
Fill in your Policy:
-
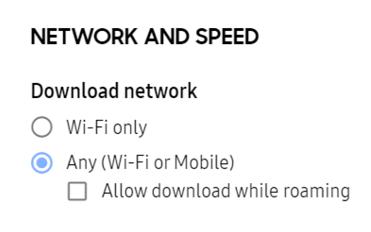
Configure your Network and speed:
Field Description Download network Select which networks devices can use to download firmware.
- Wi-Fi only — Only download firmware over Wi-Fi.
- Any (Wi-Fi or Mobile) — Allow firmware downloads over Wi-Fi and mobile networks. This option also allows downloads over VPNs and private networks. To allow firmware downloads while roaming, select Allow download while roaming.

Max bandwidth Allocate a maximum bandwidth per device for firmware downloads in MBit/s, where 0 MBit/s represents unlimited bandwidth. -
Configure your Device condition. Specify how much battery charge a device must have before it can begin installing the update. You can also prevent firmware installation on devices that aren’t connected to a charging dock.

-
Configure Postpone installation if you want to allow the device user to postpone the installation. Set the maximum number of times they’re allowed to postpone the installation before any pending firmware begins installing.

-
Click NEXT once you’ve configured all the policy settings.
-
-
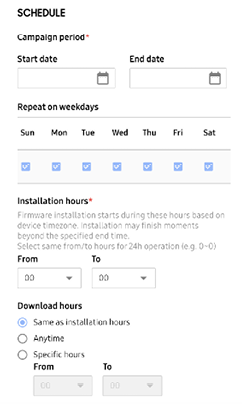
Fill in your Schedule:
Field Description Campaign period Set the dates when devices in the campaign can start to download and install the update. Repeat on weekdays Set the days of the week you want firmware updates to occur. Installation hours Set the timeframe within the campaign period when the devices in the campaign can start installing the update. This timeframe is based on the device's timezone.
If you want firmware updates to install at any time of the day, set the firmware installation period to identical values:
- From — 00
- To — 00
Devices will start installation during this period, but there's no guarantee that installation will end within this period.
Download hours Set the timeframe within the campaign period when the devices in the campaign can start downloading the firmware. You can allow downloads to occur at one of the following periods:
- Same as installation hours: Set the firmware download period to be the same as the firmware installation period.
- Anytime — Allow firmware downloads at any time.
- Specific hours — Set the firmware download period to be different from the firmware installation period.

-
Click CREATE. The console creates the campaign and adds it to the Campaigns list. A notification confirms that the operation completed.
Assign an existing campaign to devices
To assign an existing campaign to devices:
- Go to Devices.
- Select the devices you want to assign.
- Click ACTIONS > Assign Campaign.
- Select a running campaign to assign the devices to.
- Click ASSIGN.
Tutorial progress
Congratulations, you’ve completed the tutorial! You’re now set up to use Knox E-FOTA On-Premises.
PreviousOn this page
Is this page helpful?