Manage EMM groups
Last updated December 6th, 2023
This section describes how to use the tools in the EMM groups tab to manage your EMM device groups.
Add or remove device groups
You can change which device groups are synced with your EMM at any time
To add or remove device groups:
-
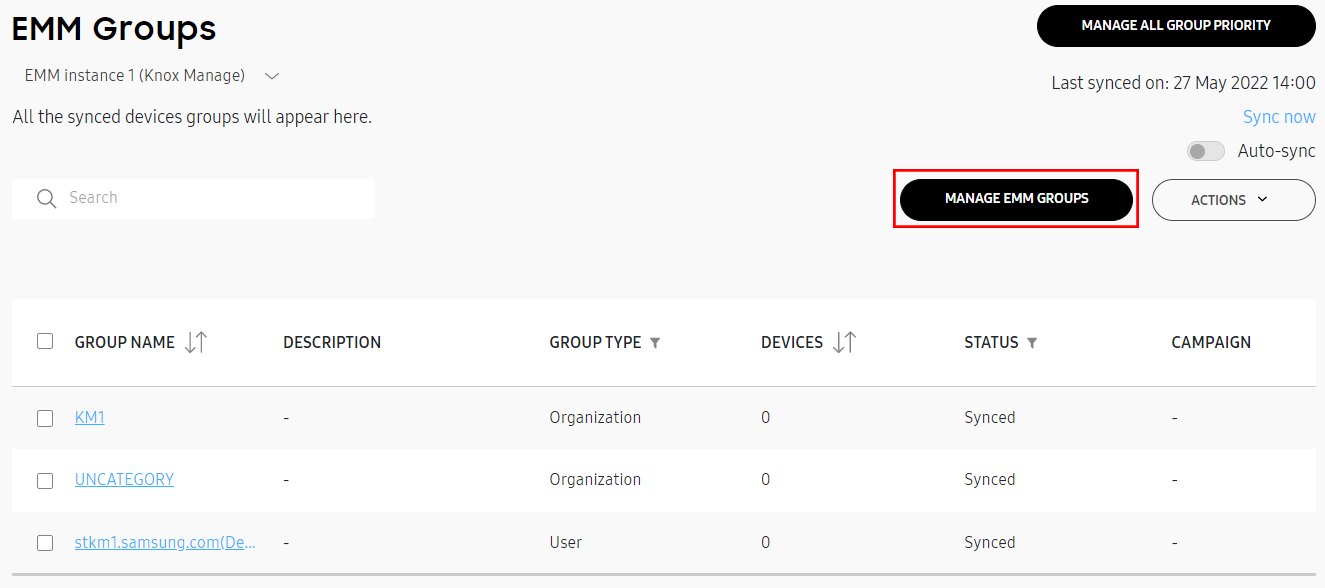
On the EMM groups tab, click MANAGE EMM GROUPS.
-
On the next page:
-
Select the device groups you want to add to Knox E-FOTA.
-
Deselect the device groups you want to remove from Knox E-FOTA.
-
-
Click UPDATE E-FOTA GROUPS.
-
In the confirmation pop up, click UPDATE.
Search EMM groups
You can search for specific EMM groups by name — including partial names — on the Manage EMM groups page to sync only the desired device groups. Additionally, you can toggle on the Sync switch of an EMM group to individually sync that group.
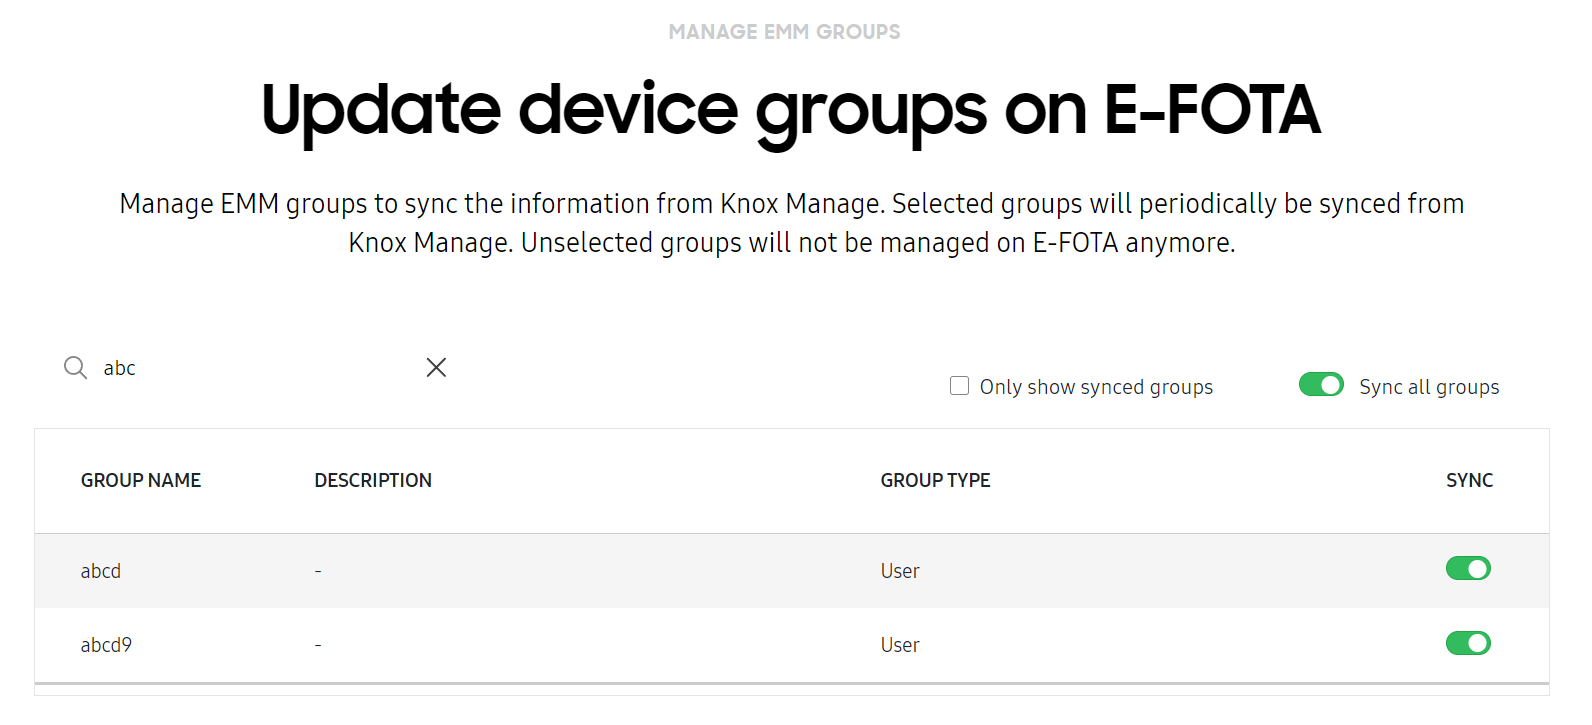
Furthermore, the EMM group search lets you:
-
Sync all the groups that are displayed in the search results. When you perform a search, the Sync all groups switch temporarily transitions to Sync all groups in search results. Any syncing changes you make are preserved even after you clear the search. Once you clear the search, the switch transitions back to Sync all groups.
-
Search and add a maximum of 1,000 device groups for syncing without triggering a warning.
Enroll devices by EMM group
Perform this procedure if you want to enroll one or more device groups to Knox E-FOTA. This means that all devices in the device groups you select will be enrolled.
-
In the EMM groups tab, select the device groups you want to enroll.
-
Click Actions > Enroll devices in groups. The Select license pop-up shows the active licenses that have enough seats to accommodate all devices in your selected device group(s). If you want to see all licenses, click Clear Filters.
-
Select the license you want to use, and click Done.
Assign a device group to a campaign
Perform this procedure if you want to assign all devices in a device group to a campaign.
-
In the EMM groups tab, select the device groups you want to assign to a campaign.
-
Click Actions > Assign campaign.
The Select campaign pop-up shows only the active and scheduled campaigns. If you want to see all campaigns (including expired ones), click Clear Filters.
The Select license pop-up shows the active licenses that have enough seats to accommodate all devices in your selected device group(s). If you want to see all licenses, click Clear Filters.
-
Select the campaign to assign, and click Done.
Default campaigns
When you assign a campaign to an EMM device group, this campaign is automatically set as the default campaign for the group. This default campaign is then assigned only to devices in this group when they’re synced from the EMM for the first time.
These synced devices exhibit the following properties:
-
The default campaign associated with these devices changes if their EMM group or EMM group priority changes. Note that these devices are not automatically assigned to the changed default campaign.
-
After the first sync, existing devices synced from EMM groups won’t be assigned the default campaign when you sync from the EMM again.
-
You can assign the default campaign to these devices, regardless of whether they were uploaded by a reseller or in bulk using a CSV file.
You can also find information about the default campaign by selecting an EMM group on the EMM groups page.
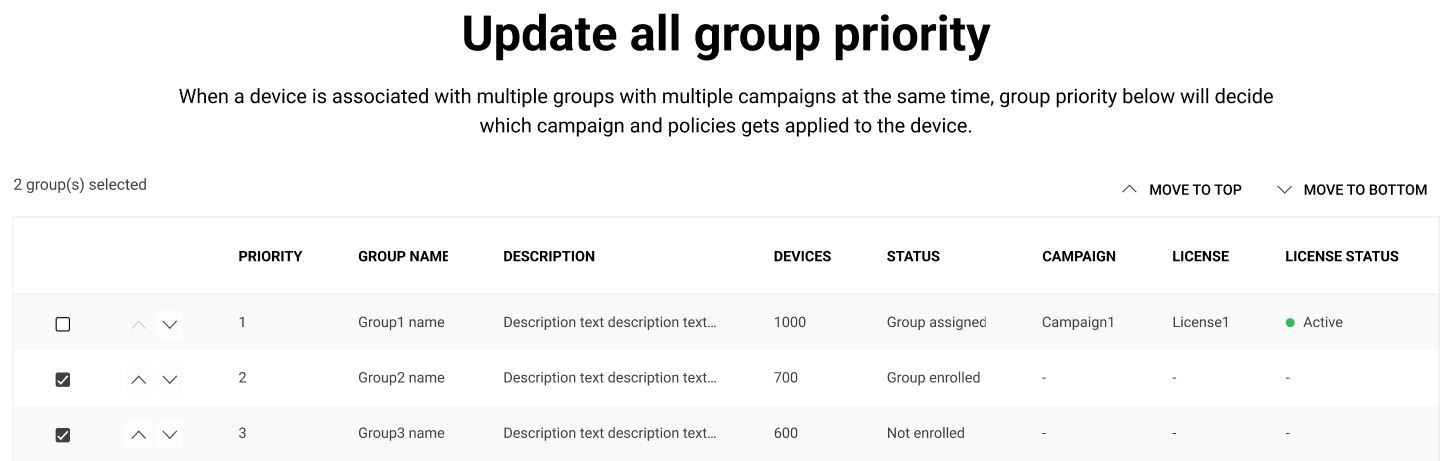
Manage group priority
Managing group priority is useful in cases where a device is included in multiple EMM groups. Assigning group priority allows you to specify which device group takes precedence in the event of a campaign conflict.
For example, device A is in both group1 and group2. If group1 is assigned to campaign1 and group2 is assigned to campaign2, which campaign is device A assigned to? The answer depends on which group has a higher priority.
To manage group priority:
-
On the EMM groups page:
-
Click Actions > Manage group priority, or
-
Click Manage all group priority.
-
-
Click one or more groups and reassign their priority using the upward or downward arrow.
-
Optionally click Move to Top or Move to Bottom on the top right to reassign the priority of one or more groups in one swift action.
-
Click Update groups priority.
EMM group auto-sync
As an IT admin, you can configure Knox E-FOTA to automatically sync any changes made to EMM groups. To do so, on the EMM groups tab:
-
Switch on the Auto-sync switch to immediately send a group sync request to your EMM.
-
Switch off the Auto-sync switch to disable the auto-sync process. EMM groups are no longer updated based on the pre-defined sync interval.
Moreover, the Auto-sync switch is switched off by default. The EMM group information is updated automatically, based on the sync interval shown beside the Next sync field. The interval defaults to 24 hours.
If the group sync is pending or if it fails, the switch is switched off and you must manually switch it on again to enable auto-sync.
You can’t manually sync EMM groups until the current EMM group syncing process is complete. During this process, the Sync now action becomes unavailable and temporarily transitions to Syncing status. Additionally, the Status column also temporarily transitions to Syncing.
EMM re-authentication
A banner at the top of your Knox E-FOTA console notifies you when devices fail to sync with the EMM. To reconnect them with the EMM:
-
Reset your client secret on the EMM console.
-
Click RECONNECT in the banner at the top of your Knox E-FOTA console.

-
Enter your new client secret, then click CONNECT AND SYNC DEVICES.
-
When the EMM sync fails, you can disconnect the EMM by clicking Disconnect in the EMM re-authentication banner at the top of Knox Admin Portal.
You must be a super admin to see the re-authentication banner.
Also, as an IT admin, you can update your EMM connection credentials anytime:
-
On the EMM groups page, click Actions > Reconnect EMM > Click Connect if all the details are correct. Doing so initiates the EMM reconnection.
-
A toast notification confirms the outcome of the reconnection.
Available only to IT admins with EMM reconnection permissions.
Policies to prevent accidental status changes when syncing from an EMM
Knox E-FOTA follows the following policies to ensure that any device you add individually is properly managed if you later sync that device through an EMM group:
Deleting a device from your EMM console does not delete it from the Knox E-FOTA console. Only the group information is removed, while campaign, license, and upload source information is kept. You can manually delete these devices on the Devices tab or through a CSV file upload.
-
When you add a device to Knox E-FOTA and then add its device group from an EMM to Knox E-FOTA, that device will keep its current status until the EMM group’s initial status changes from Synced to something else.
For example, you enrolled Device A to Knox E-FOTA and assigned it to Campaign A. On the EMM side, Device A is also a member of Group 1. When you add Group 1 to Knox E-FOTA, it will get the status Synced. Device A, however, will retain its Assigned status.
-
When an EMM group’s status changes from the initial Synced status to something else, all its members will follow the new status.
Continuing the example above — if you assign Group 1 to Campaign B, all its members, including Device A, will also be assigned to Campaign B.
-
If an EMM group is explicitly unenrolled, all its members will also be unenrolled.
Continuing the example above — if you unenroll Group 1, all its members, including Device A, will also be unenrolled.
-
When you add a device to Knox E-FOTA and then add its device groups (multiple groups) from an EMM to Knox E-FOTA, the device will follow the policy of the group with the higher priority. Group priority is set in Knox E-FOTA.
Continuing the ongoing example, say you enrolled Device A to Knox E-FOTA and assigned it to Campaign A. On the EMM side, Device A is also a member of Group 1 and Group 2. When you add Group 1 and Group 2 to Knox E-FOTA, they will both get the initial status, Synced. Device A, however, will retain its Assigned status (following the first policy above).
In this example, Group 1 has a higher priority than Group 2, so Device A will follow Group 1’s policy. If you enroll Group 2 and assign it to Campaign B, Device A is unaffected. Since Group 1 is still in its initial Synced status, Device A will continue to retain its Assigned status.
When you enroll Group 1 and assign it to Campaign C, Device A will also be assigned to Campaign C (following the second policy above).
On this page
Is this page helpful?