Manage admins and roles
Last updated July 26th, 2023
This topic describes how to invite and manage admins, as well as assign the required roles and permissions needed to complete an admin invitation.
Knox Configure supports a Role-Based Access Control (RBAC) service allowing customer (tenant) admins that are responsible for account creation (super admin) to assign more refined role permissions to individual admins as their specific enterprise requirements dictate. Though KC utilizes admin roles unique to the KC service specifically, the super admin role cuts across all supported services.
Existing customers will have their administrators migrated to the RBAC service automatically. Administrators with their own unique set of permissions (manage administrators, delete devices etc.) will be assigned new roles that map to their current permissions. If needed, new roles beyond what the migrated admins are currently assigned can be created based on a list of permissions unique for each service.
Knox Configure administrators can either be invited individually (Invite and manage admins) or in bulk (Bulk invite admins).
Invite and manage admins
Only selected IT admins are approved to enroll and manage devices on behalf of customers.
Invite IT admins from within the Knox Configure portal as needed, and assign them unique enrollment and configuration services and permissions.
-
Select Administrators & Roles from the left-hand navigation menu.
-
Select the INVITE ADMINISTRATOR button from the top, right-hand side, of the screen.

An Invite administrator screen could display stating that before an administrator can be invited a role must be first created and available for assignment. Ensure appropriate roles are created and available before proceeding with an administrator invitation.
-
Select the CREATE ROLE button.
-
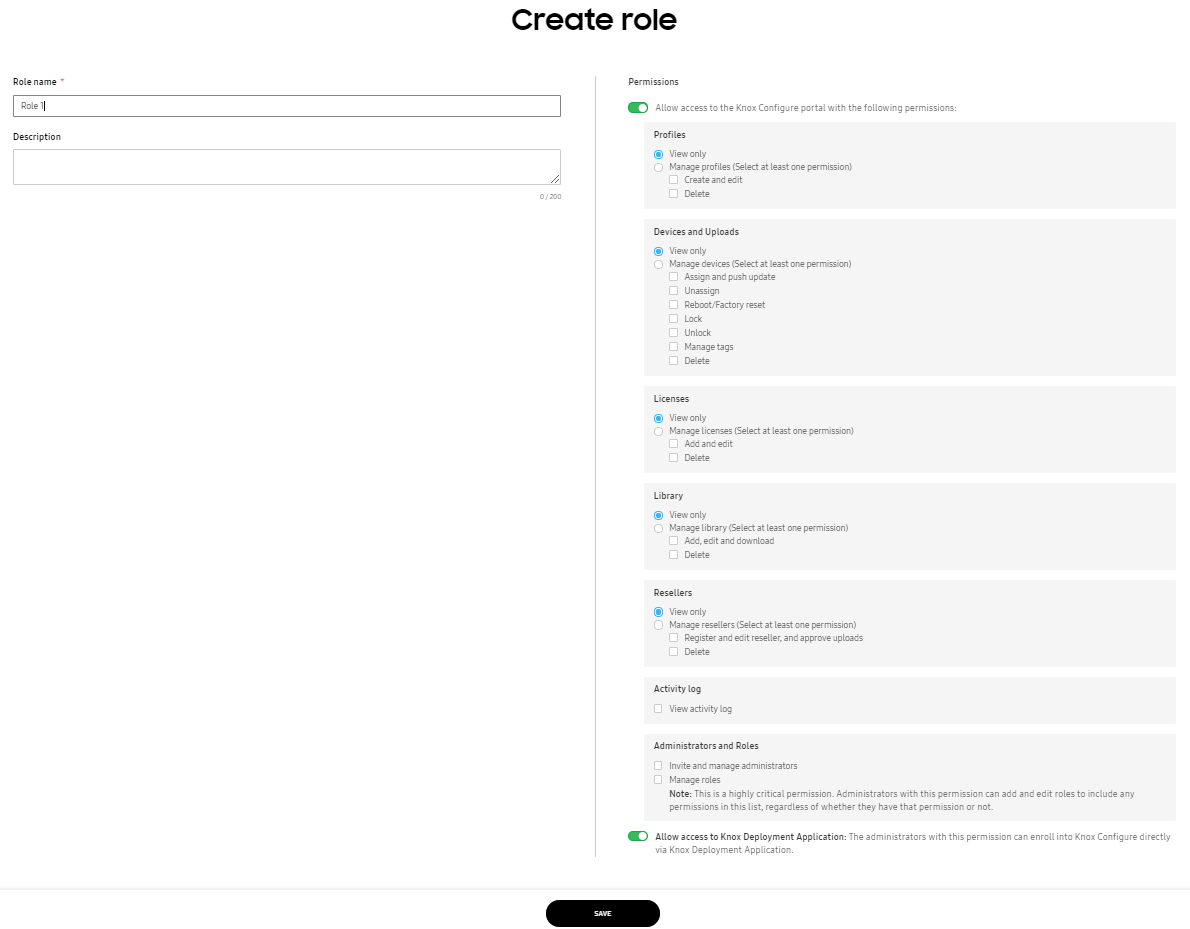
If creating a role for a pending administrator invitation, provide the required Role name and an optional description.
Refer to the Permissions portion of the screen and select additional permissions by category as required beyond the basic permissions assigned by default. When permissions require restriction to view only access for certain permission areas, consider selecting the View only option. Once assigned, no profile configuration, device management, license, or reseller administration is permitted, just view only access.
The Invite and manage administrators permission (within the Administrators and Roles category) can only be granted by an existing administrator who themselves has that specific permission.
Refer to the Allow access to Knox Deployment Application option, at the bottom of the screen, to enroll devices directly in Knox Configure using the KDA, and not the Knox Configure console. When relying exclusively on the KDA without the Knox Configure console, an admin must sign in to the KDA, choose a service (KC, KME, KG, etc.), select a profile, pair the primary/admin device with the target device, and assign the profile to the target device. Select SAVE to continue.
-
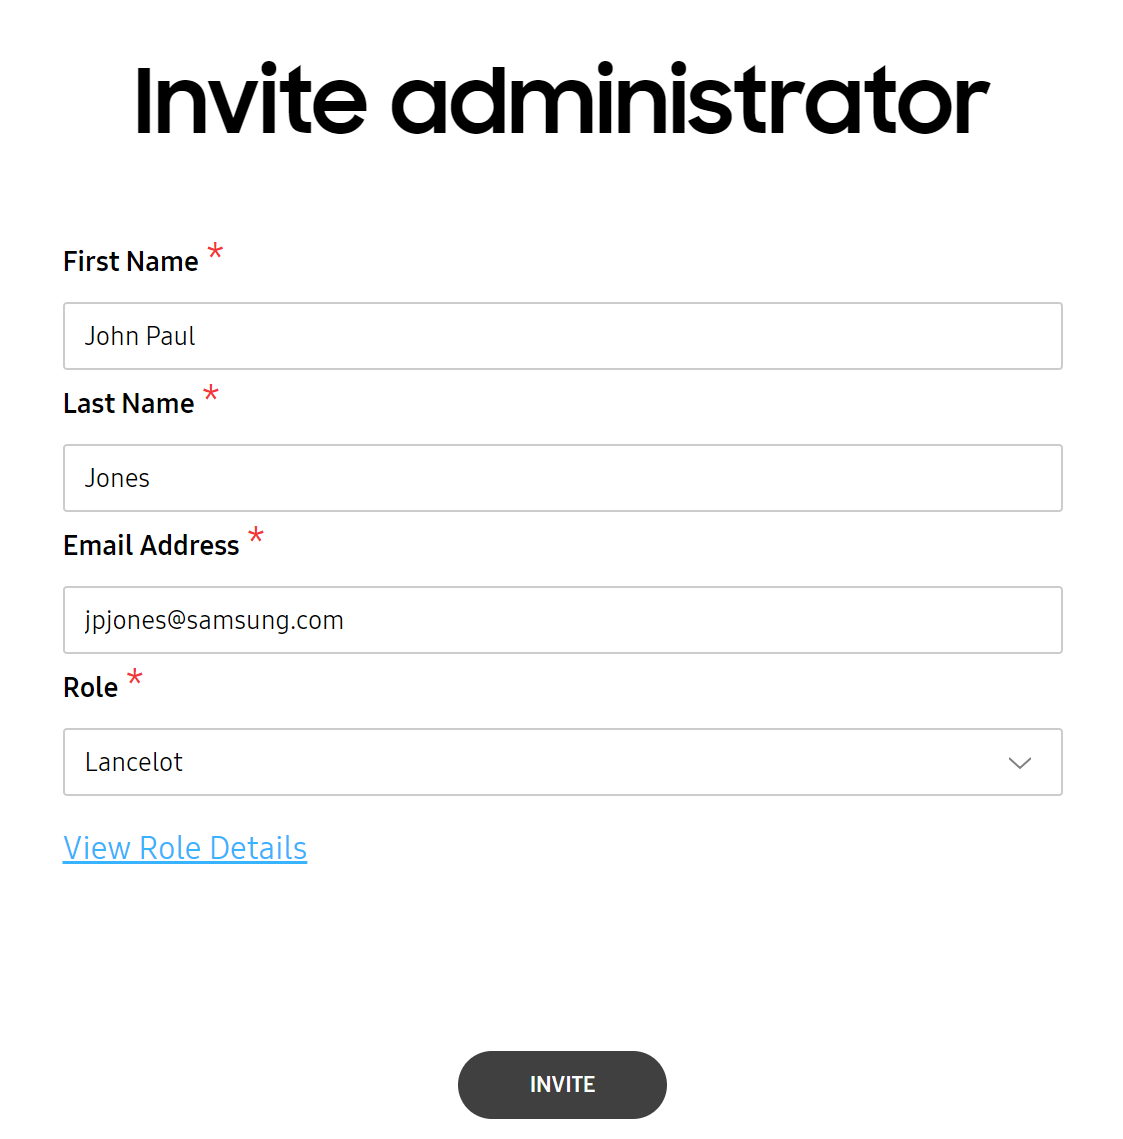
Provide the following to complete an administrator invitation:
- First Name — Provide the first name of the administrator resource for this invitation.
- Last Name — Provide the last name of the administrator resource for this invitation.
- Email — If this email is not already associated with a Samsung Account, the user will have to create a Samsung Account before logging in to Knox Configure. The creation of a Samsung account is required before an administrative account can be created. Samsung Knox does not support personal email addresses for new Knox account requests that have not been registered as a Samsung account. If the administrator’s email is already associated with an active samsungknox.com account, the invitation will fail with an error. Contact Samsung Knox support for assistance resolving the error.
- Role — Use the drop-down menu to assign this new administrator a role that is appropriate to their intended administrative function. If unsure about the exact permissions of an available role, select View Role Details to review the scope of its available permissions.
Samsung Knox does not support personal email addresses for new Knox account requests that have not been registered as a Samsung account. However, they can be invited as additional admins.
-
Select INVITE when completed. The newly added, but pending, administrator displays by name, with their name displaying as a link that can be selected to update the administrator name and company management designation. If editing the administrator’s profile, select Save.
Edit or delete a role
Existing roles can be modified or deleted as their configurations warrant update or deletion from administrator assignment.
To edit or delete an existing role:
-
Select Administrators & Roles from the left-hand navigation menu.
-
Ensure the ROLES tab is displayed.
-
Select a role whose configuration requires deletion and removal from Knox Configure.
-
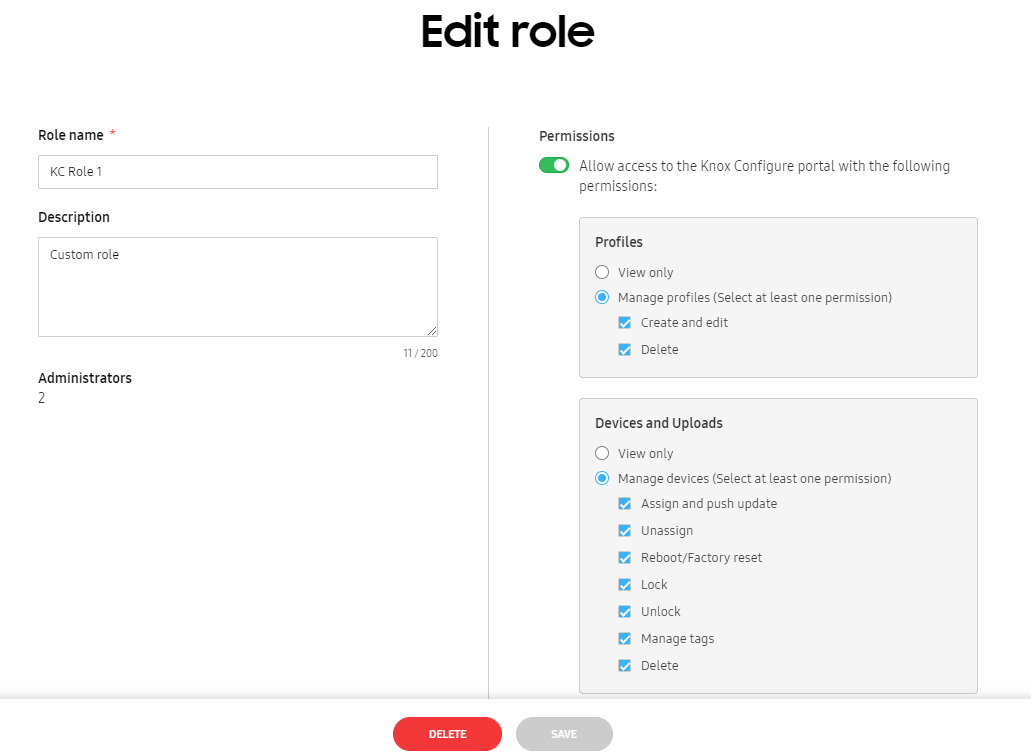
Either edit the configuration of the existing role and select SAVE, or select the DELETE button at the bottom of the screen to permanently remove the role.
Optionally revise the existing Role name and Description. When permissions require restriction to view only access for certain permission areas, consider selecting the View only option. Once assigned, no profile configuration, device management, license, or reseller administration is permitted, just view only access. If there are administrators currently using this role and screen displays stating the administrators assigned this role will receive updated permissions based on your role revisions. Select CONFIRM to proceed.
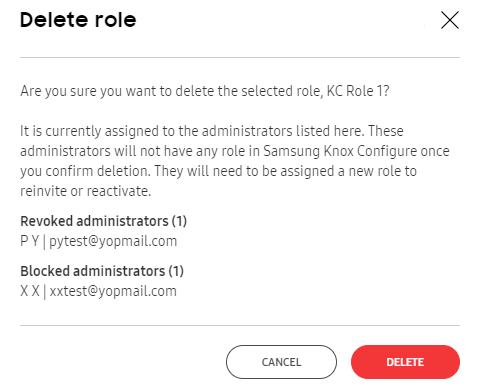
When deleting a role with administrators already assigned, existing administrators assigned to a role intended for deletion must be re-assigned to another role before the deletion can proceed. Any pending, revoked, or blocked admins assigned the deleted role are assigned a role of NoRole. Select the DELETE button to proceed with the role deletion.
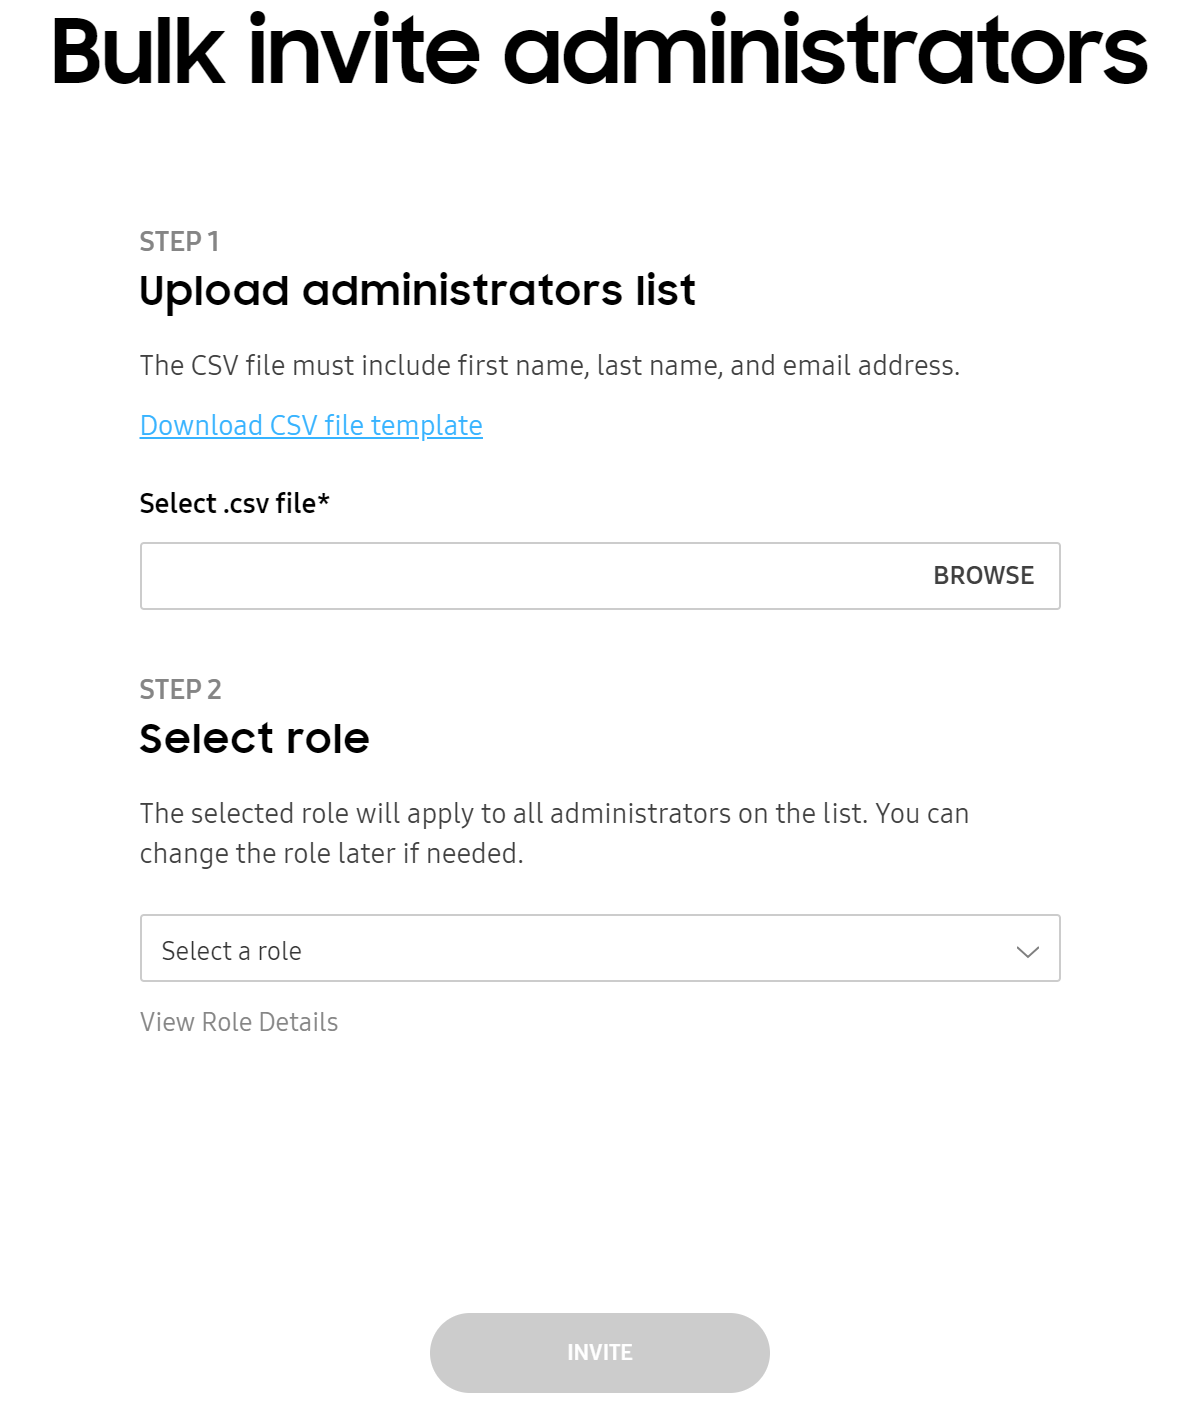
Bulk invite admins
Administrators can be invited in bulk by uploading a properly formatted CSV file to the console.
To bulk invite admins:
-
Select Administrators & Roles from the left-hand navigation menu.
-
Select the INVITE ADMINISTRATOR button from the top right-hand side of the screen.
-
Click Invite multiple administrators from the Invite administrators screen.
-
Browse to the location of a properly formatted CSV file containing the correct information for administrator uploads. If unsure how to format a CSV file for administrator uploads, select the Download CSV file template link. The template displays the following guidance for preparing the CSV file.
- Before uploading the CSV, please erase the explanation line beginning with #.
- The row: First name, Last name, Email address is the header row and cannot be deleted.
- Next row will contain information of admins that you want to invite.
- Each row below header need to have first name, last name and email, separated by a comma.
- First and last names cannot contain numeric characters.
- Email address should follow valid format as name@domain.
- Each field can have maximum 60 characters.
-
Use the Role drop-down menu to select the role to apply to each administrator in the CSV file. Once the administrators are uploaded to the console, their roles can be changed as required.
-
Select INVITE to initiate the administrator upload. The newly added, but pending, administrators display by name, with their names displaying as links that can be selected to update their administrator names and company management designations.
When trying to set up bulk invites using a CSV file for users in the unified Knox Admin Portal, first and last name fields cannot use the following 10 special characters: = + @ < > { } ( ). Whenever these special characters are used, the console notifies through an error log.
On this page
Is this page helpful?