Knox ML Encryption Tool
Installation
-
Log in to Knox Developer Dashboard > Download.
-
Download one of the following:
-
Knox ML encryption tool — Linux
Supported OS version — Ubuntu 20.04
-
Knox ML encryption tool — Windows
Supported OS version — Windows 10
-
-
Run the executable. On Linux, follow below steps to run the Knox ML Encryption Tool:
-
Unzip
KnoxMLEncryptionToolLinuxV1.2.zip. -
Change the permission and run the setup.
> chmod 777 setup.sh > sudo./setup.sh -
Run the Tool from Desktop icon.
-
UI parameters
To generate the encrypted neural model package, following inputs from the user are required:
| Input field | Required | Explanation | Supported Format |
|---|---|---|---|
| ML file format | Yes | List of Model formats to choose from. The user need to select format of the Raw model which will be encrypted. Currently supported model formats are tflite, tensorflow, caffe, keras, coreML, and PyTorch. |
|
| ONNX conversion | Yes |
Select whether you want to convert to ONNX format. * CoreML, Keras, PyTorch format is required to convert to ONNX format as mandatory |
|
| Package Version | Yes | An integer value that is the version of the encrypted model package. | An integer in the range 1 - 4294967296 |
| Allowed Apps List and Certificate Hash | Yes | List of allowed packages that can load the model along with Hash of the signing certificate used to sign the APK which will be allowed to load and execute the model. |
|
Supported software packages
Following are the software packages and its versions supported by Knox ML Encryption 1.2 tool.
| Software Packages | Libraries | Supported Version |
|---|---|---|
| Keras | keras | 2.4.3 |
| keras2onnx | 1.7.0 | |
| Onnx | onnx | 1.9.0 |
| onnxmltools | 1.7.0 | |
| Scikit | scikit-learn(linux) | 1.0 |
| scikit-learn(windows) | 0.24.2 | |
| skl2onnx(linux) | 1.9.3 | |
| skl2onnx(windows) | 1.9.3 | |
| TensorFlow | tensorflow | 2.3.0 |
| tf2onnx | 1.9.1 | |
| Tflite | tflite | 2.4.0 |
| PyTorch | torch | 1.9.0 |
Encrypt files
To encrypt your ML model, open the Knox ML Encryption Tool on your computer and do as follows depending on the tool’s version. To see which version you can use depending on device, refer to Knox ML Encryption Tool Revision.
Model Encryption Tool V1.1 steps
-
Click Get Started.
-
(Optional) click Settings icon and select the path where you want to save the encrypted model.
-
Click Utility option next to Settings icon. Browse and select the certificate file used to sign the APK and click Generate Hash.
-
Click Copy Hash and add it to the Allowed Apps List along side of the package name for the App.
-
Return to Encrypt Screen and add plain ML Model file and its package version.
-
Enter Model Package version and add Allowed_Apps List under Set Model Policy section. Refer to Template option for proper format.
-
Click Encrypt. The KMLPKG file is created.
-
Click View File button to view the encrypted package file.
Model Encryption Tool V1.2 steps
Tool Configurations
Before encryption, you need to do some configurations. In the image, Action 1 shows the Settings tab, Action 2 shows the Utility tab, and Action 3 shows the Resource Manager tab.
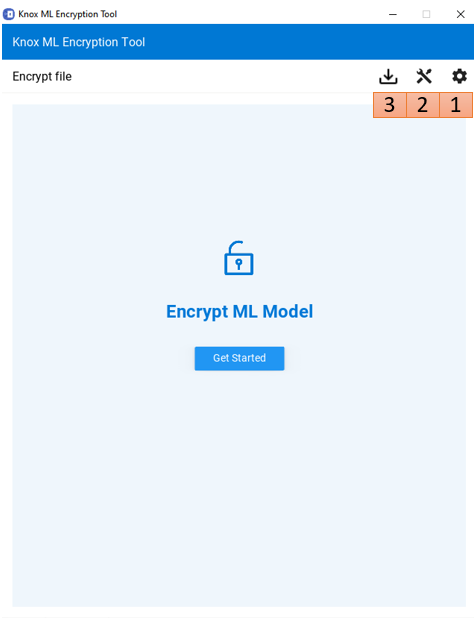
Settings Tab
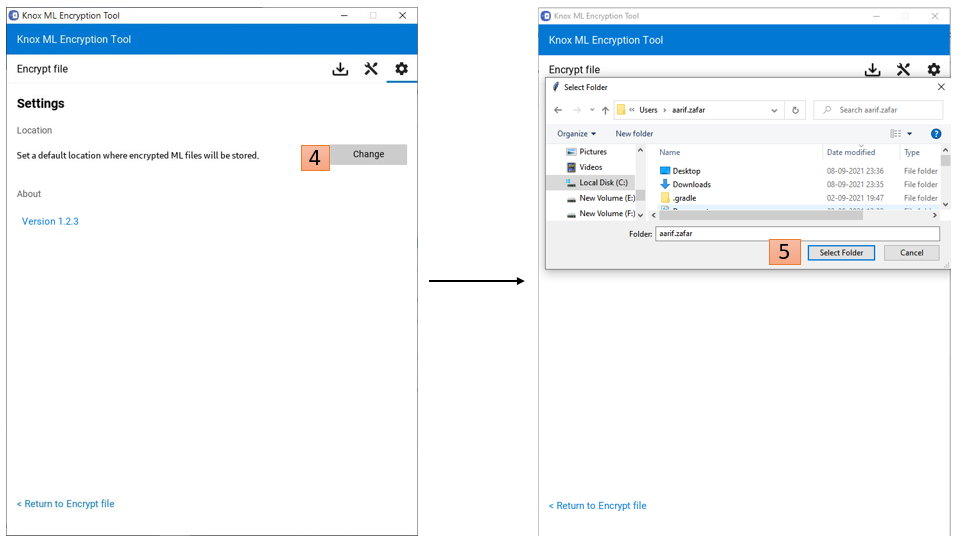
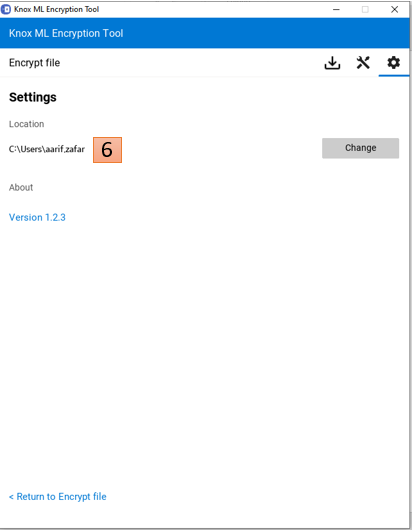
In the Settings tab, you can choose the location to save the encrypted models. If you do not select any location, the encrypted model is saved at the same location as the raw model. Action 4 in in the image shows the Change button to click first and Action 5 shows the Select folder button after browsing to the desired location. Action 6 shows the selected location under Location.
Utility Tab
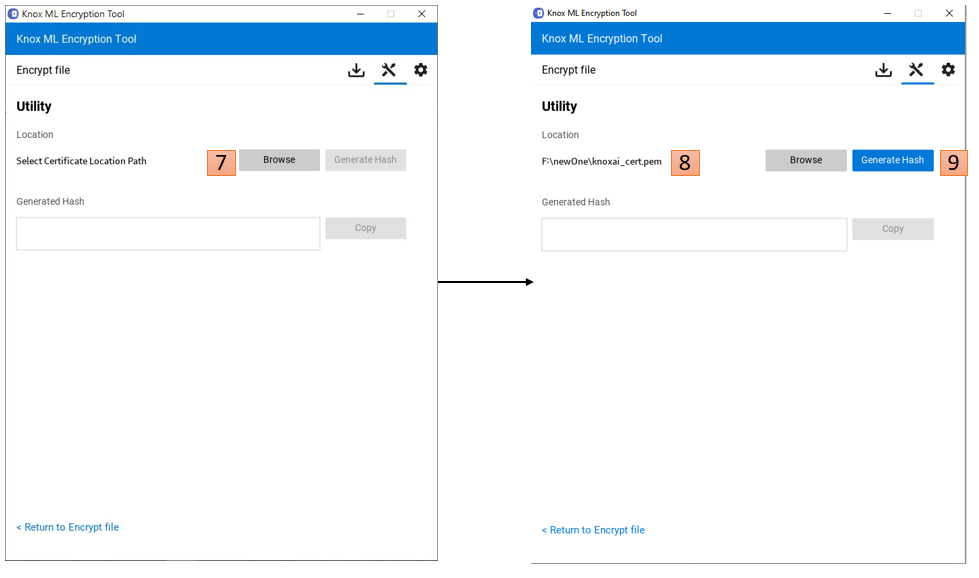
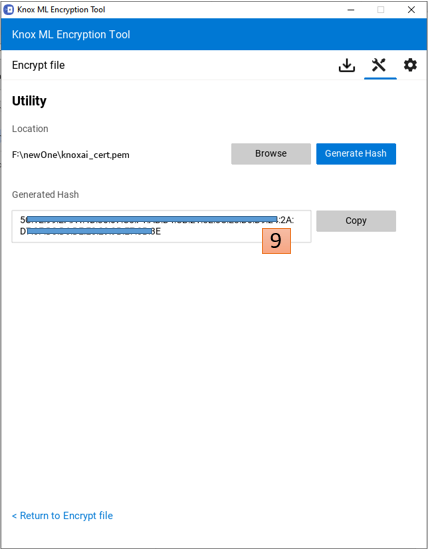
In the Utility tab you can choose the certificate used to sign the APK and generate hash which is used during packaging after model encryption. Action 7 in the image shows the Browse button to choose this certificate file. After choosing the certificate, its path is visible under Location shown by Action 8. Action 9 shows the Generate Hash button. After hash generation, hash code is visible in Generated Hash box. Click Copy to copy Hash and add it to the Allowed Apps List along side of the package name for the App.
Resource Manager Tab
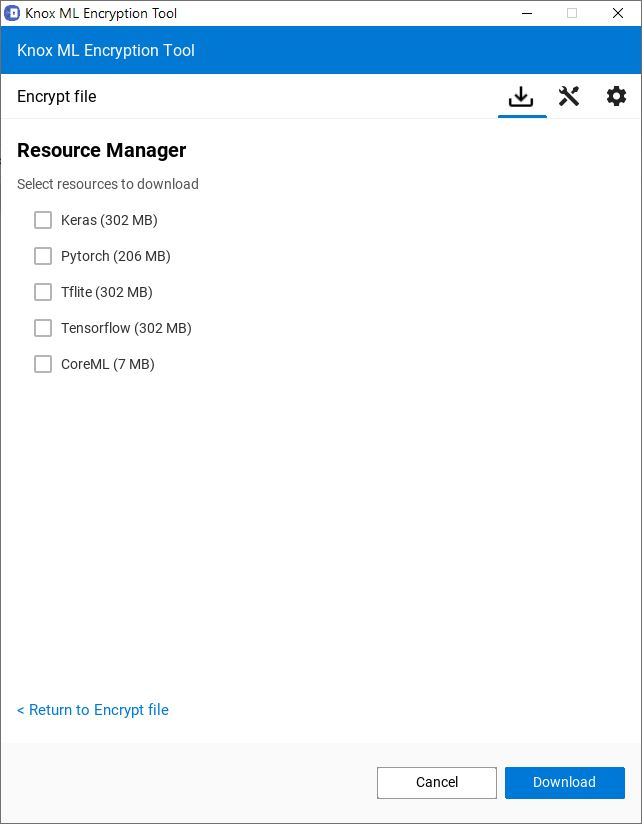
In the Resource Manager tab you can download resources required for conversion of models to ONNX. This is a one-time process and once downloaded, the resources will remain downloaded. Alternatively, resources can be downloaded during encryption, as and when required.
-
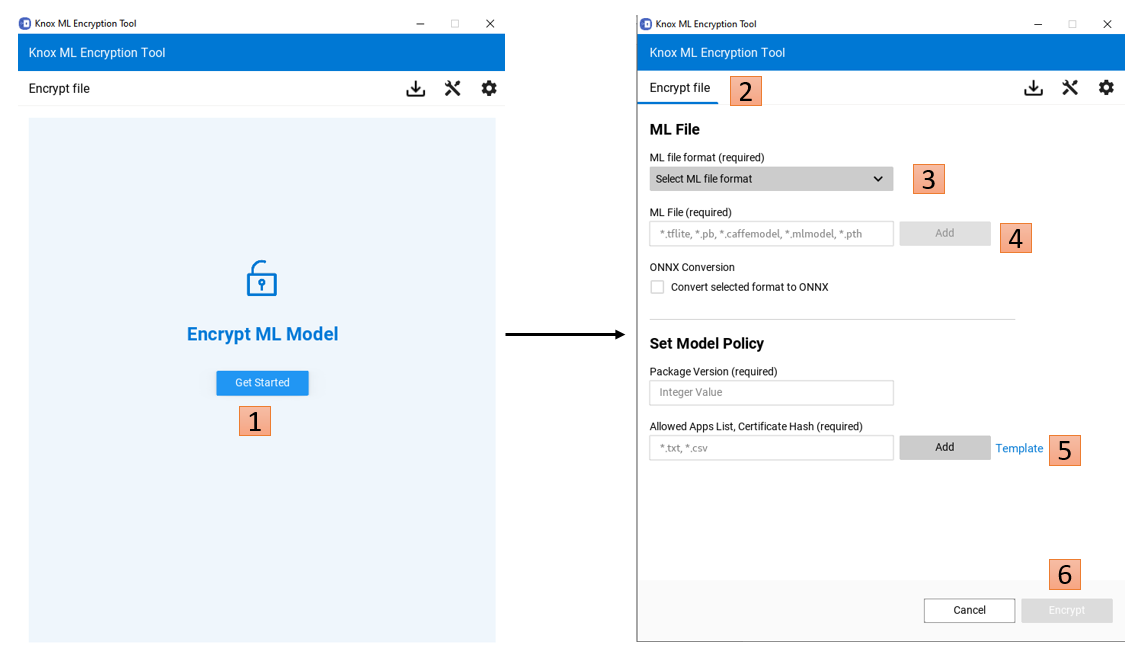
Click Get Started button as shown in Action 1 in the image. Action 2 shows the Encrypt file highlighted with blue underline, Action 3 shows the ML File format button, and Action 4 displays the disabled Add button.
-
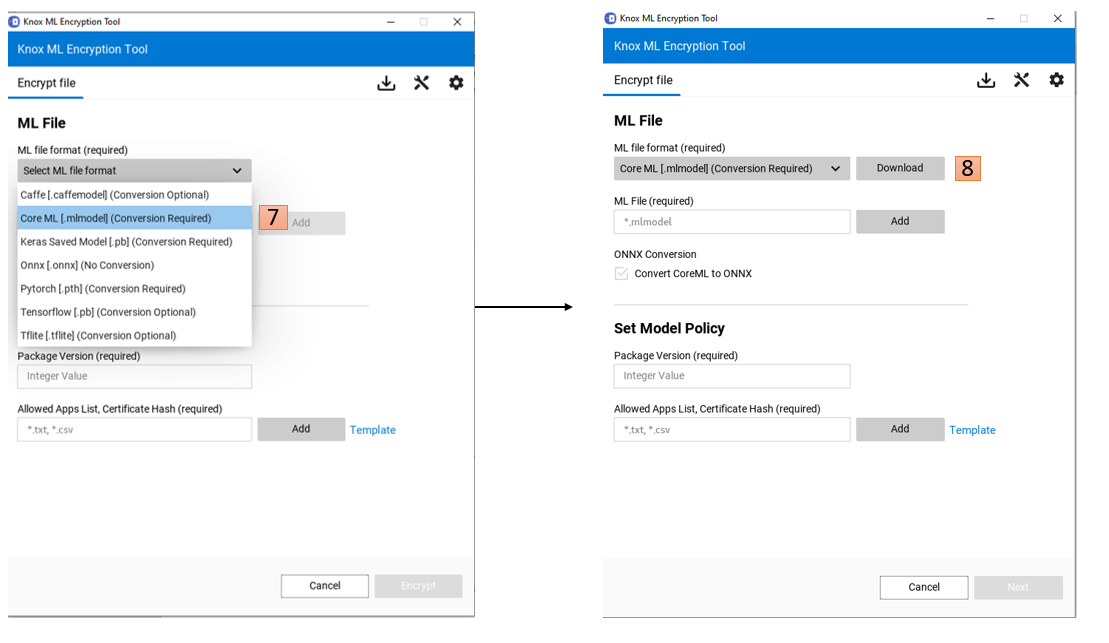
Select Model type from drop down list as demonstrated by Action 7 and download the resources required to convert ML model to ONNX model type as demonstrated by Action 8.
-
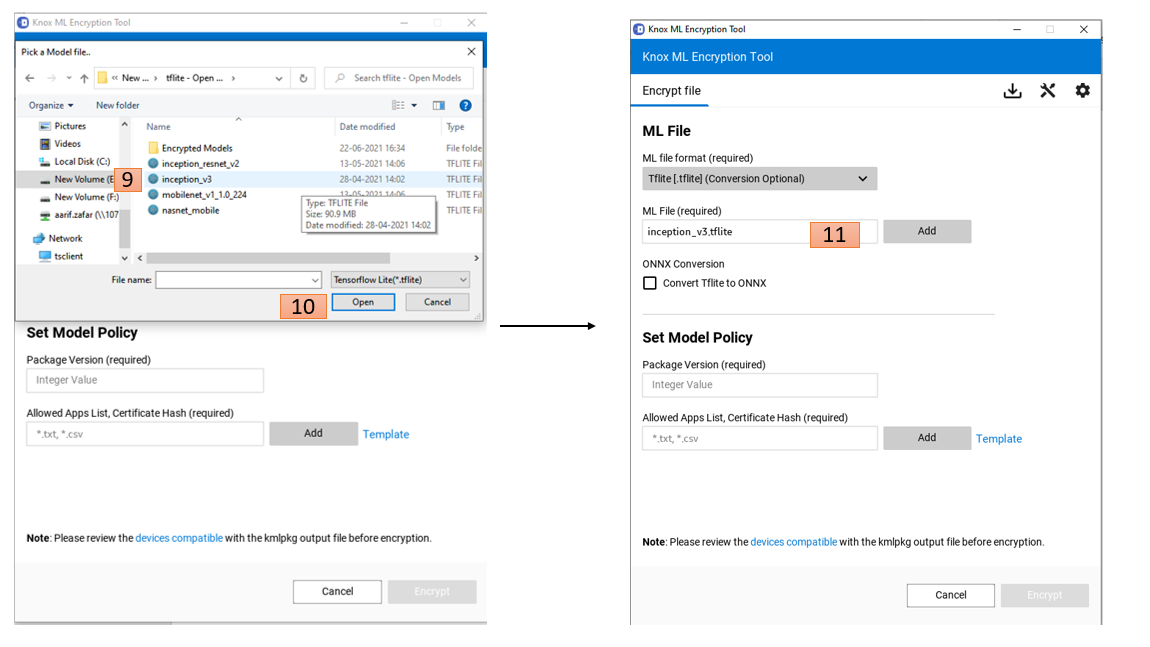
Click the Add button as demonstrated in Action 4. This opens up the file browser. Select the appropriate file as indicated in Action 9 and after the selection, click Open as indicated in Action 10. The name of the selected file is visible in the ML File field as shown in Action 11.
-
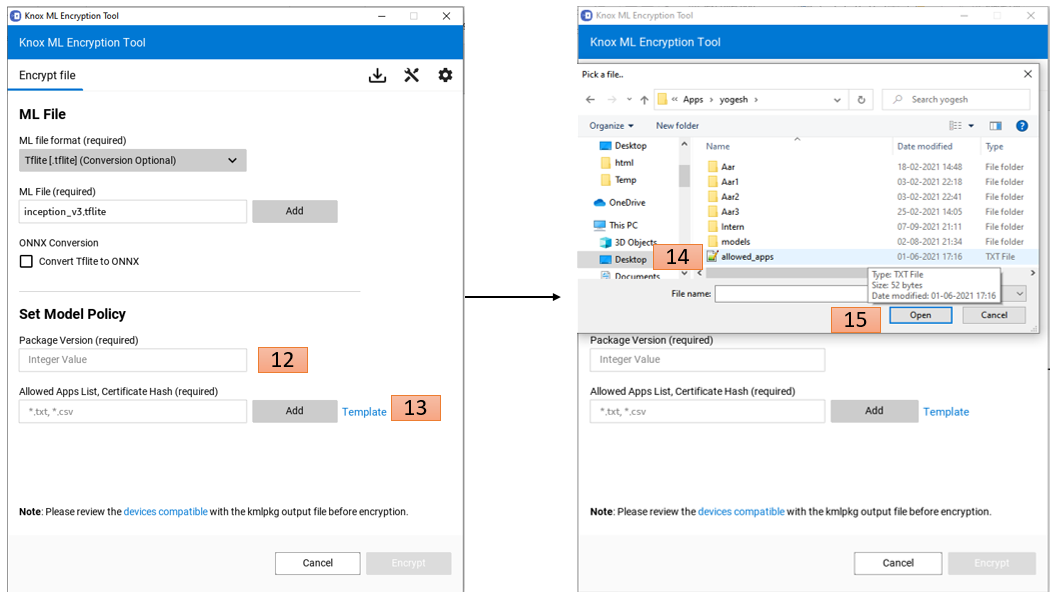
Add the package name as demonstrated in Action 12. To select Allowed Apps List click the Add button as in Action 13. A file browser pops up. Select the appropriate list and click Open as demonstrated in the Action 14 and 15.
-
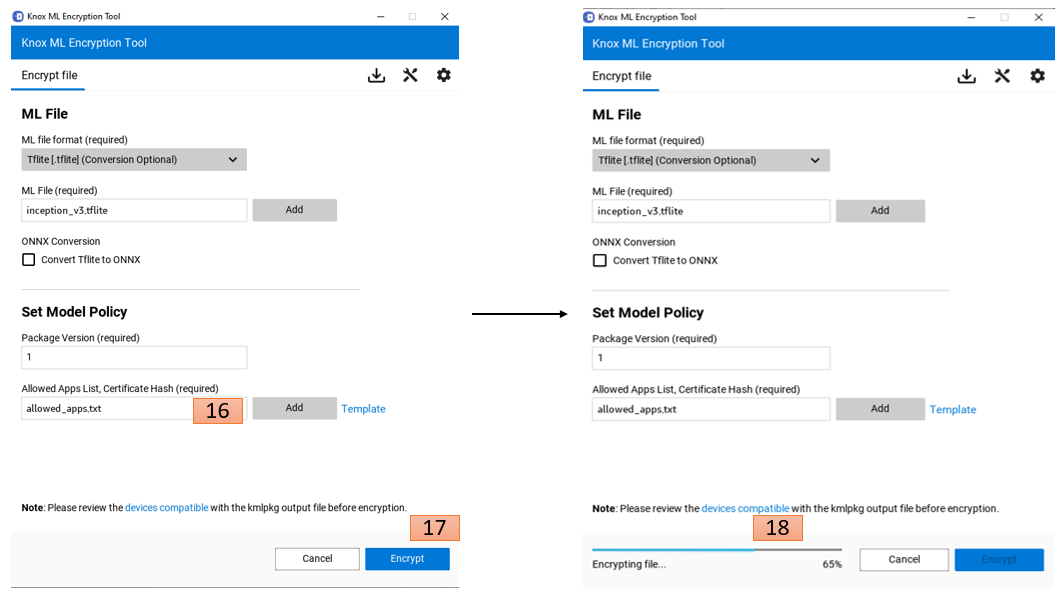
The allowed apps list file name is visible in the Allowed Apps field as demonstrated in Action 16. If ONNX conversion option is selected, Click the Next button and provide input parameters required for ONNX conversion, otherwise click the Encrypt button as demonstrated in Action 17, and encryption process starts as demonstrated in Action 18.
-
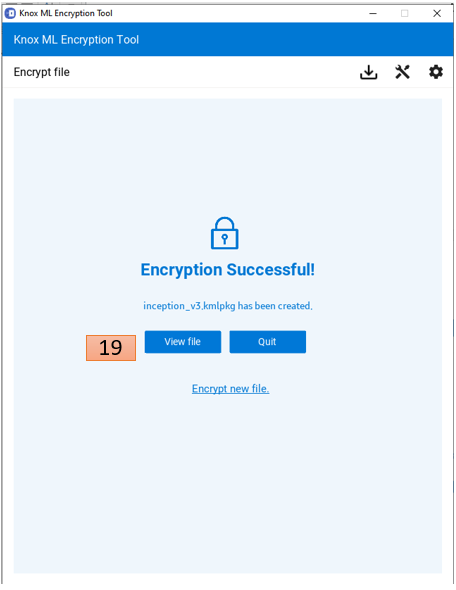
As the encryption is completed you are redirected to the Encryption Successful!. Your encrypted model package is generated in the folder specified. Clicking on View file as shown in Action 19 takes you to the generated package.
Types of Encrypted Knox ML output packages
You can generate following two types of Knox ML packages:
-
KONPKG — This ONNX converted-ML model package format is supported by Knox ML Encryption Tool v1.2 onwards. This format is currently supported in devices with SDK 3.8 with KnoxML version v1.2 or higher.
-
KMLPKG — This ML model package format is supported by Knox ML Encryption Tool v1.1 onwards. This format is currently supported in devices with SDK 3.7.1 with KnoxML version v1.1 or higher.
To find out what Knox version your device is on, go to Settings > About phone > Software information > Knox version.
Deploy encrypted package to app
You can deploy the generated model package by keeping it in the application assets folder. Knox SDK provides the APIs to load the model in the application run-time.
To load the Model package in the application run-time, make a File Descriptor (FD) or create a data buffer of the package—if the package is present in the assets of the application—and call the subsequent API. To learn more about the development process, see model protection deployment, but ensure that you have the Knox SDK installed before you do so.
Troubleshooting
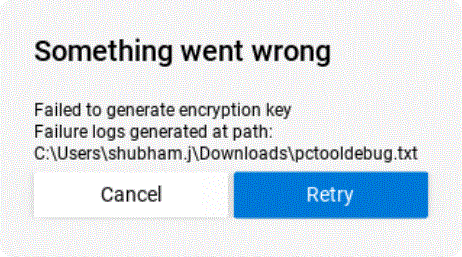
If you run into any errors, a failure log is generated. You can create a support ticket through your Knox Partner Portal > Support. Attach the failure log with the ticket and describe the issue in detail so that we can reproduce it to fix the error.
On this page
Is this page helpful?