Configure Sentinel
Last updated April 28th, 2025
Before Sentinel can collect security telemetry data from your Samsung Galaxy devices, you’ll need to first configure your Azure environment with the Knox Asset Intelligence for Microsoft Sentinel solution, register an Entra ID application, and install a Data connector.
Create solution
The first step in this process is to create the Samsung Knox Asset Intelligence solution in your Azure environment. To do this:
-
Sign into your Azure portal, then search for Samsung Knox Asset Intelligence for Microsoft Sentinel.

-
Review the details of the solution, then click Create.

-
On the next page, select your Azure Resource group and Workspace details, then click the Review + create tab and click Create.

-
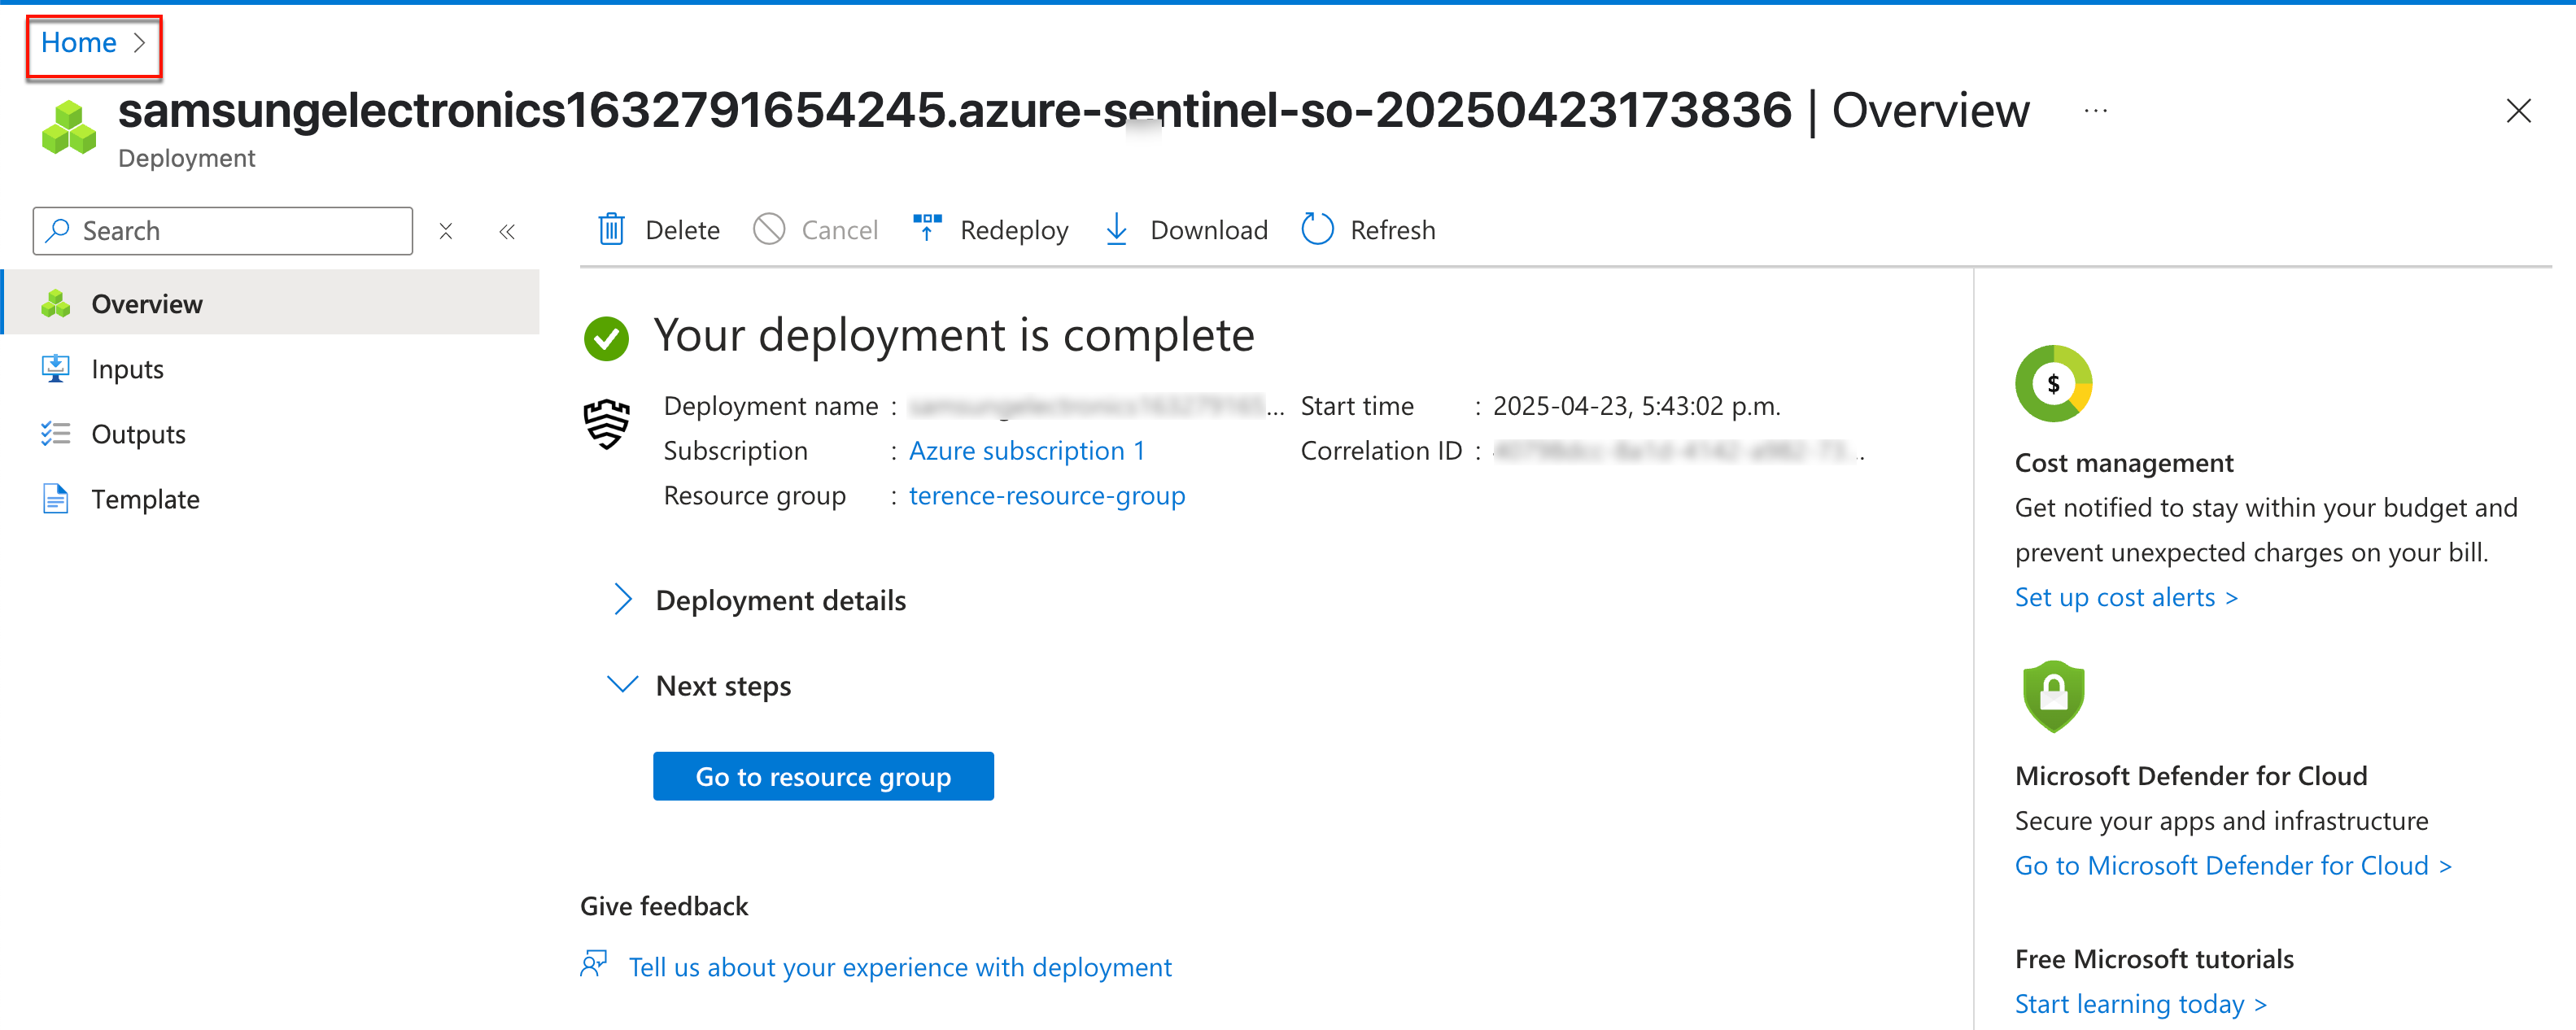
Once your deployment completes, return to your Azure portal home.
Register an Entra ID app
After the solution is created, you’ll need to register an Entra ID application in order to securely transfer data between Knox Asset Intelligence and Sentinel. To do this:
-
Go to your Azure portal home page, then click the Microsoft Entra ID service. On the next page, go to Manage > App registrations in the left navigation pane, then click New registration.

-
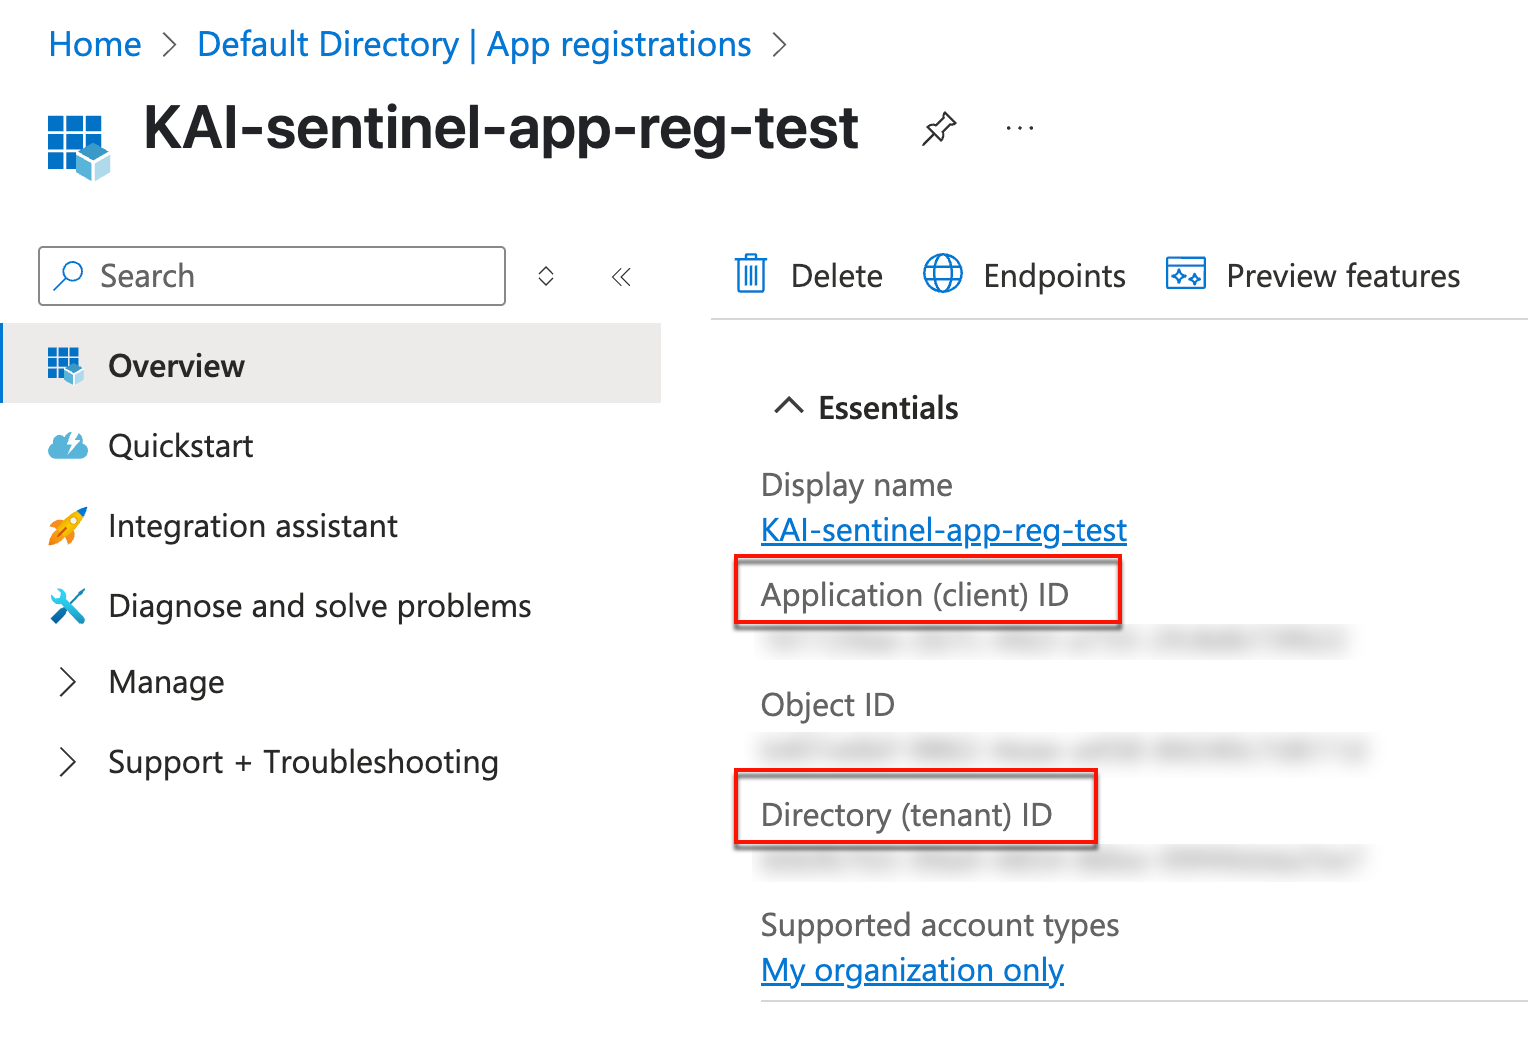
On the Register an application page, provide an app name, then click Register. Once the app is registered, you’ll see the Entra ID app details on an overview page. Copy the Application (client) ID and Directory (tenant) ID to a notepad, as these will be required later in the configuration.
-
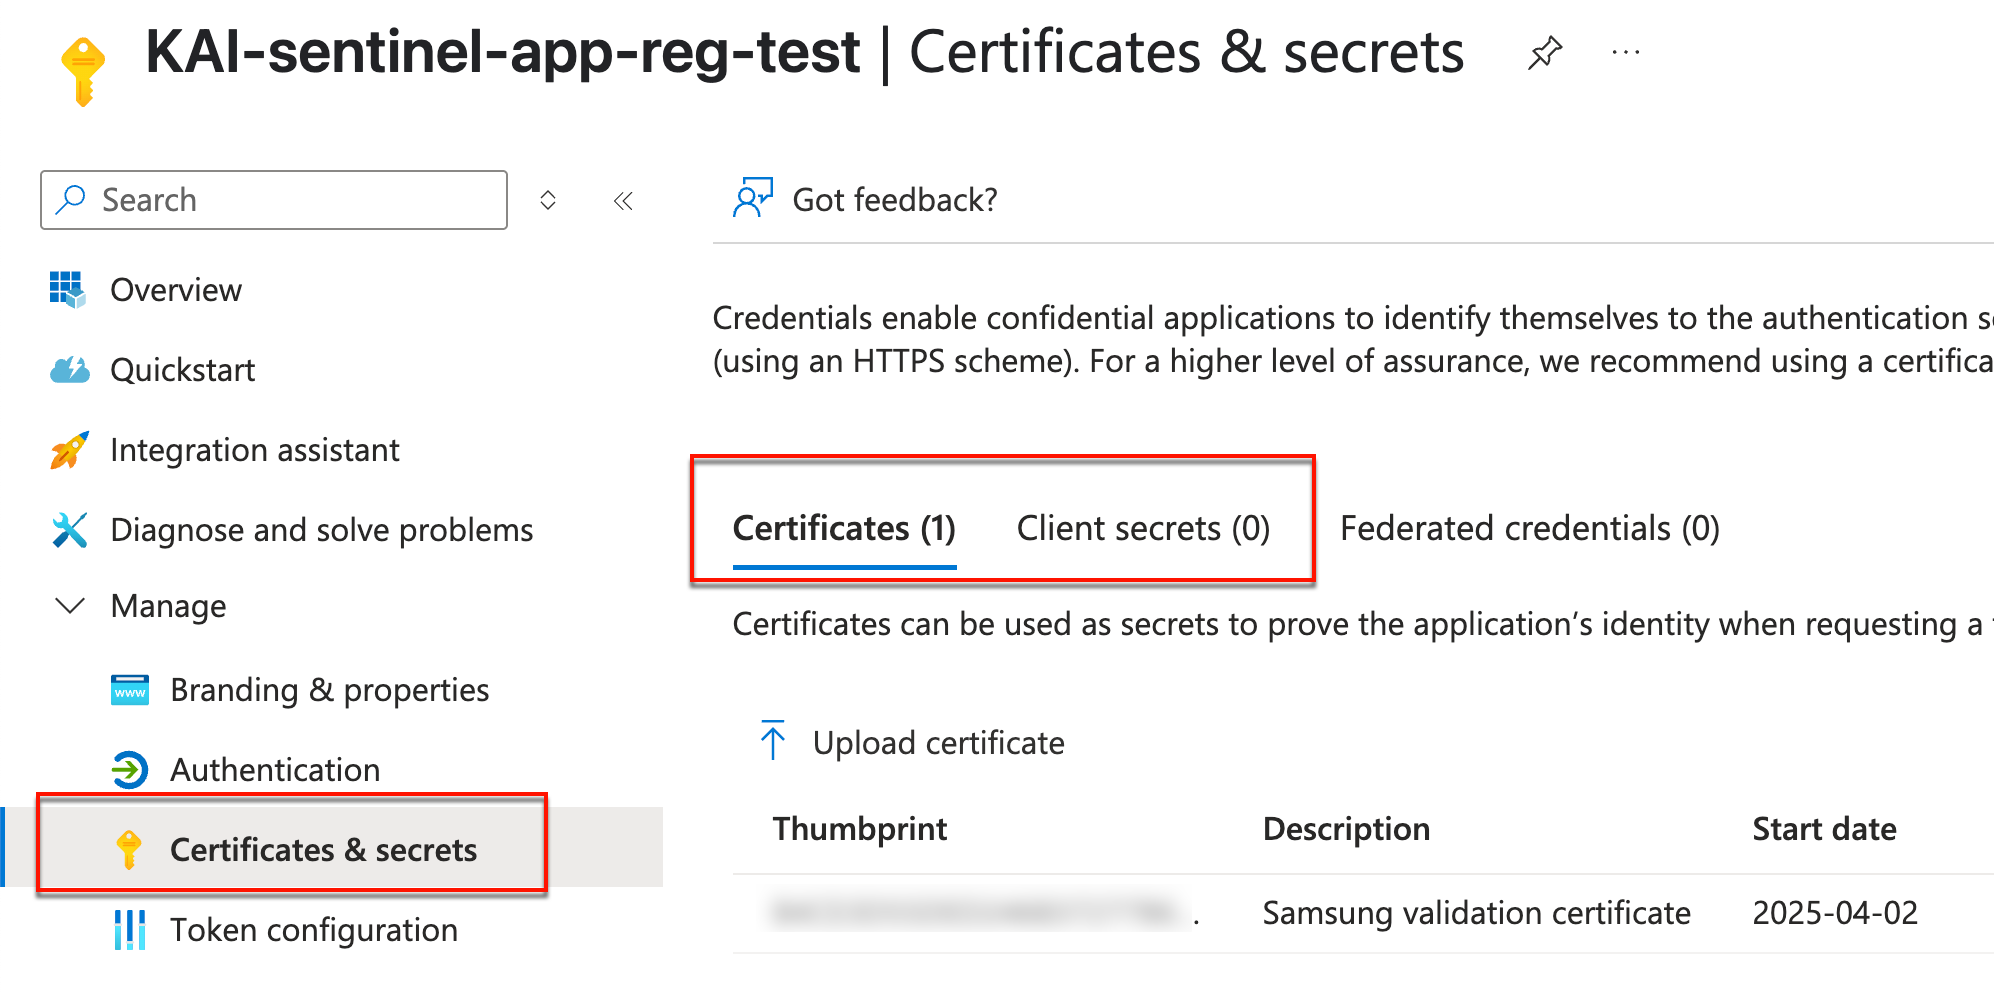
Next, you’ll need to create app credentials to allow Knox Asset Intelligence to authenticate itself in Sentinel. From the same app registration overview page, go to Manage > Certificates & secrets in the left navigation pane. You can either upload a signed Samsung Certificate, or create your own Client secret key.
-
To use a Certificate credential, download the signed certificate, then click the Certificates tab > Upload certificate to add it to your application.
-
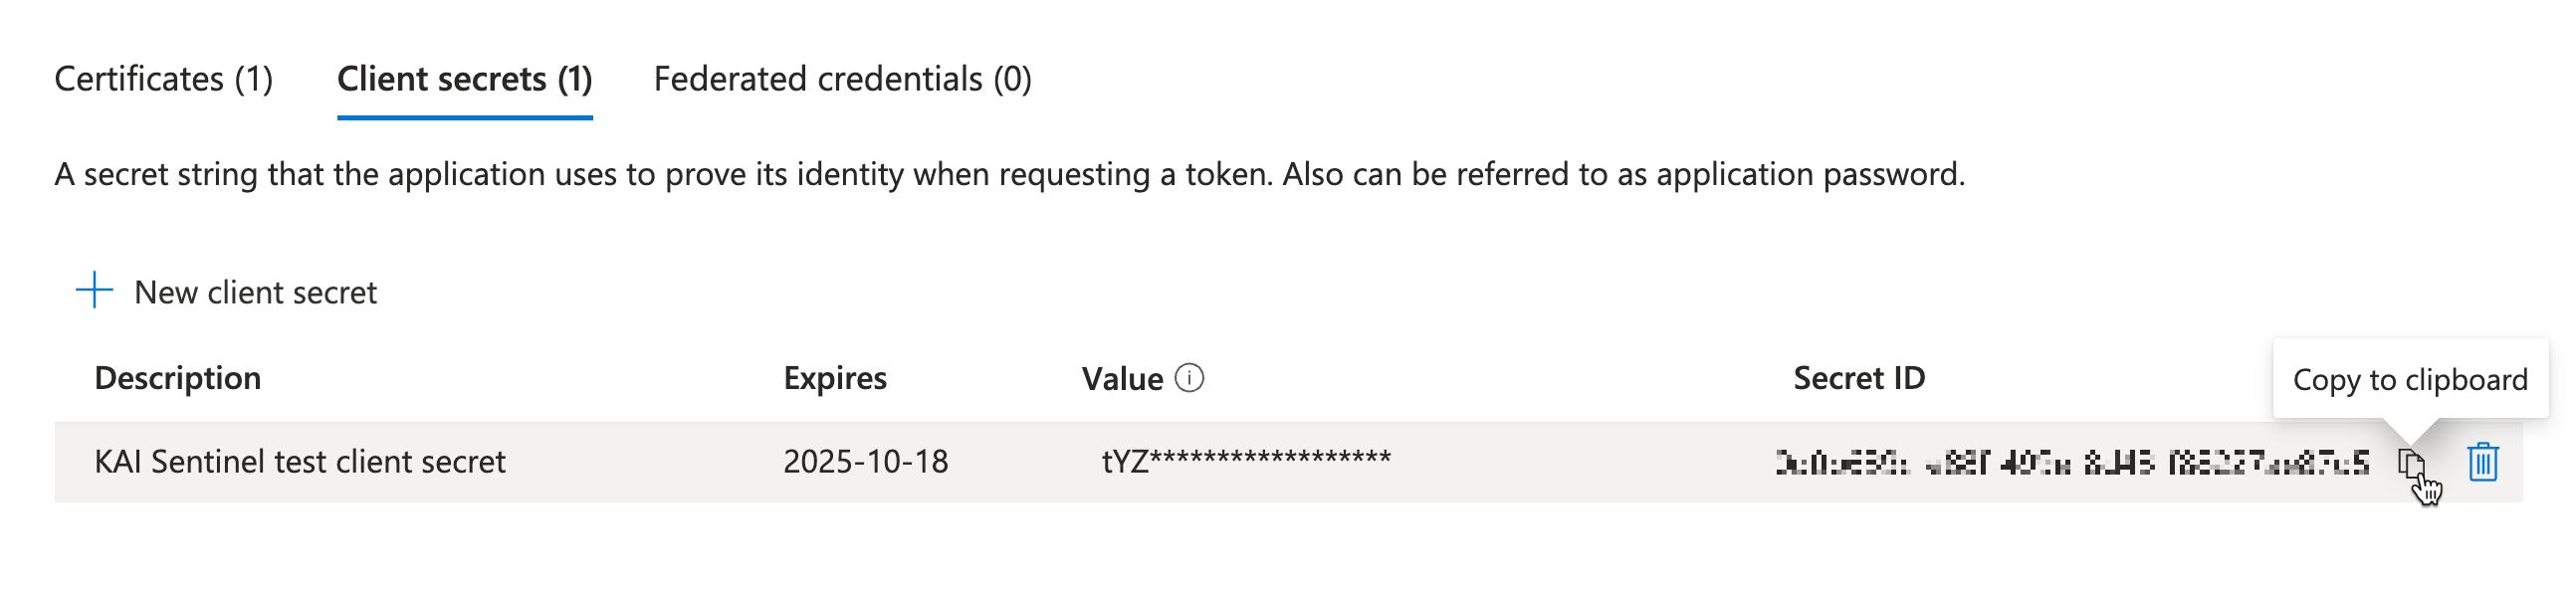
To use a Client secret credential, click the Client secrets tab > New client secret, then provide a description and expiration date for the key. Once the key is added, copy the Secret ID to a notepad, as this will be required later in the configuration if you are using this type of credential to authenticate.
-
Install Data Connector
Once your Entra ID app is registered, the next step in the Sentinel configuration process is to install the Knox Asset Intelligence Data connector. To do this:
-
Go to your Azure portal home page, then click the Microsoft Sentinel service.
-
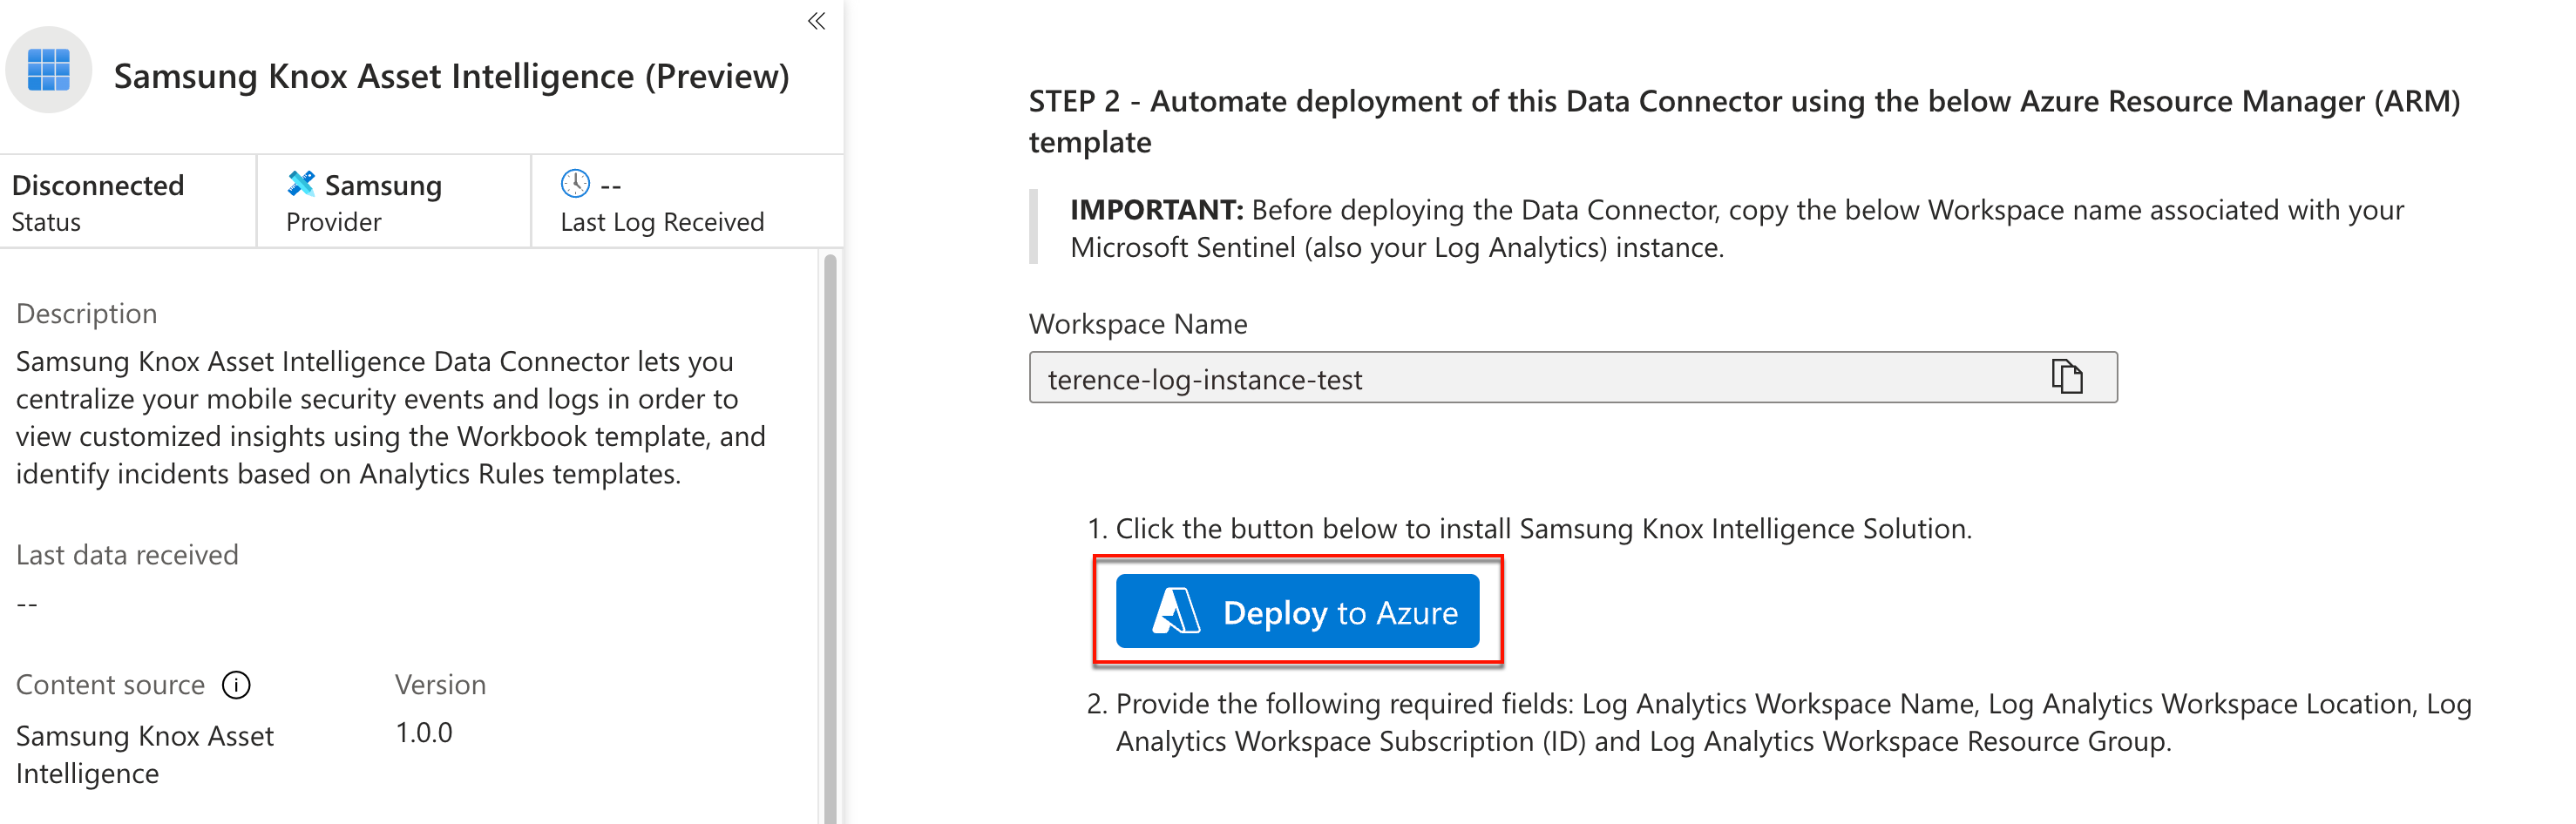
On the next page, Click your Sentinel instance name, then click Data connectors. On the list of available connectors, click Samsung Knox Asset Intelligence, then in the side panel, click Open connector page.

-
On next page, go to the Configuration section, then click Deploy to Azure, then click Apply.
-
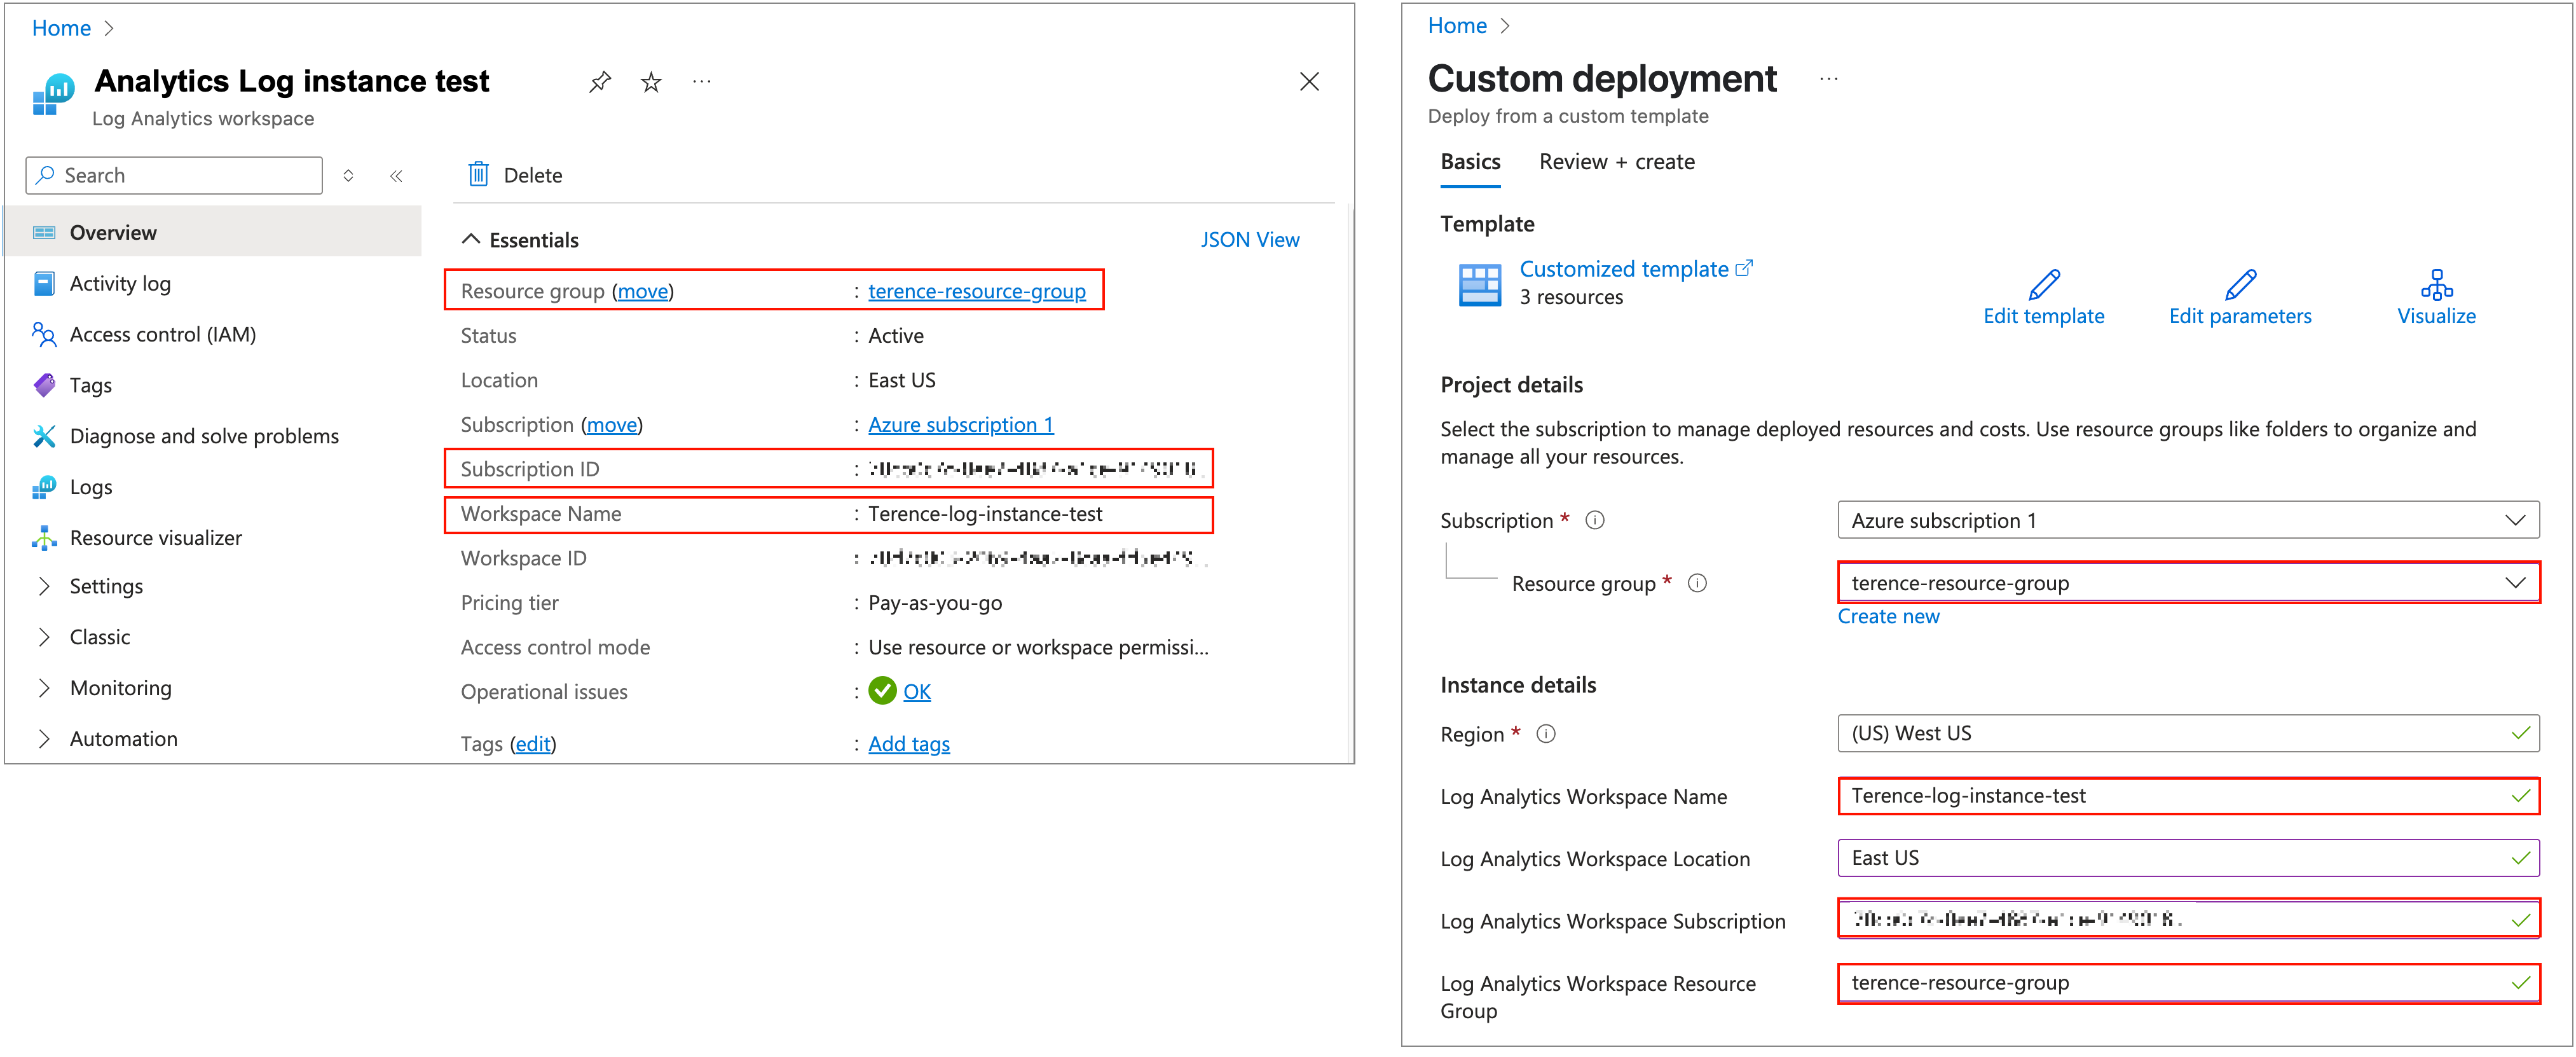
On the Custom deployment page, fill out the fields in the Data connector template with the information from your Log Analytics workspace instance, then click Review + create, then click Create.
The Custom deployment template’s Log Analytics Workspace Subscription field is mapped to the Log Analytics Workspace Subscription ID, and not the Subscription name.
Copy Data connector information
Once the Data connector is created, you’ll need to configure your access control settings and copy some key information to a notepad. This information will be required during the Knox Asset Intelligence configuration step. To do this:
-
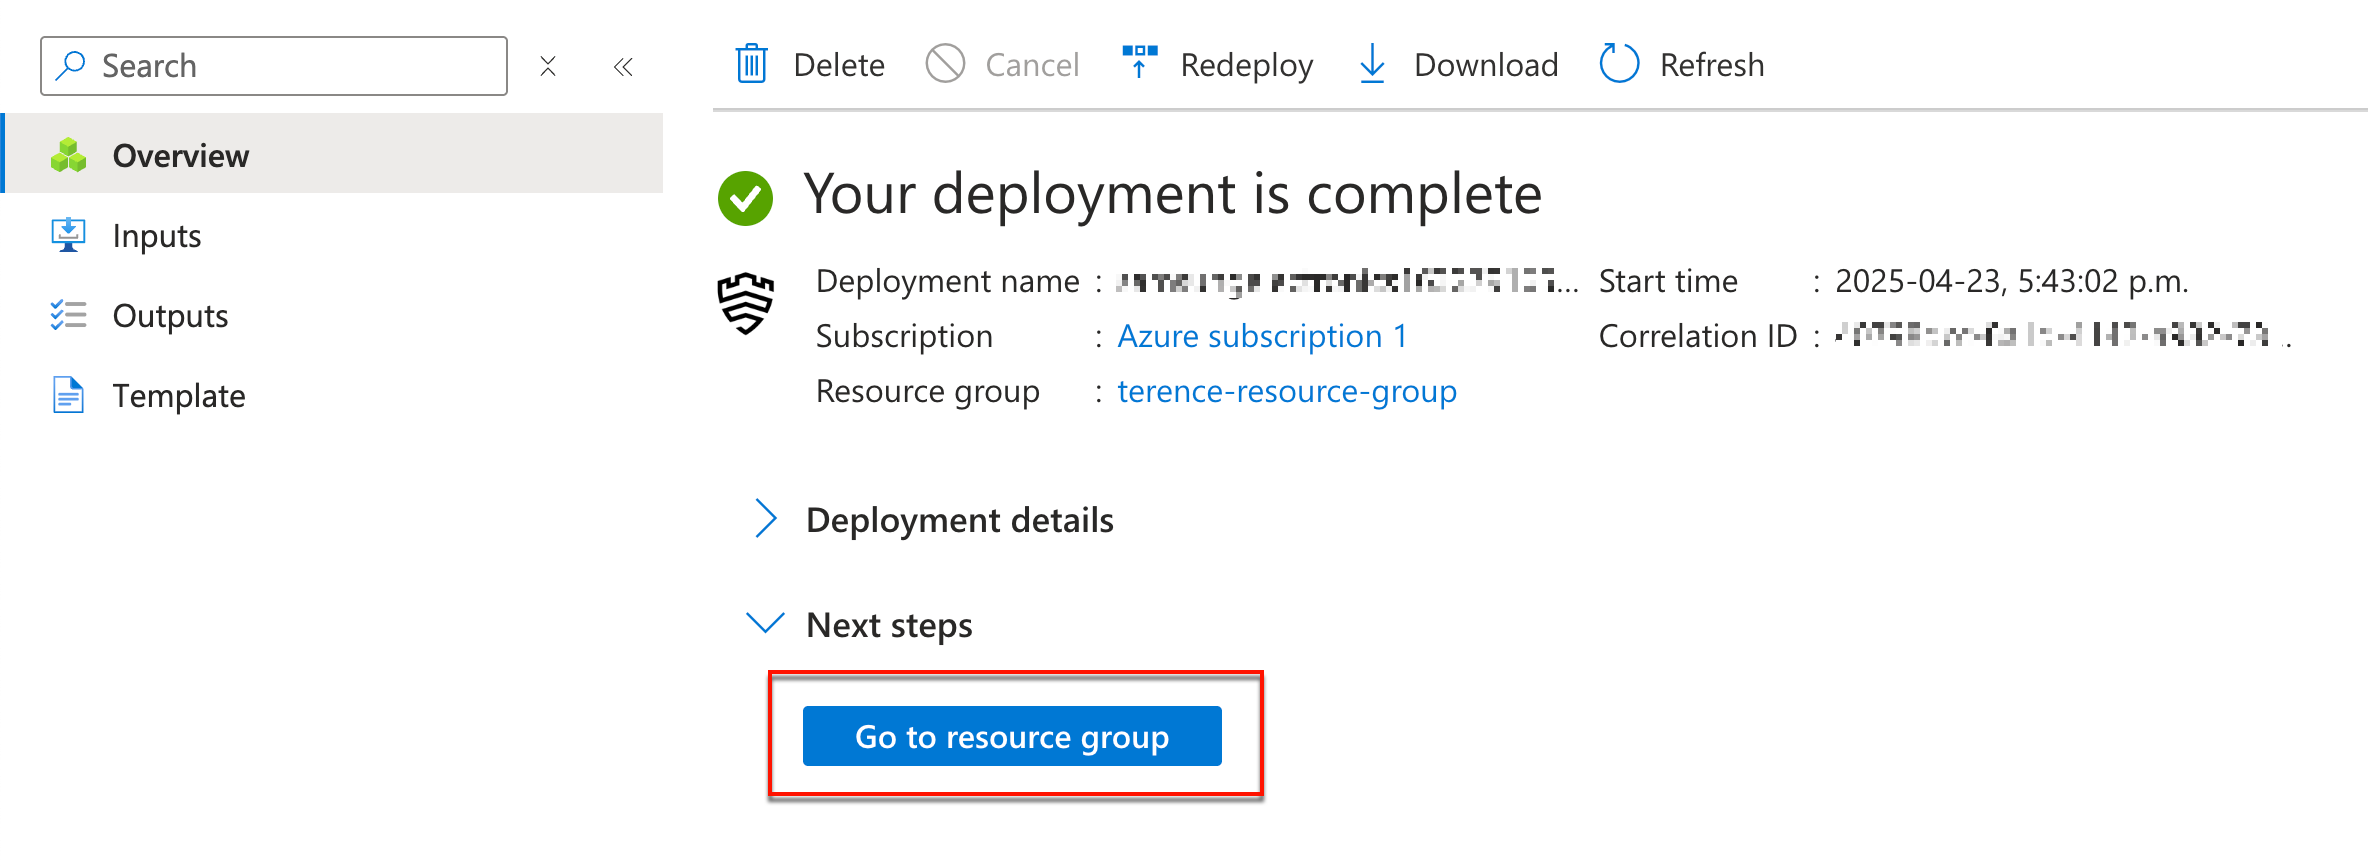
Click Go to resource group to return to your resource group’s Overview page.
-
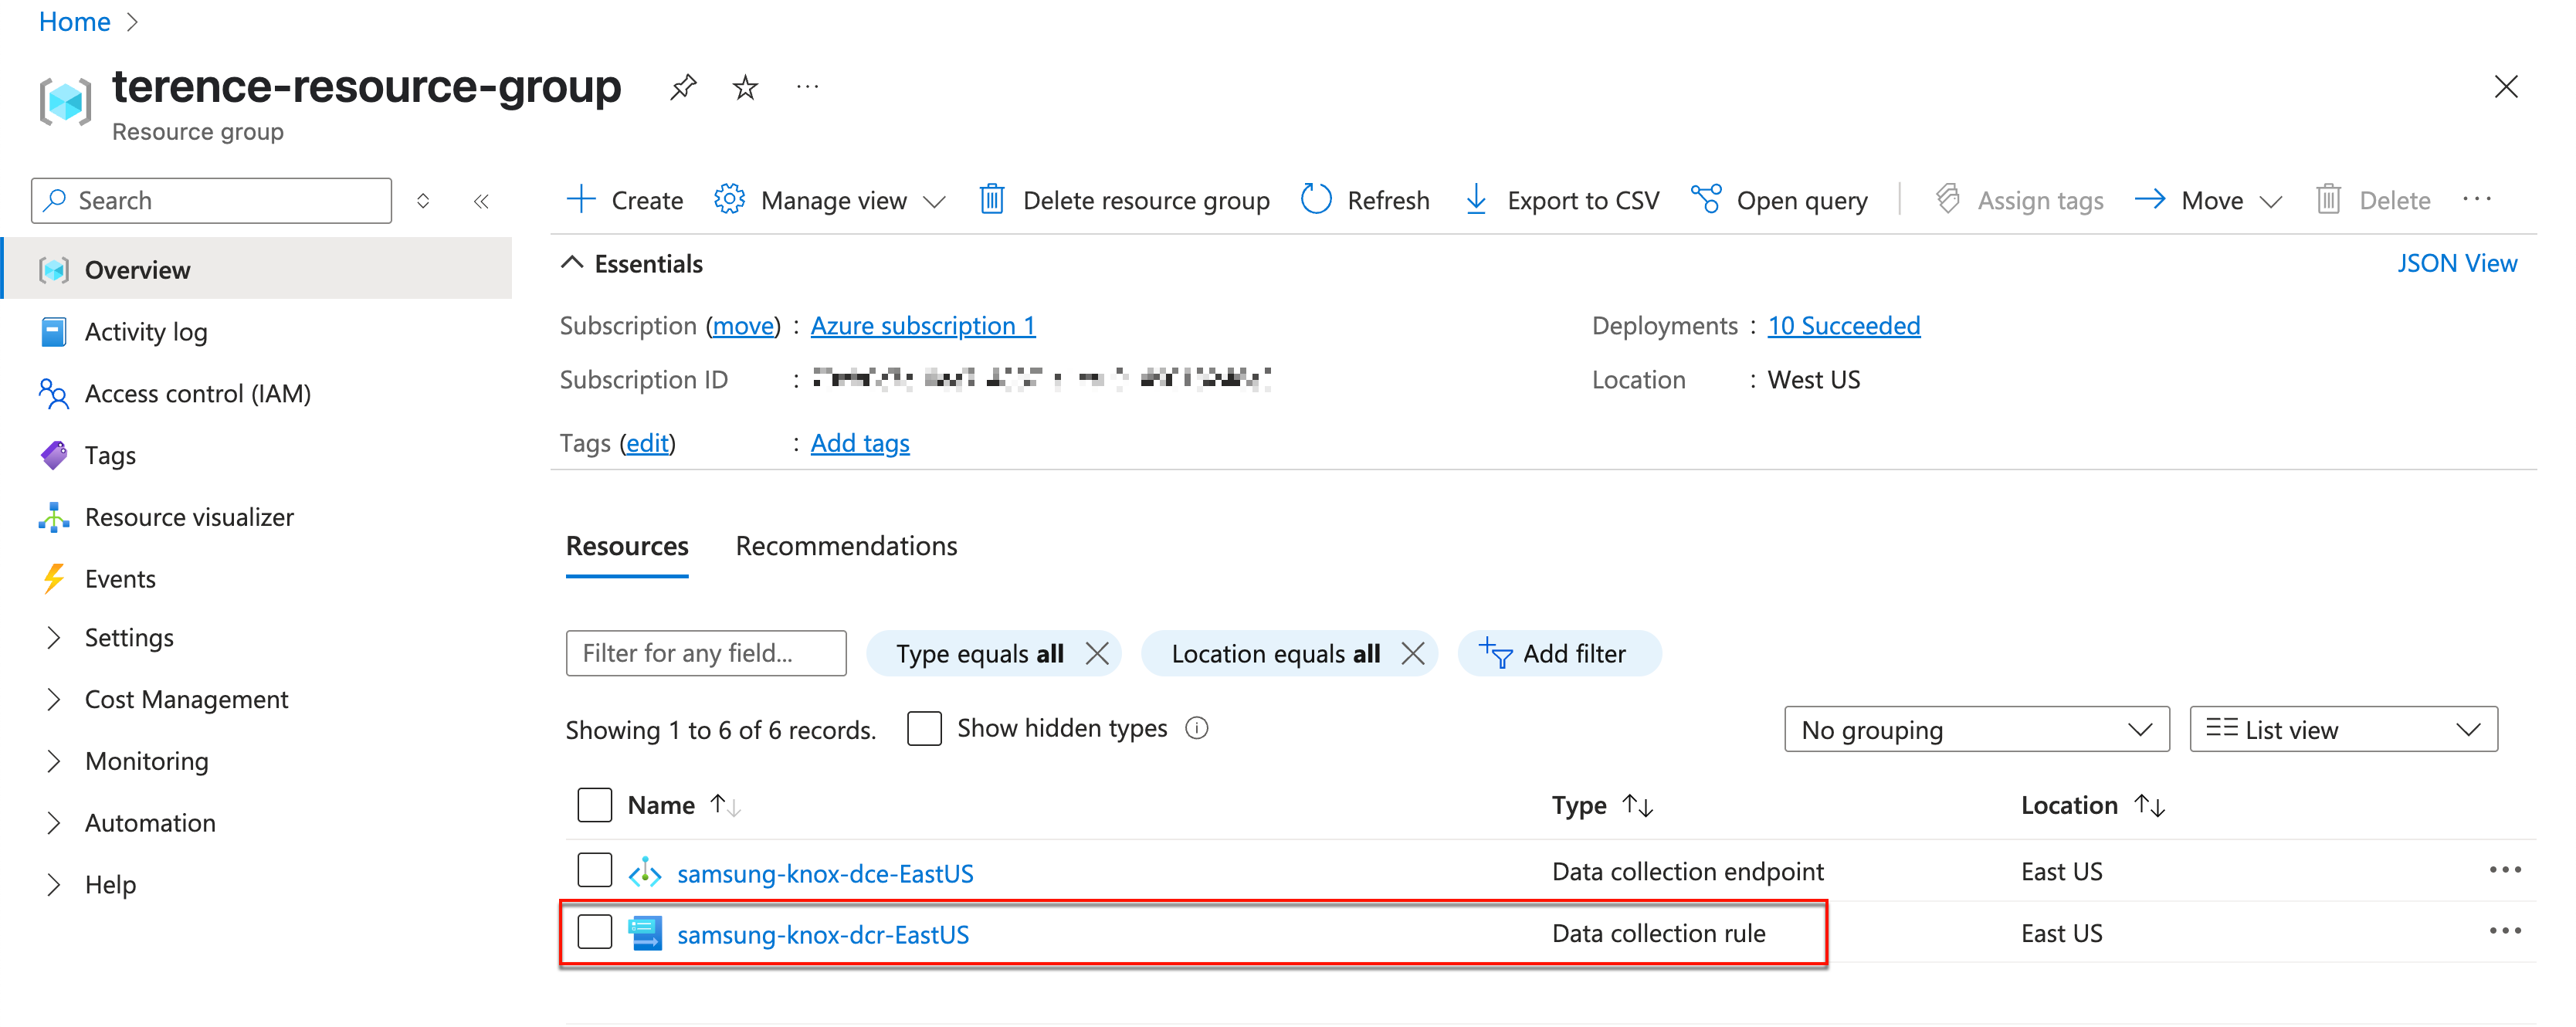
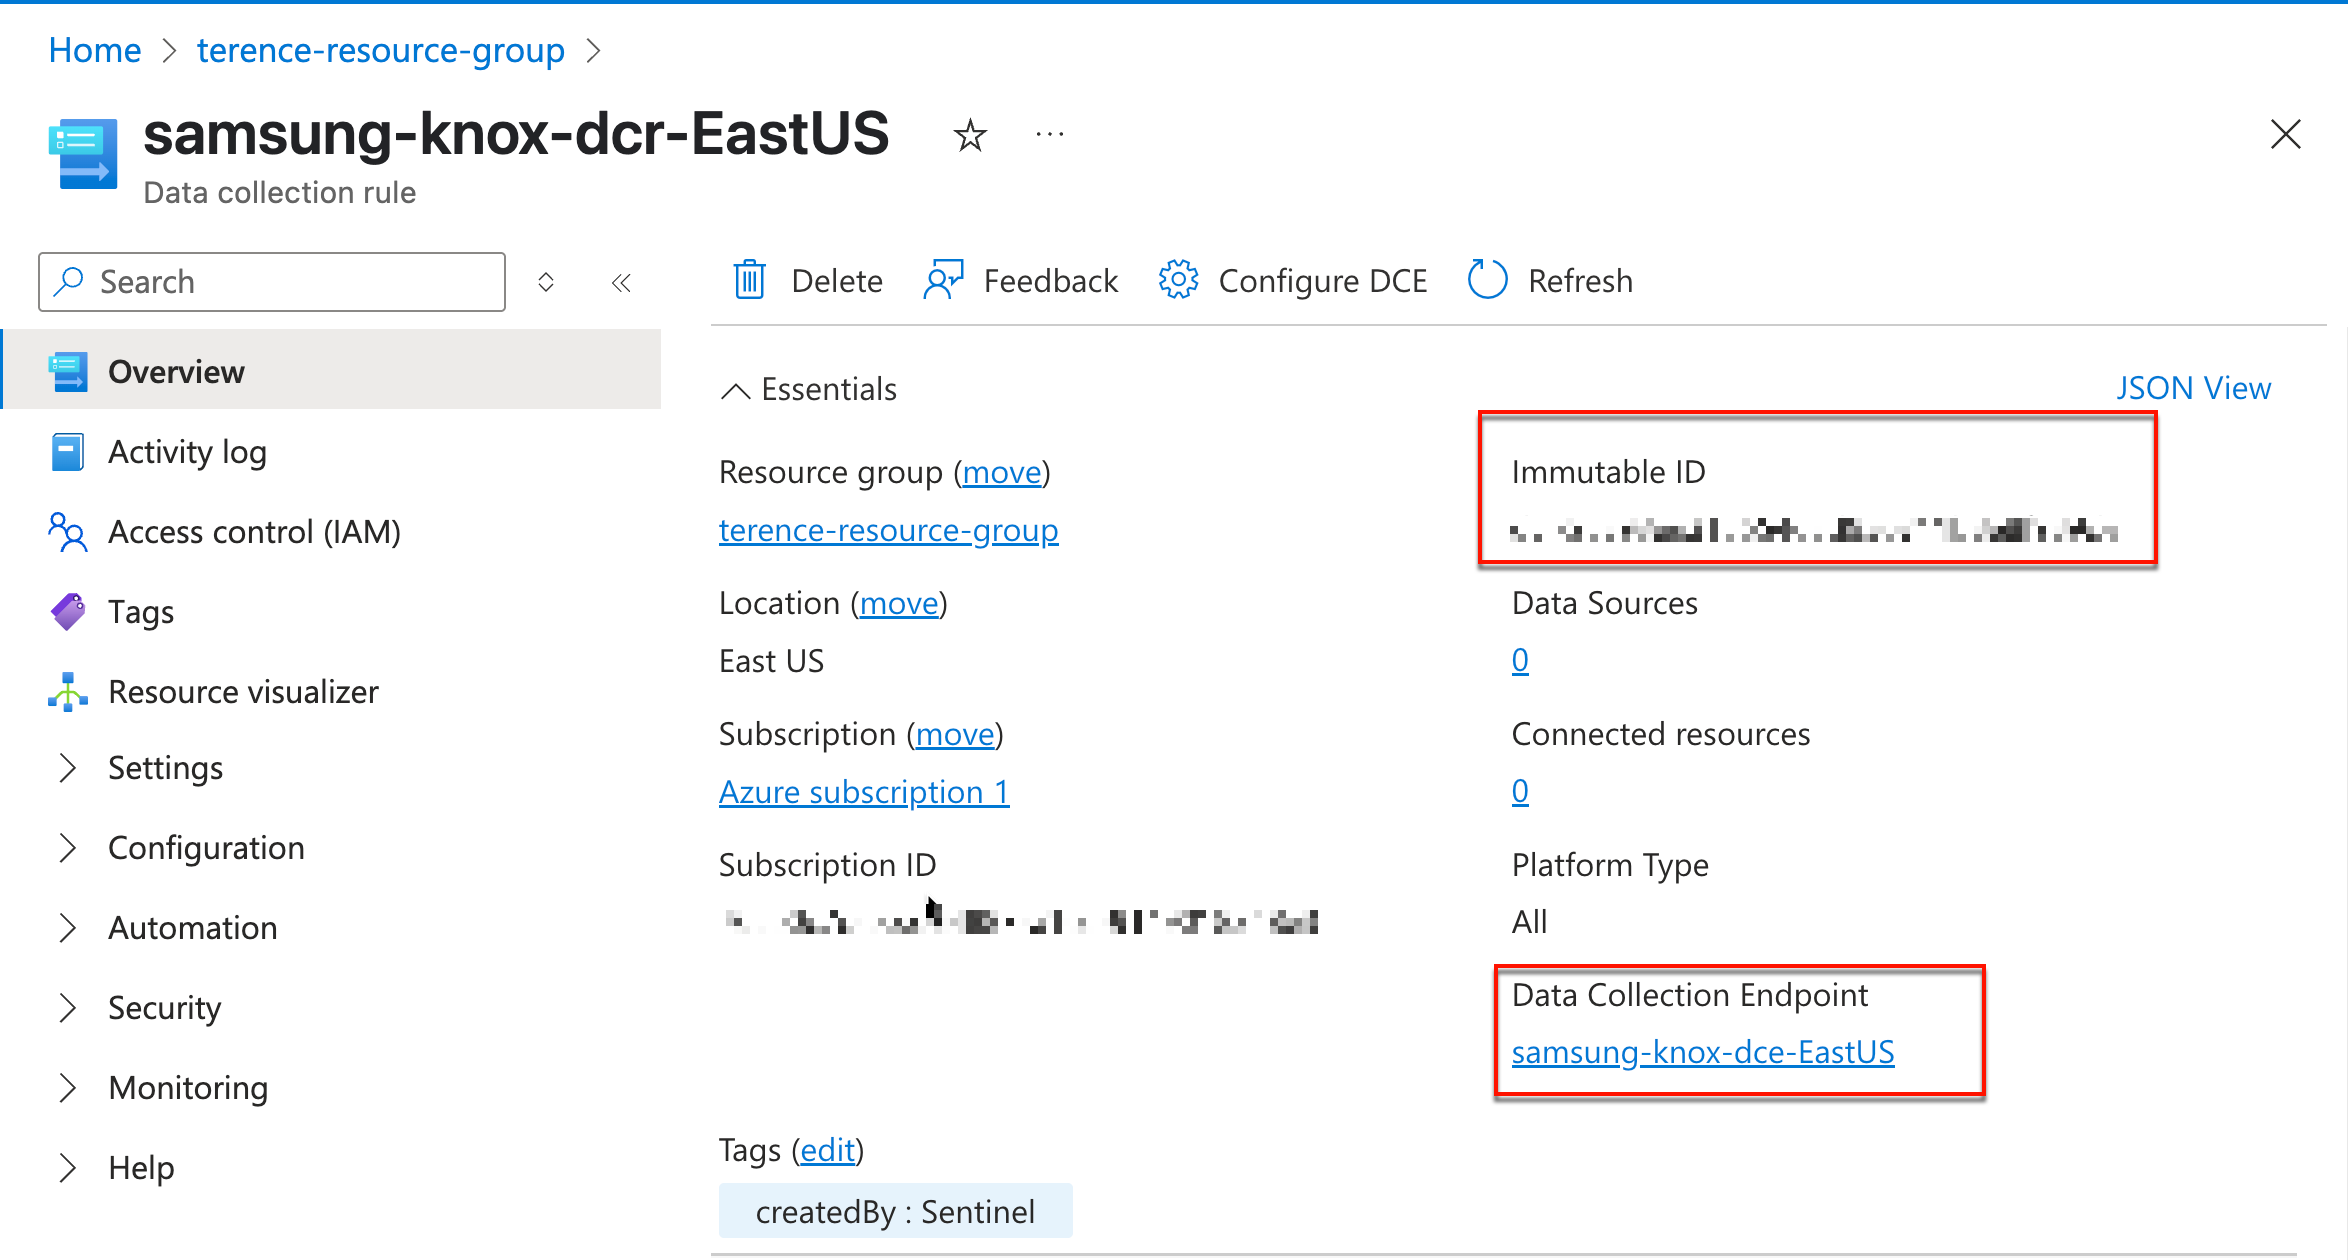
From the Resource group Overview page, click your Data collection rule resource.
-
On the Data collection rule page, copy your Immutable ID to a notepad, then click the Data Collection Endpoint link.
-
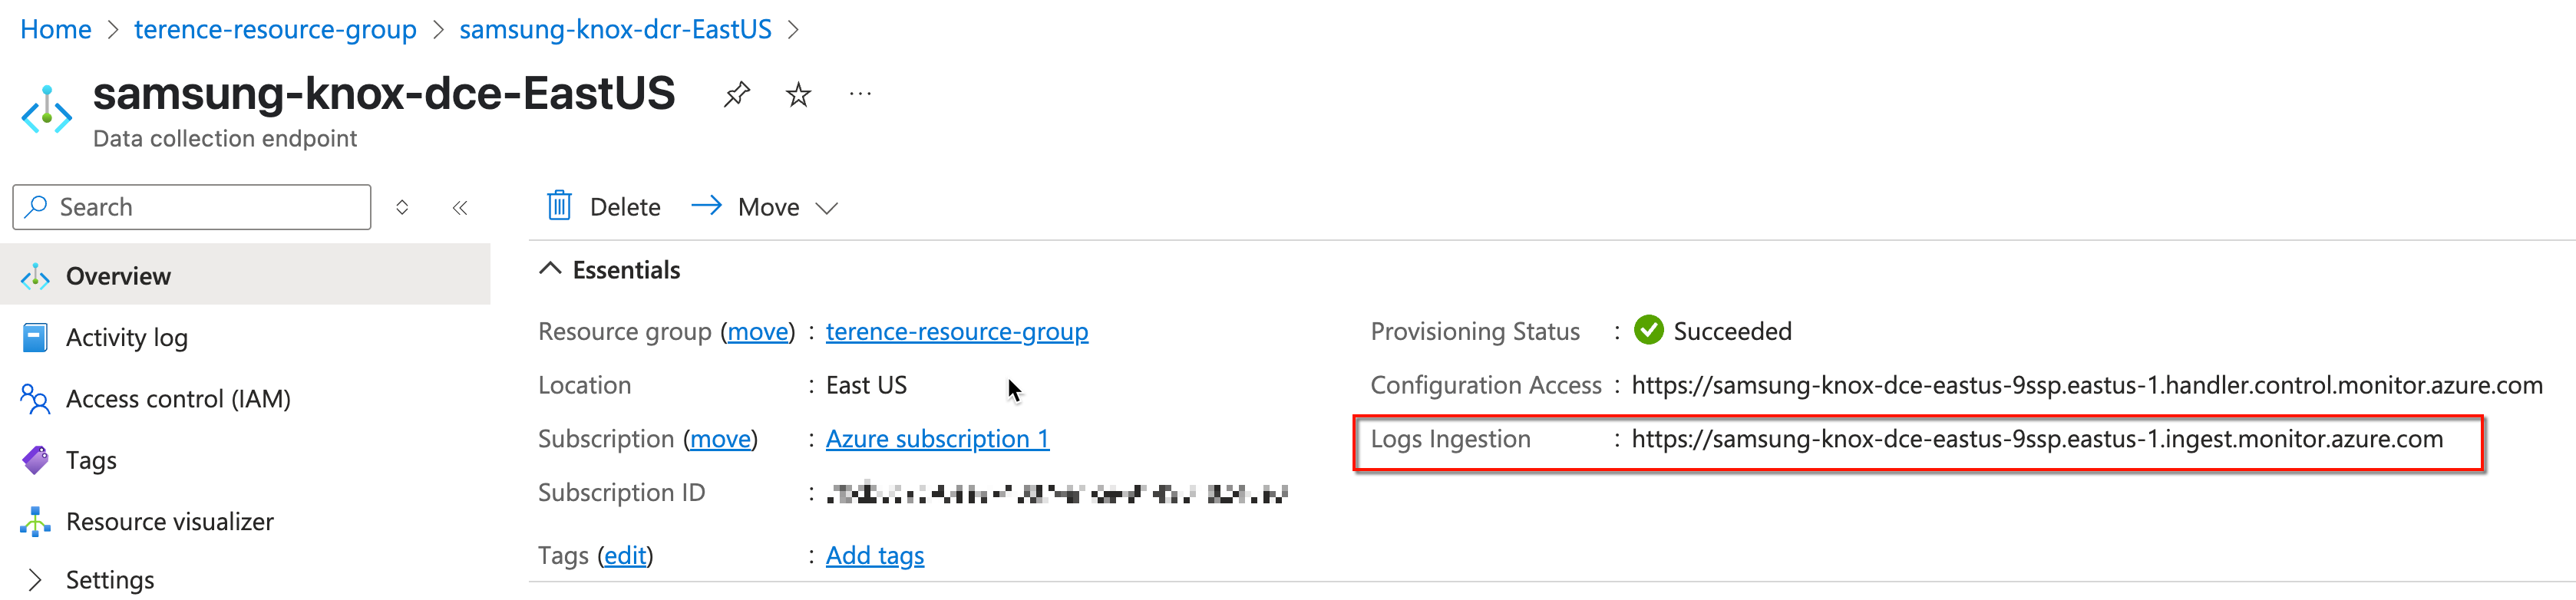
On the Data collection endpoint page, copy your Logs ingestion URL to a notepad.
-
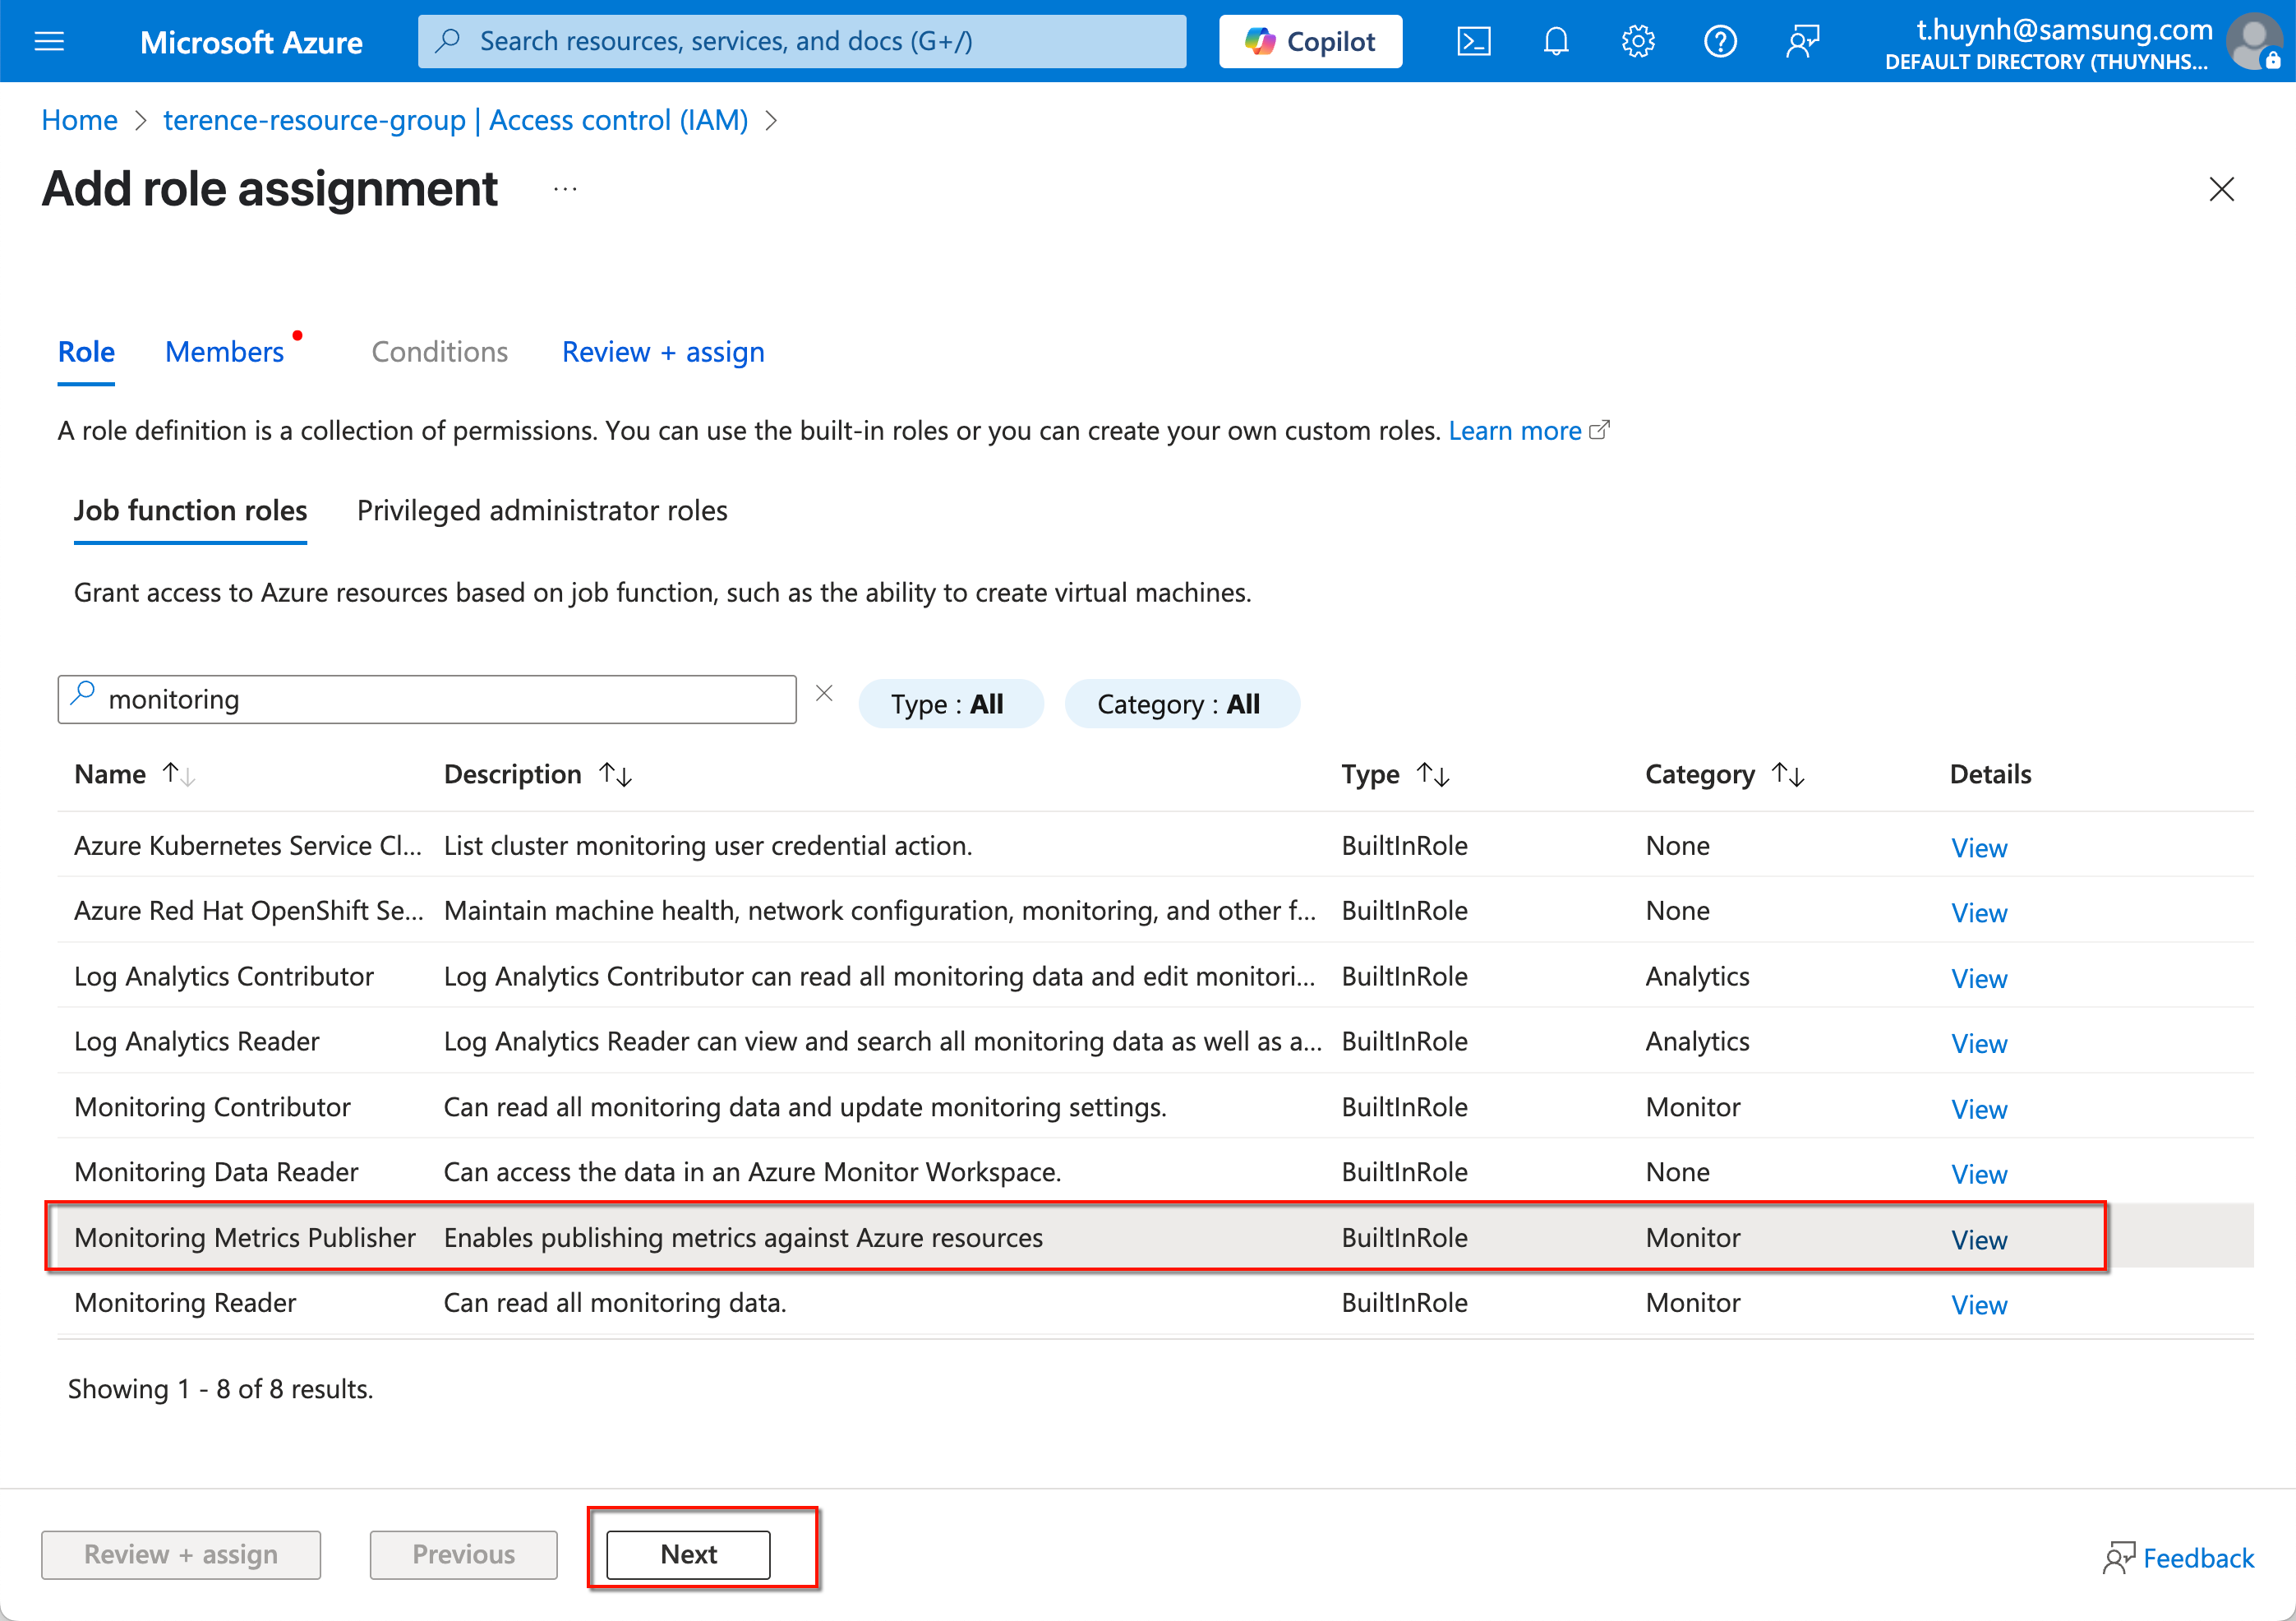
Return to your Resource group Overview page, click Access control (IAM) in the left navigation pane, then click Add role assignment.

-
On the role assignment page, search for Monitoring Metrics Publisher, then select the role and click Next.
-
On the Members tab, click Select members. You’ll then need to add the name of the Entra ID app you created. Refer to Register Entra ID app for more details. Search for the name of your Entra ID app, click Select, then click Review + assign.

Collecting your information
Now that you’ve installed the Knox Asset Intelligence solution in Sentinel, created an Entra ID application, and configured the data connector, you should have the information required in order to configure Knox Asset Intelligence. Before proceeding, ensure that you have the following information from your Azure portal:
From Entra ID app:
- Directory (tenant) ID
- Application (client) ID
- Client secret key (Secret ID)—only if Client secret authentication is used.
From Sentinel data connector:
- Data collection endpoint’s Log ingestion URL
- Data collection rule’s Immutable ID
On this page
Is this page helpful?