Schema structure
Last updated July 26th, 2023
This section provides an overview of the Knox Service Plugin schema structure and general best practices.
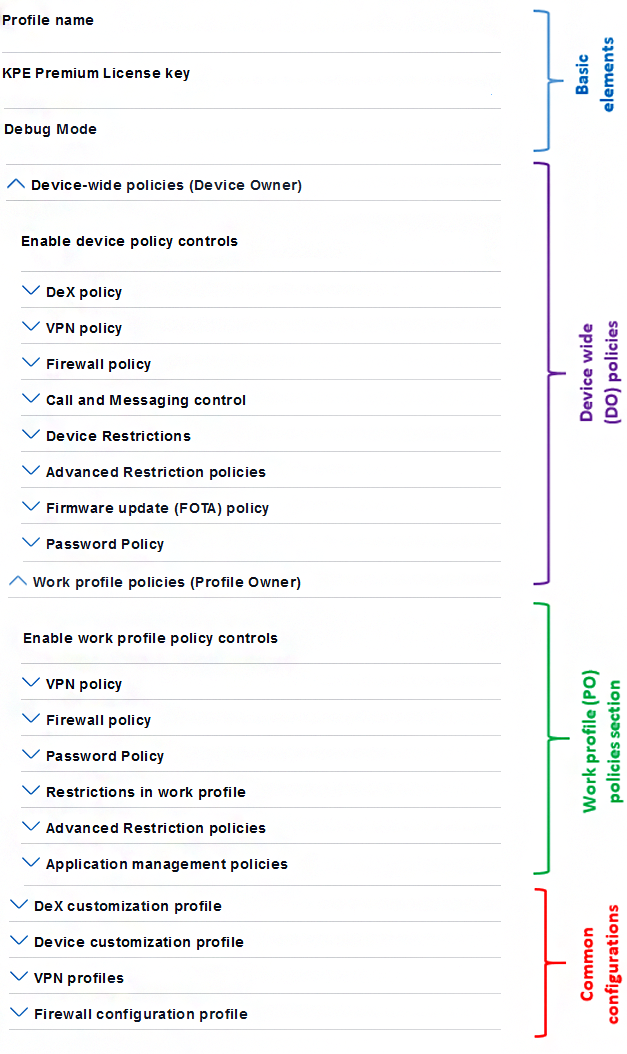
The following image shows the high level categories of policies and common configurations. It has four main components:
-
Basic elements — General operational controls for Knox Service Plugin. For example, turn on debug mode or enter a Knox Platform for Enterprise Premium license key.
-
Device-wide policies — Policies applied to company owned devices. These devices are enrolled to an EMM during its initial setup, and they can be deployed as a fully managed device, or as a company owned device with a work profile (WP-C).
-
Work profile policies — Policies applied to personal devices (BYOD) with a work profile. These devices are enrolled to an EMM with a work profile after its initial setup.
-
Configurations — Specific configuration properties that are used in conjunction with policy controls. For example, VPN profile settings, APN settings, or DeX customization settings. These can be used on either device-wide policies or work profile policies.
Schema breakdown
Common configurations
Each version of Knox Service Plugin includes a few common options. The features available within these options depend upon your Knox Service Plugin deployment mode, Knox Platform for Enterprise license status — whether you have a Standard or a Premium license — as well as the features available on your UEM console.
These common options are as follows:
-
Profile name — A unique name you provide for a set of policy configurations. You can create many different profile names for various sets of configurations. Later, you can use the name for tracking and debugging purposes. We recommend using a name under 50 characters.
-
Knox License key — If your EMM didn’t activate a Knox Platform for Enterprise Premium license for you, you can enter your license key here, and Knox Service Plugin can activate your license for you when you push the configuration. If you have a Knox Platform for Enterprise DualDAR key, enter it here to activate it.
-
Debug mode — When you turn on debug mode, the Knox Service Plugin app becomes visible on devices, where you can view policy configuration results and errors. We recommend enabling this mode only during test phases and not during final deployment. If you run into any Knox Service Plugin deployment issues, enable debug mode and perform the action again, then export the debug logs and reach out to support to help diagnose and fix your issue.
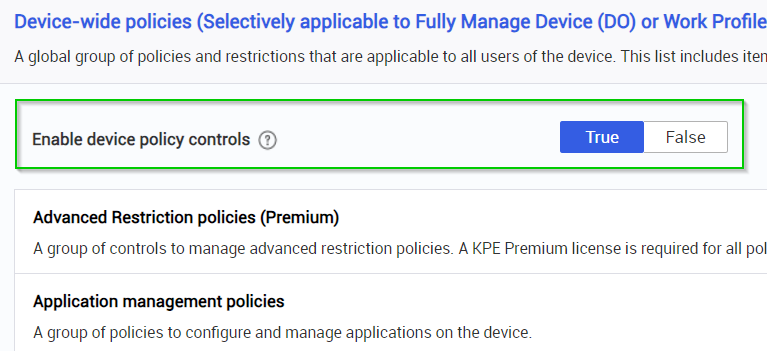
Group policy control flag
Each policy group has a control that enables or disables it. By default, all policy groups are disabled, so you must enable the control before configuring any policies in that group. For example, to use policies under Device-wide policies, set Enable device-wide policies to True. To configure settings under Device restrictions, set Enable device restriction controls to True, then activate individual policies such as Allow microphone and Allow Wi-Fi.
Profile Configurations
Some Knox Service Plugin policies allow you to create and save multiple configuration profiles. Different policies may use their configuration in different ways.
For certain policies, such as Wi-Fi policies, every configuration you create is applied simultaneously. For example, with Advanced Wi-Fi policies you create a separate configuration for each network SSID, and all of them take effect together. The device applies the appropriate configuration whenever it connects to a network that has a matching SSID.
For other policies, such as VPN and firewall policies, you create multiple named configurations but select only one to apply at a time. This allows you to pre-define various settings (for example, a VPN profile for different offices) and then choose the appropriate one by name when deploying to devices.
Recommended practices
-
Auto-install and run apps — Turn this feature on if your EMM supports it. This feature ensures all devices automatically install and run Knox Service Plugin, so your policies are automatically enforced on your devices.
-
Auto-update — Turn this feature on if your EMM supports it. This feature ensures that the Knox Service Plugin app is up to date on deployed devices. Knox Service Plugin is designed to be backward compatible. For example, a newer version of the app can handle older schema data, but older app versions can’t handle new schema data.
-
Native console policies — Use the policies natively supported by your EMM, and use Knox Service Plugin for any additional device control policies that aren’t supported by your EMM.
-
Test in small batches — Always test your Knox Service Plugin schema changes with a limited set of devices, debug the issues by enabling debug mode, then roll out to wider deployment.
Special cases
List applications
Some fields allow you to specify more than one app to target. For example: when you select apps to allowlist for a proxy. To list out apps, use a comma-separated list of packages. For example com.samsung.android.email.provider, com.sec.android.app.sbrowser. To find a package name, look at the Google Play store URL or contact the app vendor.
Uploading files
Some Knox policies, such as DeX customization, require you to provide bulk data, such as an image file. However, OEMConfig specifications do not currently support file uploads.
If you need to upload a file you can use one of the following two methods:
-
Web URL — Upload the file to a cloud server and provide the web URL as an input string to Knox Service Plugin. Ensure that the URL is publicly accessible.
-
Push the image file to the local storage — Use the UEM console to push the image file to the local storage on the device and provide the file path on the device as the input string to Knox Service Plugin. Contact your EMM vendor to find out if they support this feature.
Push the image to your device before you install Knox Service Plugin.
On this page
Is this page helpful?