How to configure Knox E-FOTA on Microsoft Intune
Last updated August 4th, 2026
Categories:
This content is intended for customers looking to use Knox E-FOTA on Microsoft Intune.
Environment
- Knox E-FOTA
- Microsoft Intune
Overview
Knox E-FOTA requires the following components to manage firmware on your Samsung device fleet:
- The Knox E-FOTA client installed on your devices
- Devices that are enrolled in Knox E-FOTA on Microsoft Intune
- A firmware management policy, created and assigned to the device fleet
This guide outlines the steps you must follow to configure Knox E-FOTA on Microsoft Intune.
Prerequisite: Set up Samsung Knox cloud services
Before you can use Knox E-FOTA on Microsoft Intune, ensure that the following prerequisites are met:
- You have a Samsung Knox account
- You’ve connected your Microsoft Intune tenant with Samsung Knox E-FOTA
Step 1: Create a device group
Create a group for Samsung devices you want to manage with Knox E-FOTA. If you already have a device group, you can skip to Step 2: Deploy required Samsung apps with Managed Google Play.
-
Sign in to the Microsoft Intune admin center.
-
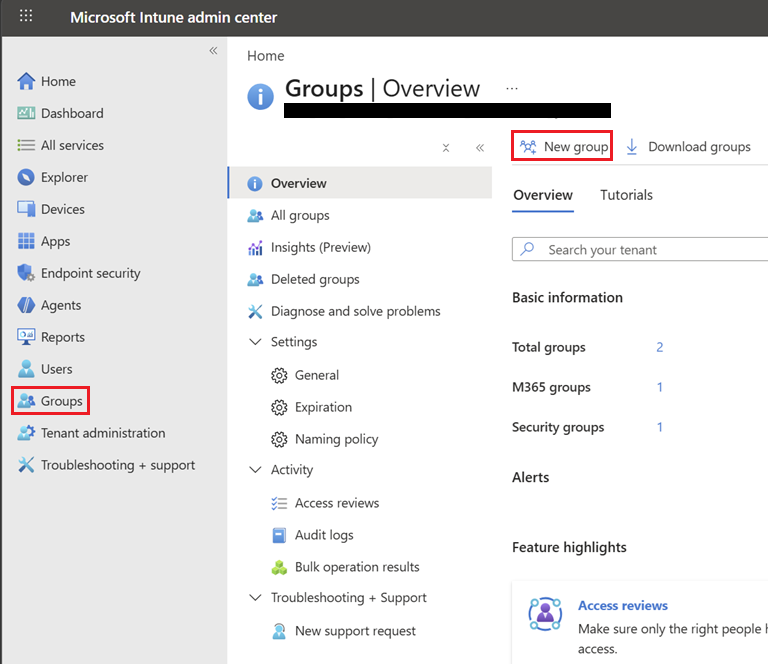
On the navigation menu, go to Groups and click New group.
-
Create a Group name and click Create.
Step 2: Deploy required Samsung apps with Managed Google Play
To use Knox E-FOTA, you must install and run the Knox E-FOTA app on your devices. We recommend using Knox Service Plugin to automatically install and run the Knox E-FOTA app.
Add required apps to your device group
To add Knox E-FOTA and Knox Service Plugin to your device group:
- Connect your Intune account to your Managed Google Play account.
- On the navigation menu, go to Apps > Android.
- Click Create.
- Under Category, select Store app. Under App type, select Managed Google Play app.
- Search for Knox E-FOTA, then click on the app and click Select.
- Search for Knox Service Plugin, then click on the app and click Select.
- Click X to close Managed Google Play and return to the Android apps list, which should now include Knox E-FOTA and Knox Service Plugin. If these apps don’t appear, click Refresh.
- Click Knox E-FOTA on the Android apps list. Under Manage, click Properties.
- Next to Assignments, click Edit.
- Under Required, click Add group.
- Select the group of devices you want to manage with Knox E-FOTA.
- Click Review + save, then click Save.
- Repeat steps 8 to 12 for Knox Service Plugin.
If you’re enrolling corporate-owned dedicated devices with Managed Home Screen or any kiosk app, add the following Android Enterprise system apps to your device group:
| App name | Publisher | Package name |
|---|---|---|
| Knox E-FOTA Plugin | Samsung Electronics Co., Ltd. | com.samsung.android.knox.efota.plugin |
| Knox Container Core | Samsung Electronics Co., Ltd. | com.samsung.android.knox.containercore |
| Knox E-FOTA | Samsung Electronics Co., Ltd. | com.samsung.android.knox.efota |
Configure Knox Service Plugin
Configure Knox Service Plugin to automatically install and run the Knox E-FOTA app:
-
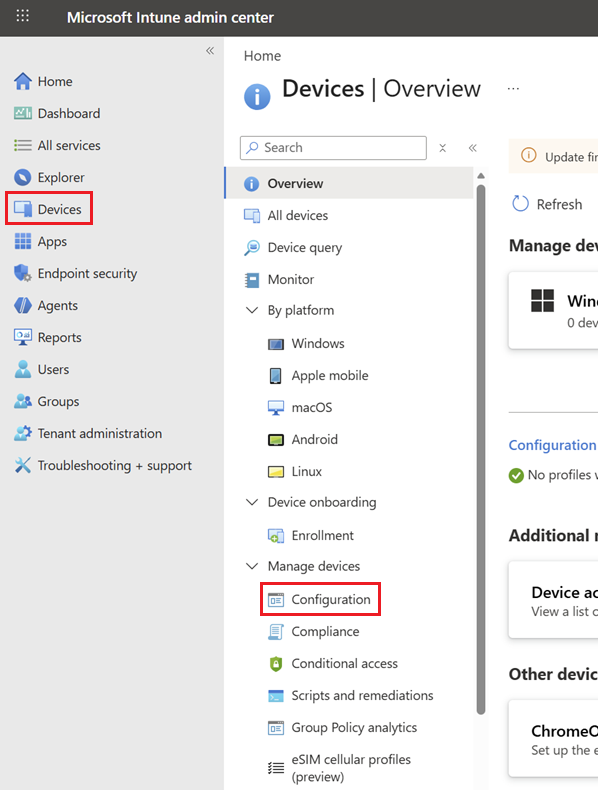
On the navigation menu, go to Devices.
-
On the Devices menu, go to the Manage devices section and click Configuration.
-
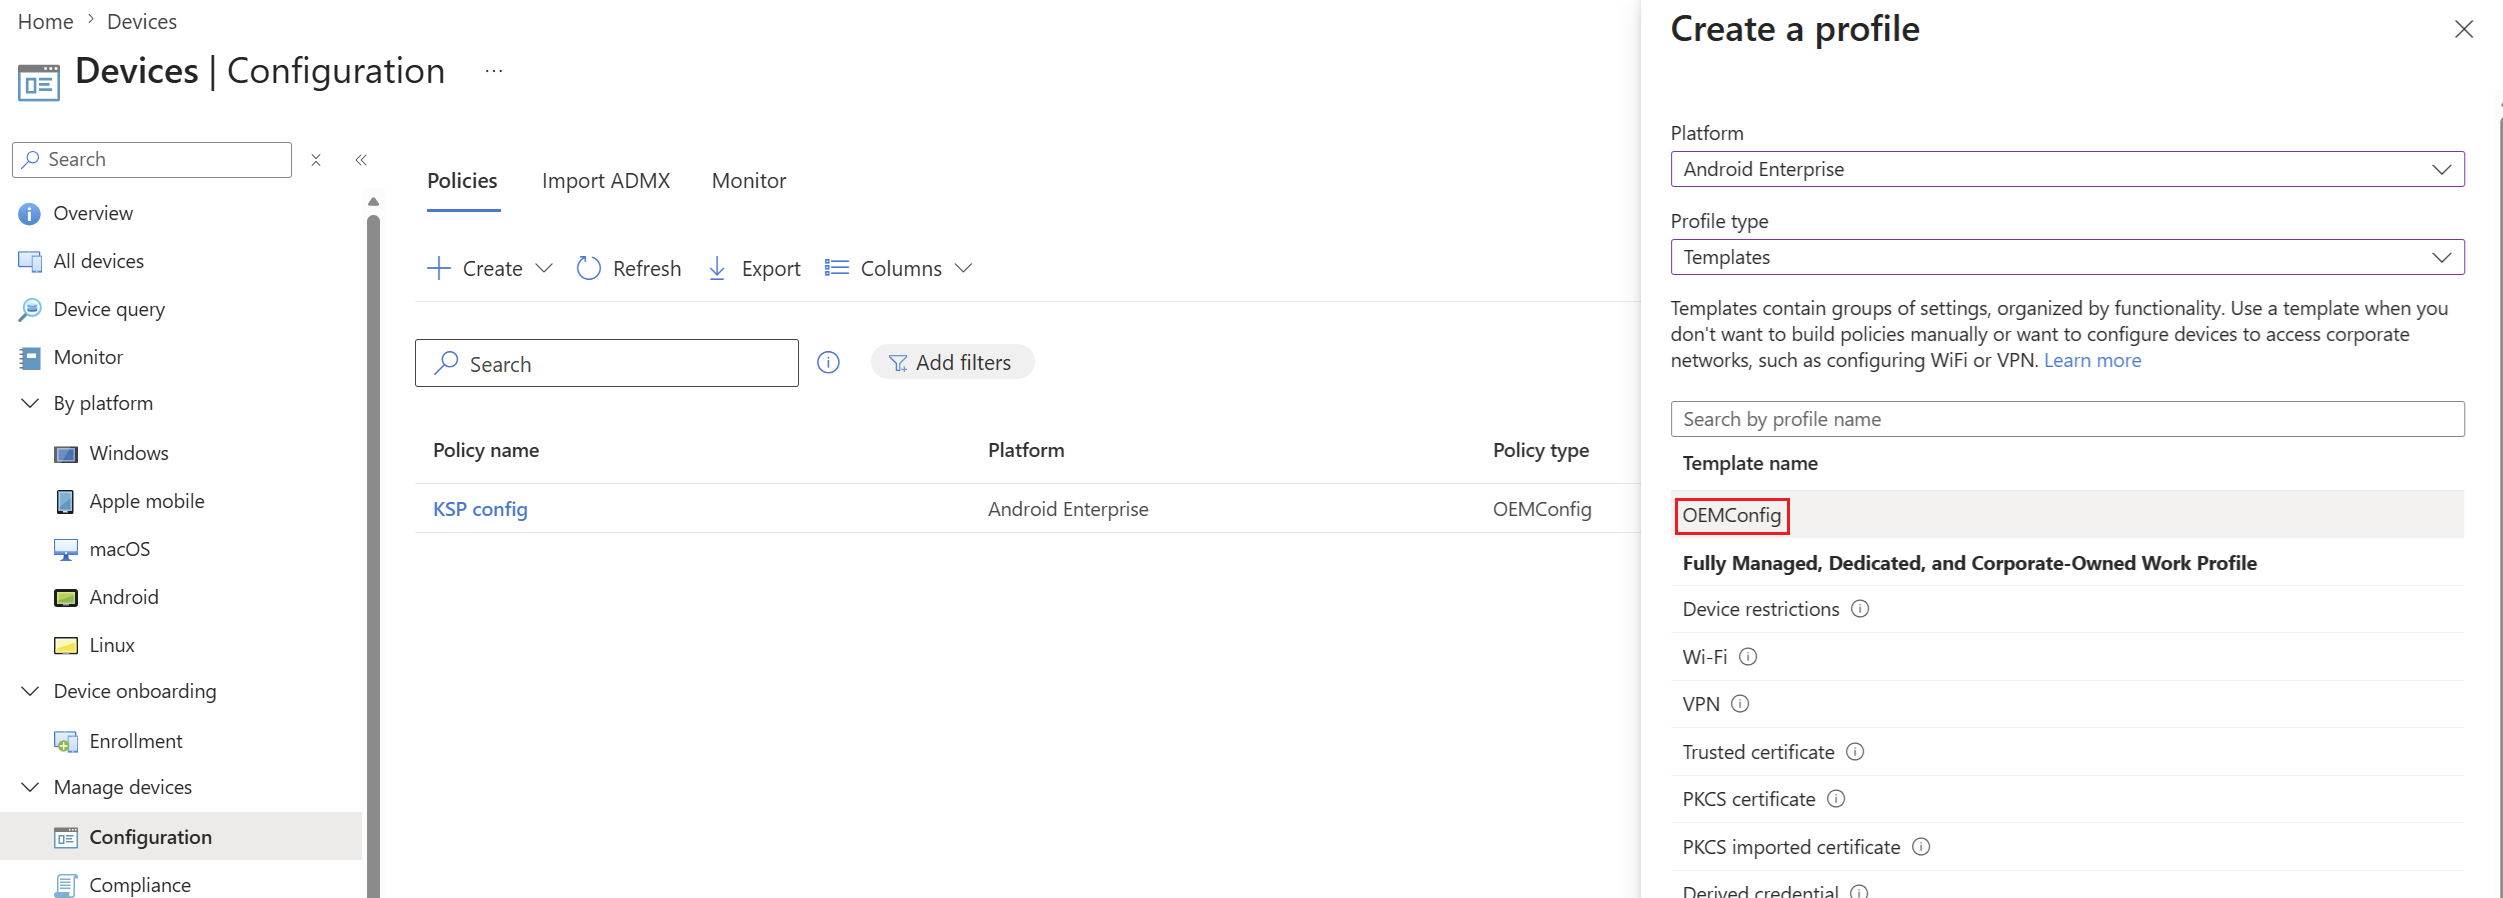
Click Create > New Policy.
-
Under Platform, select Android Enterprise.
-
Under Profile type, select Templates.
-
Select OEMConfig.
-
Click Create.
-
Give your profile a Name.
-
Click Select an OEMConfig app, and select Knox Service Plugin.
-
Click Next.
-
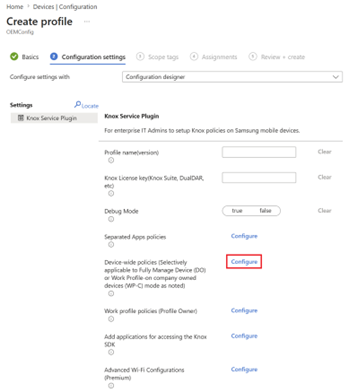
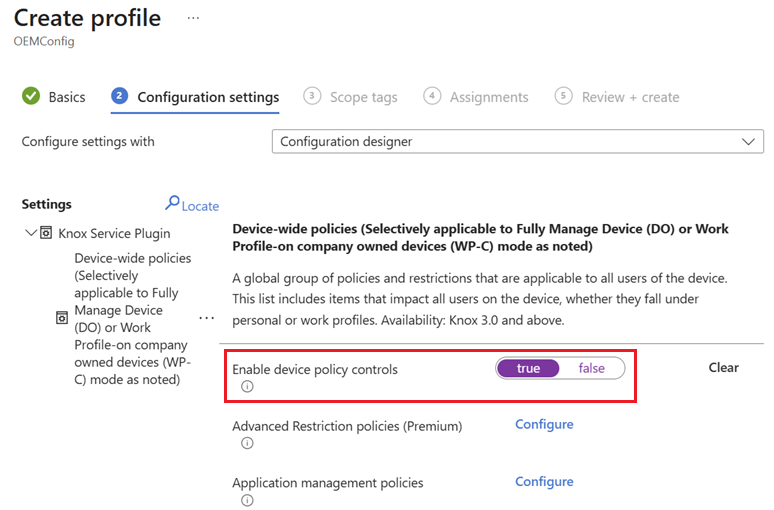
Next to Device-wide policies, click Configure.
-
Set Enable device policy controls to True.
-
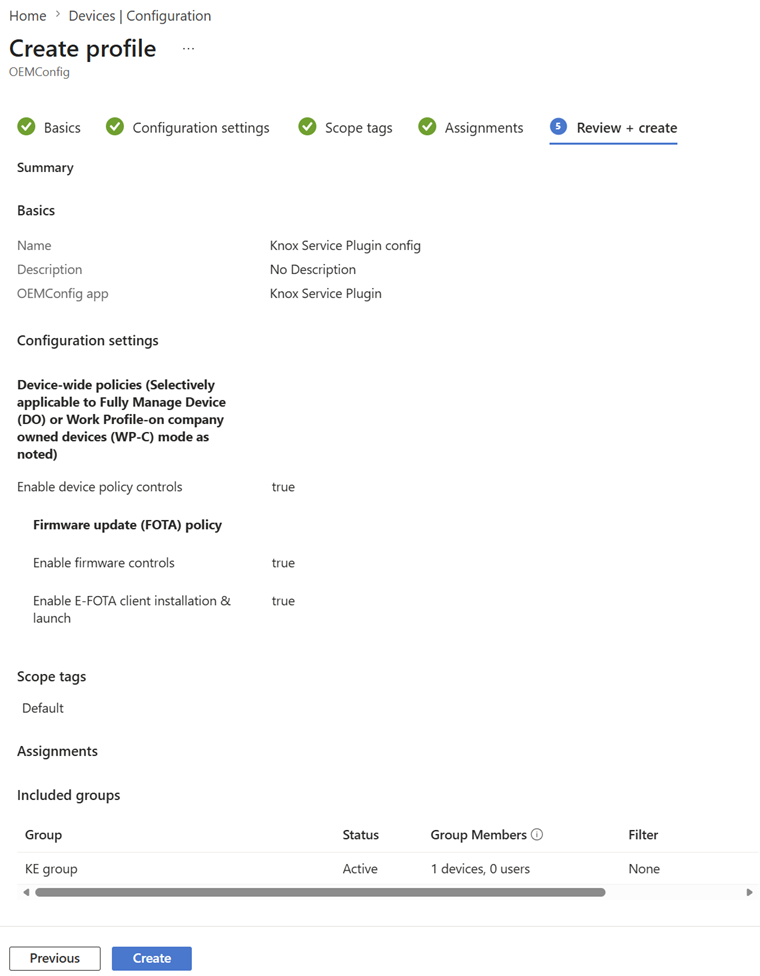
Next to Firmware update (FOTA) policy, click Configure.
-
Set Enable firmware controls to True.
-
Set Enable E-FOTA client installation & launch to True.
-
Click Next.
-
(Optional) Select scope tags, then click Next.
-
On the Assignments tab, click Add groups and select the group of devices you want to manage with Knox E-FOTA.
-
Click Next and review your profile.
-
Click Create.
Step 3: Enroll and add devices
Enroll your devices to Microsoft Intune, and add them to the group of devices you want to manage with Knox E-FOTA. Skip this section if you’ve already enrolled devices to Microsoft Intune and added them to your device group.
- Enroll Android devices in Microsoft Intune.
- On the navigation menu, go to Groups > All groups.
- Click on your device group.
- Under Manage, click Members.
- Click Add members, and select devices to add to your group.
- Click Select.
Step 4: Register devices with Samsung
Register your device group with Samsung Knox E-FOTA so you can begin managing firmware for those devices.
-
Sign in to the Microsoft Intune admin center.
-
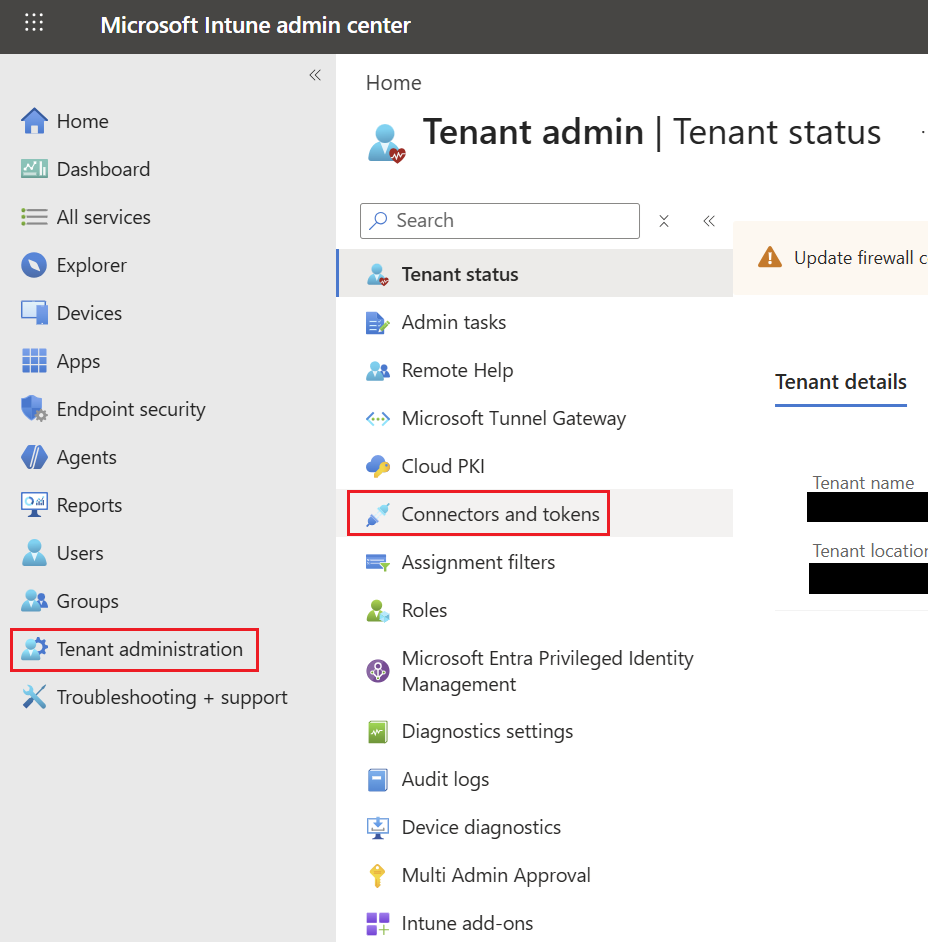
On the left navigation menu, go to Tenant administration > Connectors and tokens.
-
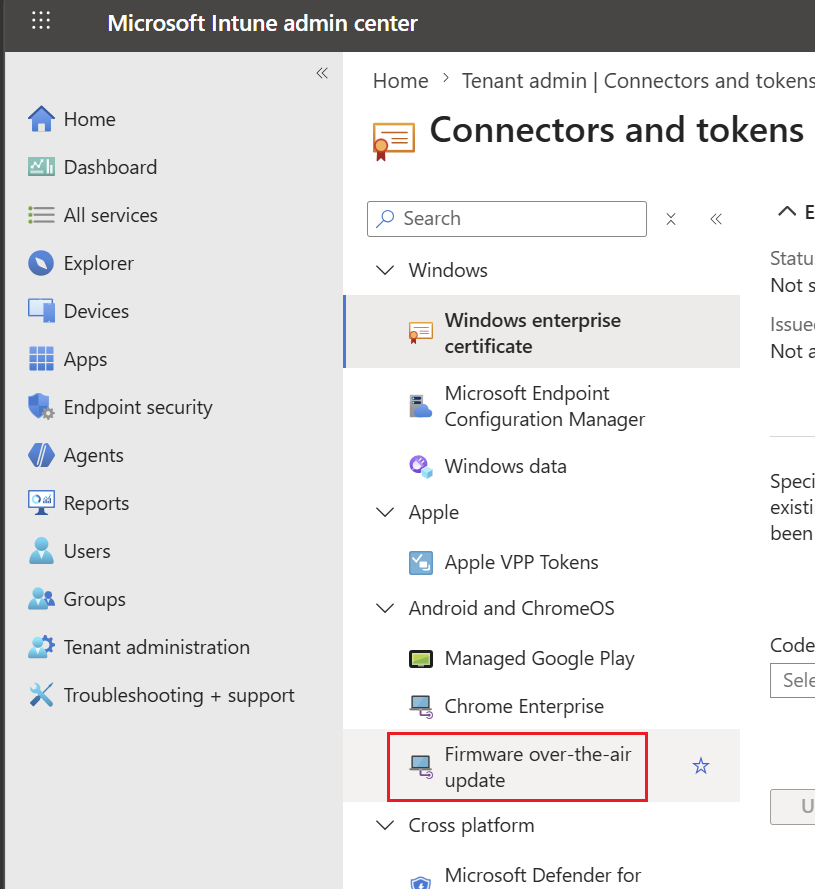
On the Connectors and tokens menu, go to Firmware over-the-air update.
-
Select Samsung on the list of OEMs.
-
Under Register Devices with Samsung, click Add groups.
-
Select your device group.
-
Click Select.
-
Click Register.
Step 5: Create a Knox E-FOTA firmware deployment
Create a firmware deployment to set detailed policies to schedule and throttle firmware downloads, and configure firmware policies for your fleet of devices.
-
On the navigation menu, go to Devices.
-
Under Manage updates, click Android FOTA deployments.
-
Click Create.
-
Under Manufacturer, select Samsung then click Create.
-
Give your deployment a Name then click Next.
-
Configure the following firmware deployment settings:
-
Firmware version — Select the device model, sales code, and CSC you want to target. This defines which devices will receive the firmware update.
Under Update type, choose one of the following policies:
- Latest any — Pushes the newest available firmware version to your devices.
- Latest Up to Max OS Version — The latest firmware, within a select OS version, is pushed to the devices.
- Lock current firmware version — Prevents any firmware changes on your devices, maintaining the current version.
- Select firmware version — Lets you pick a specific firmware version from the available options for your targeted devices. Only firmware versions compatible with the targeted devices are available.
-
Deployment schedule — Set the date range when devices in the deployment can start to download and install the update. If you want to run the deployment indefinitely, select Set start date only.
The timezone is set in UTC, and you can’t set a start date and time that’s in the past.
-
Installation schedule — Controls when during the day devices can begin installing firmware, based on the device’s local timezone. For example, you might set this to overnight hours to minimize user disruption.
- Download period — Control when during the day devices can begin downloading firmware, based on the device’s local timezone. You can set this time window to match the Installation schedule, or set a custom time window for downloads.
- Allow user to postpone installation — Allow users to postpone the installation up to three times, and configure how often they’re reminded.
-
Device conditions — Specify device conditions that must be met before installation can begin.
- Minimum battery — Require a minimum battery percentage before installation starts.
- Charging status — Require devices to be connected to a charging dock during installation.
- Network type — Allow firmware downloads over any network, or restrict devices to only download firmware when connected to Wi-Fi.
-
-
(Optional) Select scope tags, then click Next.
-
Select the device groups to include or exclude this firmware deployment, then click Next.
-
Review your firmware deployment settings, and click Create.
See also
On this page
Is this page helpful?