Manage users
Last updated August 28th, 2026
The term user refers to an IT admin, teacher, staff member, or student at your educational organization. Managing users ensures the right people have appropriate access to Samsung Account for Education services. You must be an admin with the Super Admin or User Management Admin role to manage users.
Find and organize users
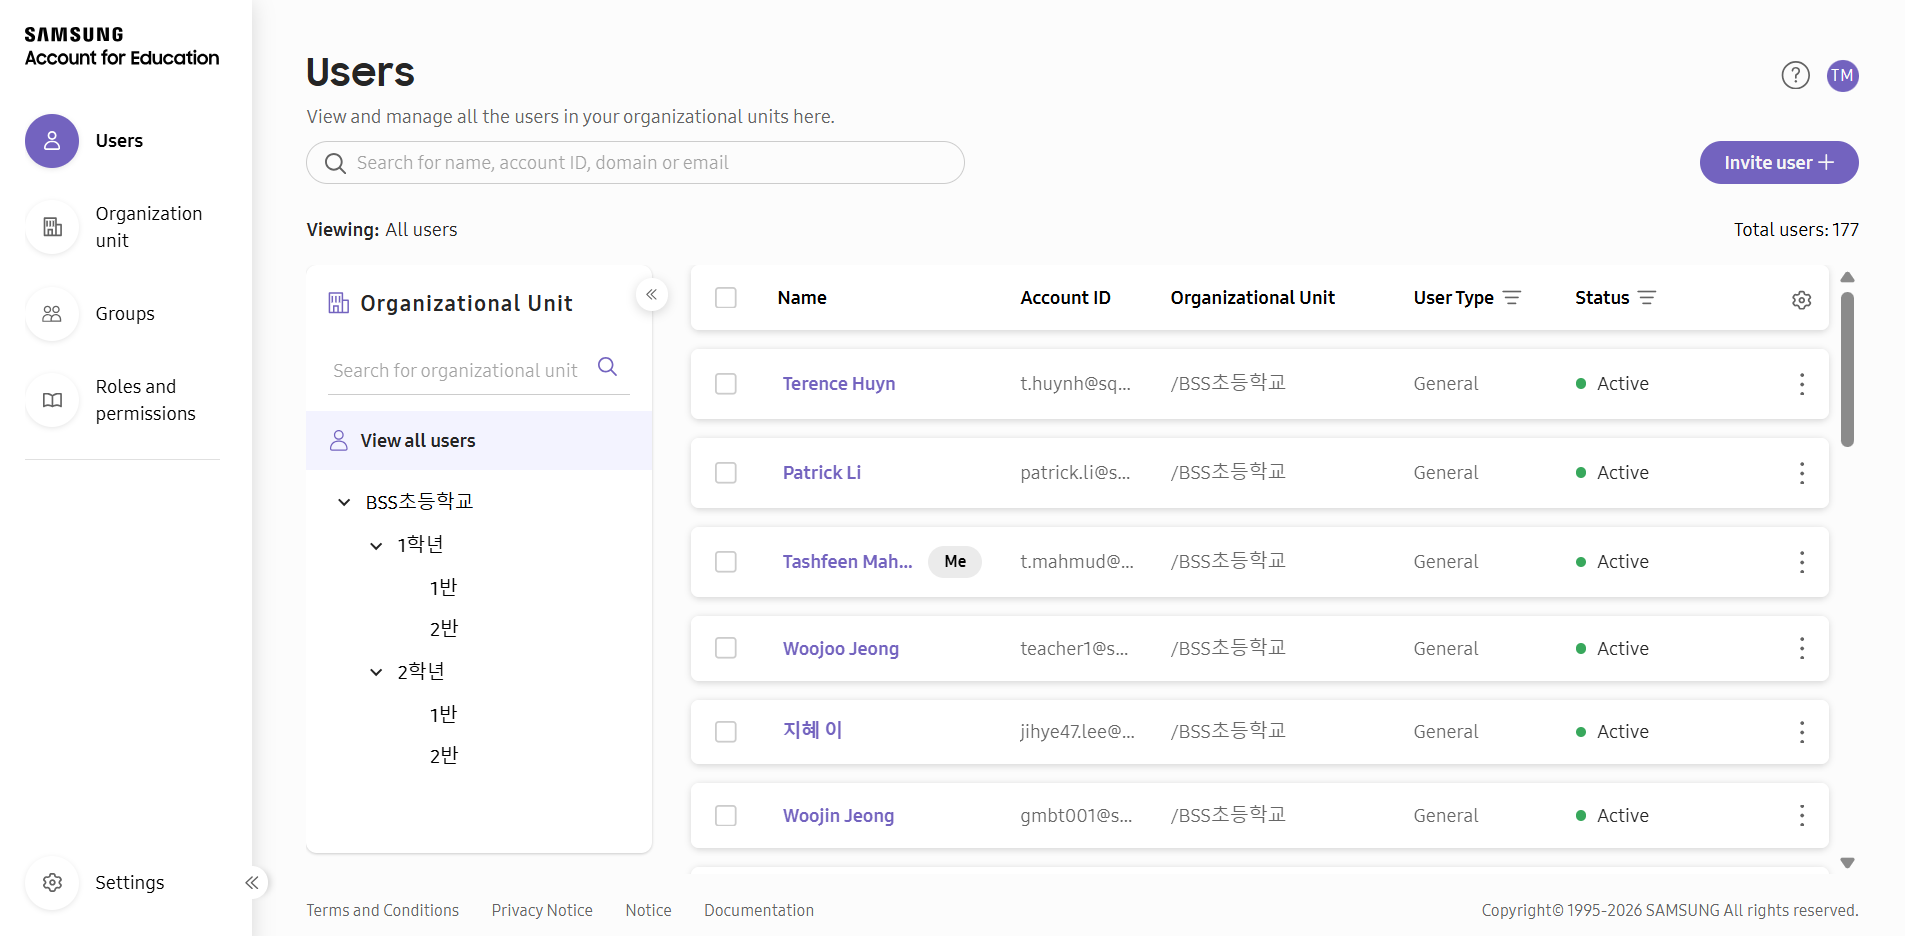
From the Users page, you can quickly locate specific users and customize the view:
- To find a user, use the search bar at the top to search by user name or account ID.
- To view users in a specific organizational unit, use the search bar in the Organizational unit panel or select an organizational unit from the tree.
- To customize the columns shown, click the gear icon to show or hide columns in the user list.
- To sort or filter users, click column headers to sort by that value or use the filter icon to filter results.
User statuses
A user can have one of the following statuses. Each status has a corresponding color indicator in the user list and determines the actions you can take.
| Status | Color | Description | Available actions |
|---|---|---|---|
| Active | Green | User has full access | Deactivate, security actions |
| Pending | Yellow/Orange | Invitation sent, not activated | Resend invitation, cancel invitation |
| Inactive | Gray | Account deactivated | Activate, delete |
| Locked | Orange | Too many failed sign-in attempts | Reset password, reset 2SV |
| Pending deletion | Red | Scheduled for deletion (30 days) | Cancel deletion |
User types
A user’s status indicates the state of their account, while their type indicates the type of account they have. There are two user types in Samsung Account for Education:
| Type | Use case | 2SV support | Password |
|---|---|---|---|
| General User | Teachers, staff, and long-term users. Each account is for one person and must use that person’s real name. | Yes | User sets their own |
| Classroom User | Students and short-term users. An account can use a non-real display name, be shared by students in a class, and be used for different classes. | No | Auto-generated initially; must be changed at first sign-in |
Classroom User accounts do not require an email address, as no personally identifiable information (PII) is collected for classroom users. Use only identifiers that comply with your institution’s privacy policies.
Invite a user
You can invite users to add them to your educational organization’s Samsung Account for Education account. Your educational organization must be verified before you can invite users.
Confirm the user type that you’re inviting, as it can’t be changed later.
Invite a general user
General users are invited individually.
A teacher is a general user who has been added to the Teacher Group. If you do not add them to the Teacher Group, they won’t be able to sign into the Knox Classroom console.
- Navigate to Users.
- Click Invite user.
- Select General user.
- Click Next: User details.
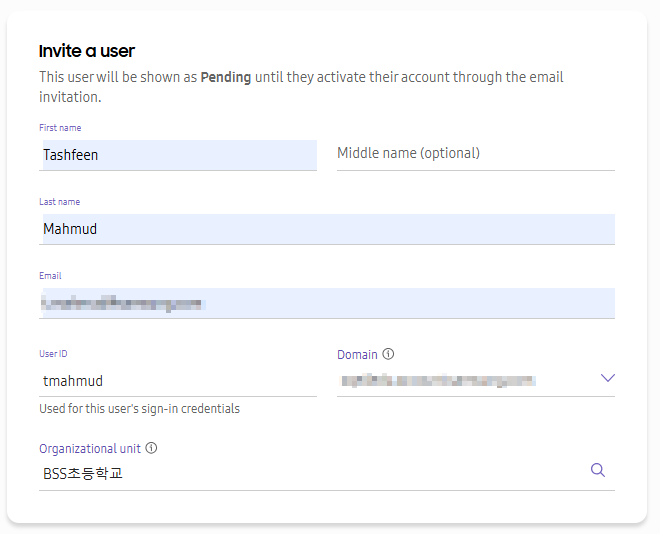
- Enter the user details:
- First name — Enter the user’s first name.
- (Optional) Middle name — Enter the user’s middle name.
- Last name — Enter the user’s last name.
- Email — Enter the user’s work email address.
- User ID — Enter an ID for the account.
- Domain — Select a domain from the dropdown.
- Organizational unit — Select an organizational unit from the tree.
- Click Invite.
The invited user receives an email with activation instructions.
Invite a classroom user
A Classroom User account can be shared by students in a specific class.
- Navigate to Users.
- Click Invite user.
- Select Classroom user.
- Click Next: User details.
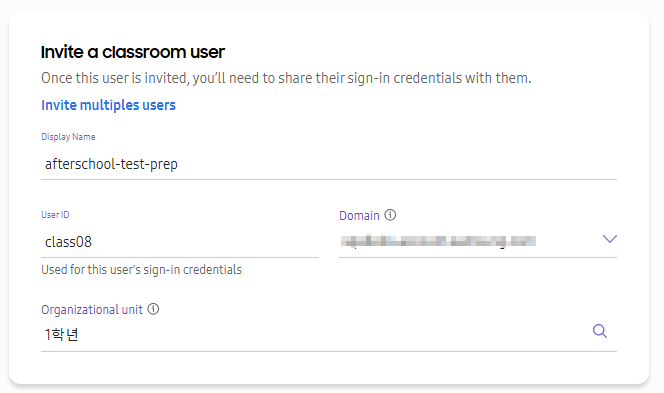
- Enter the user details:
- Display name — Enter a display name for the account.
- User ID — Enter an ID for the account.
- Domain — Select a domain from the dropdown.
- Organizational unit — Select an organizational unit from the tree.
- Click Invite.
The Invite users page displays the account ID and an auto-generated one-time password. Copy these values before clicking Done.
Share the account ID and one-time password with the students who will use the classroom user account. When they first sign in, they must change the auto-generated password. If you changed it for them beforehand, share the new password with them.
Bulk upload classroom users
You can bulk upload up to 10,000 Classroom User accounts using a CSV file at once. For each classroom user, you’ll need to enter a display name, user ID, and a one-time password that they’ll need to change after their first sign-in.
Bulk creation, import, and update are not available for General User accounts.
To do so:
-
On the Users page, click Invite user.
-
Select Classroom user. The Invite a classroom user page that opens.
-
Click Invite multiple users. The Add multiple classroom users page opens.
-
Click Choose file, or drag and drop, to upload your CSV file.
You can also download a CSV file that contains the required column headers by clicking Download CSV template.
-
Select a Domain and an Organizational unit to add your classroom users to.
-
Click Invite.
The classroom user accounts that you entered in the CSV file are added to your Users list.
Share the account IDs and one-time passwords with the students who will use the classroom user accounts. When they first sign in, they must change the one-time password that you set in the CSV file.
Manage the user lifecycle
Managing the user lifecycle ensures users have appropriate access throughout their time at your educational institution. You can use the following sections to complete common lifecycle management actions for user accounts.
Activate a user
You can reactivate a previously deactivated user account.
- Navigate to Users.
- Select a user with Inactive status.
- Click (More actions icon).
- Select Activate user.
- Confirm by clicking Activate.
The user status changes to Active, and the user can sign in.
Deactivate a user
You can deactivate an active user account when they should only temporarily not have access.
- Navigate to Users.
- Select a user with Active status.
- Click (More actions icon).
- Select Deactivate user.
- Confirm by clicking Deactivate.
The user status changes to Inactive, and the user cannot sign in.
Delete a user
You can delete an inactive user when they are permanently leaving your educational organization and you need to free up their account.
- Navigate to Users.
- Select a user with Inactive status.
- Click (More actions icon).
- Select Delete user.
- Review the 30-day grace-period notice.
- Click Delete.
The user enters Pending deletion status for 30 days and is then permanently deleted.
Cancel deletion
You can restore a user account that is scheduled for deletion.
- Navigate to Users.
- Select a user with Pending deletion status.
- Click (More actions icon).
- Select Cancel deletion.
- Confirm by clicking Yes, cancel.
The user status changes to Inactive. Activate the account to restore sign-in access.
Cancel an invitation
You can cancel an invitation that a user no longer needs.
- Navigate to Users.
- Select a user with Pending status.
- Click (More actions icon).
- Select Cancel invitation.
- Confirm by clicking Yes, cancel.
The user is permanently deleted from the database.
Resend an invitation
You can resend an invitation when a pending user has not received it.
- Navigate to Users.
- Select a user with Pending status.
- Click (More actions icon).
- Select Resend invitation email.
- Confirm by clicking Send.
The user receives a new email with activation instructions.
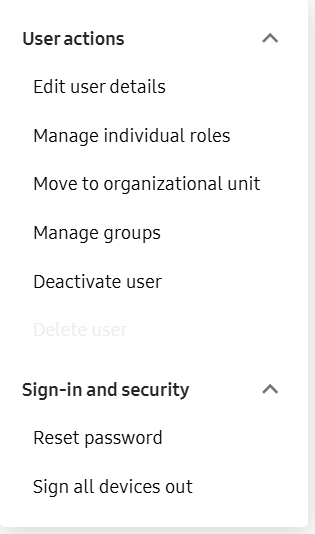
Manage sign-in and security
Sign-in and security actions help you manage user access and protect accounts. You can use these actions to help users regain access or sign out of their devices.
Reset a password
You can send a password-reset link to a user as follows:
- Navigate to Users.
- Select the user.
- Click (More actions icon).
- Under Sign-in and security, select Reset password.
- (Optional) Select Sign this user out of all devices.
- Click Reset.
The user receives an email with a password-reset link.
Sign out of all devices
You can sign out one or more users from all their devices.
To sign out one user:
- Navigate to Users.
- Select the user.
- Click (More actions icon).
- Select Sign out of all devices.
- Click Sign out.
To sign out multiple users:
- On the Users page, select users using the checkboxes.
- Click Sign out of all devices from bulk actions.
- Confirm by clicking Sign out.
Manage classroom users
Classroom users only access the Samsung Account for Education portal for onboarding purposes. Once they onboard, they are associated with their classroom account. Thereafter, they can no longer access the portal directly.
Generate a new password
You can generate a new temporary password for a classroom user if needed:
- Navigate to Users.
- Select a classroom user.
- Click (More actions icon).
- Select Generate new password.
- Click Generate.
Copy the generated password and share it with the student.
Edit user details
You can edit the details of an existing user from the user details panel to keep their information current and accurate.
- Navigate to Users.
- Select a user to open the details panel.
- Click (More actions icon).
- Select Edit user details.
- Modify the required details.
- Click Save.
Move a user to another organizational unit
You can move one or more users to another organizational unit to align with your educational organization’s structure and apply appropriate group policies.
To move one user:
- Navigate to Users.
- Select a user to open the details panel.
- Click (More actions icon).
- Select Move to organizational unit.
- Select the destination organizational unit.
- Click Move.
To move multiple users:
- On the Users page, select users using the checkboxes.
- Click Move to organizational unit from bulk actions.
- Select the destination organizational unit.
- Click Move.
Manage user groups
You can add or remove a user’s group membership from the Manage groups dialog to control access and permissions for multiple users efficiently.
Add a user to a group
You can add an existing user to a group from the user details panel.
A teacher is a general user who has been added to the Teacher Group. If you do not add them to the Teacher Group, they will not be able to sign into the Knox Classroom dashboard.
- Navigate to Users.
- Select a user to open the details panel.
- Click (More actions icon).
- Select Manage groups.
- Click Add to group.
- Search for and select a group.
- Click Done.
Remove a user from a group
You can remove a user’s membership from a group in the Manage groups dialog.
If you remove a user from the Teacher Group, they will no longer be able to access the Knox Classroom dashboard. In Samsung Account for Education, removing a user from a group only removes their group membership. It does not delete their user account.
- In the Manage groups dialog, click Remove next to the intended group.
- Confirm the removal.
Manage individual roles
You can assign a role directly to an individual user from the user details panel.
- Navigate to Users.
- Select a user to open the details panel.
- Click (More actions icon).
- Select Manage individual roles.
- Click Add new role.
- Select a role.
- Click Done.
Where to go next
For related administration tasks, see the following guides.
- To organize users, see Manage groups.
- To create your institution’s hierarchy, see Manage organizational units.
- To manage role assignments, see Manage roles and permissions.
On this page
Is this page helpful?